ThreeRouter
User Guide
One API Key to access all AI models. DeepSeek-V4, MiniMax-M3, Kimi-K2.6, Qwen3.8-Max, GLM-5.3, Seedance-2.0 and more, making AI development easier.
Start Configuration
Configure ThreeRouter API Key and CC Switch
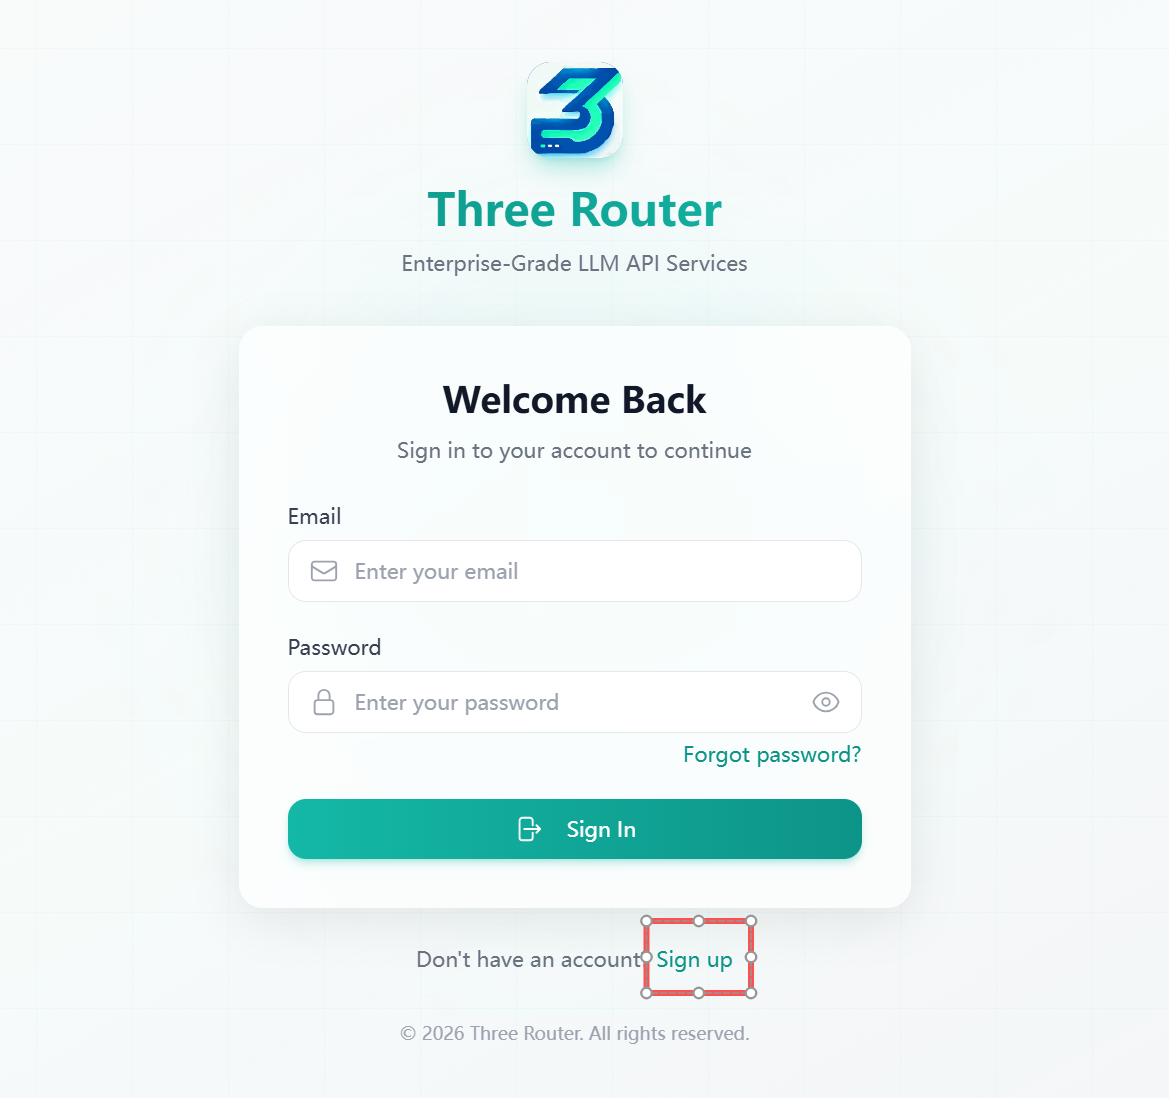
Register ThreeRouter Account
Visit ThreeRouter Website to register an account.
Create API Key for Required Group
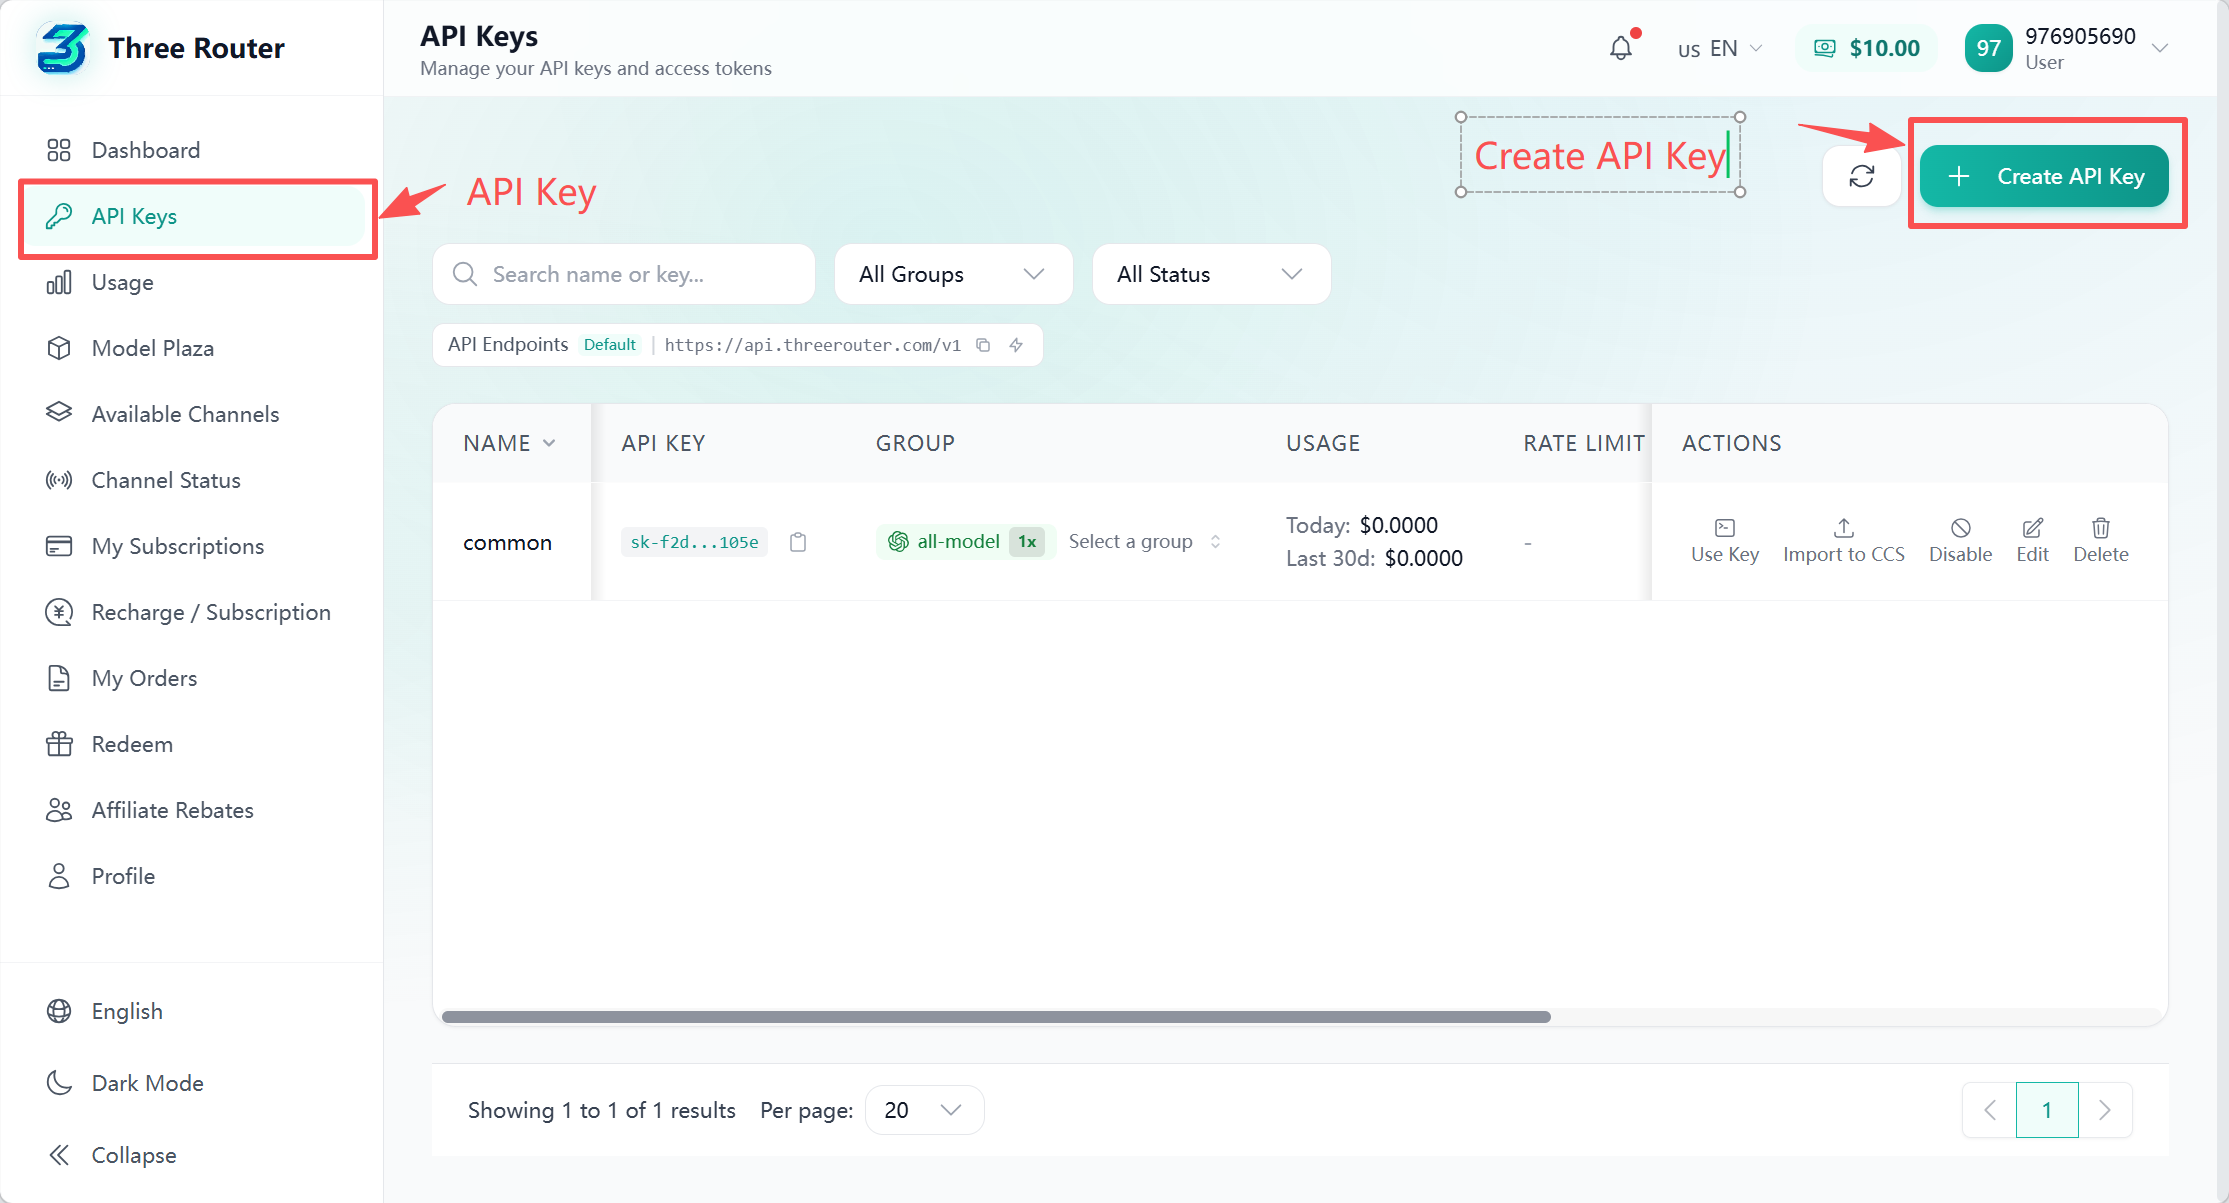
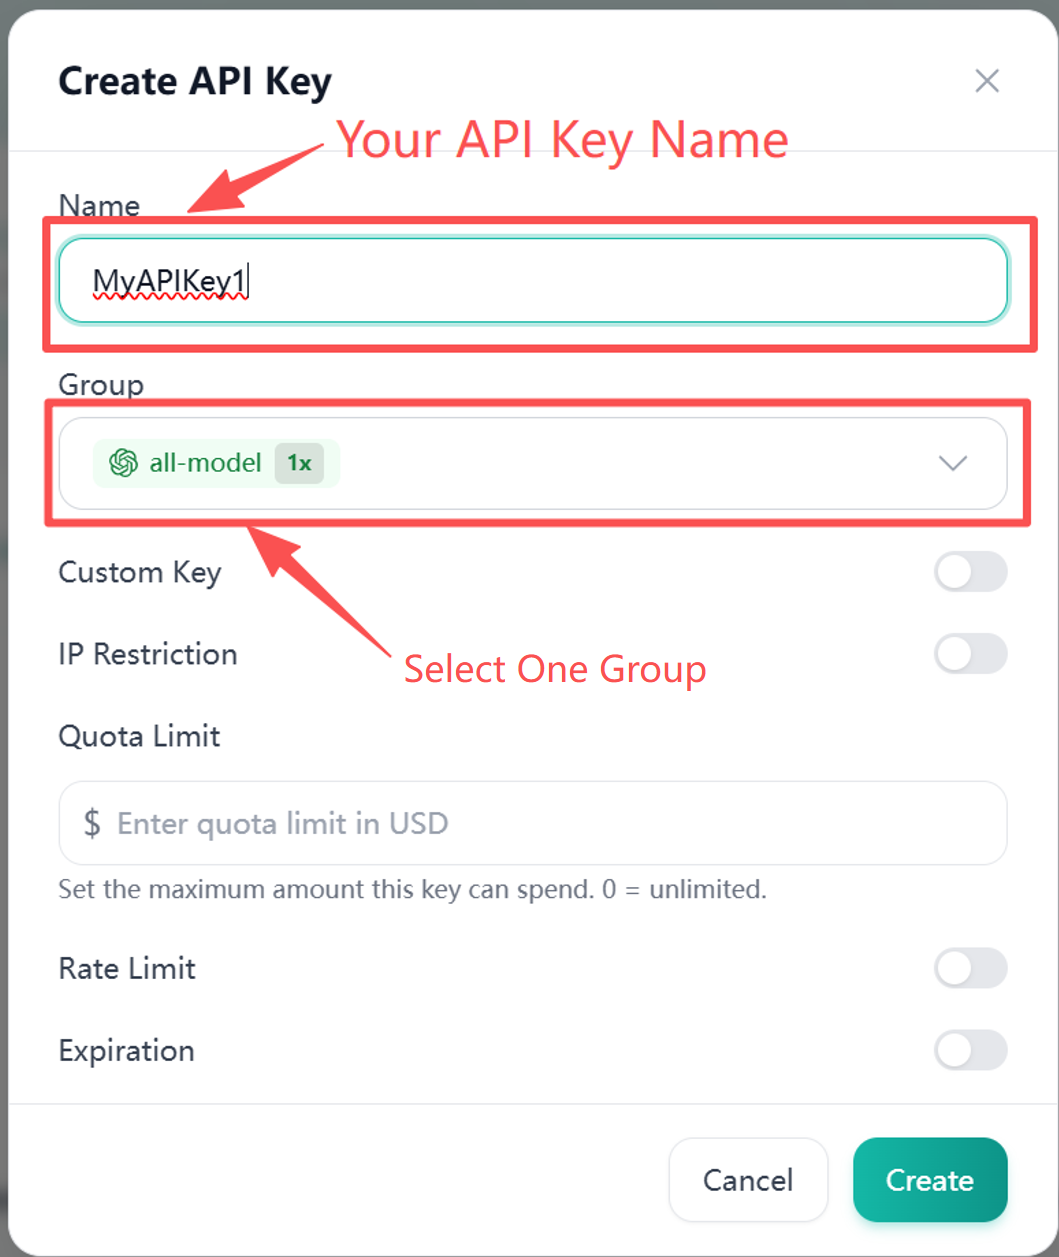
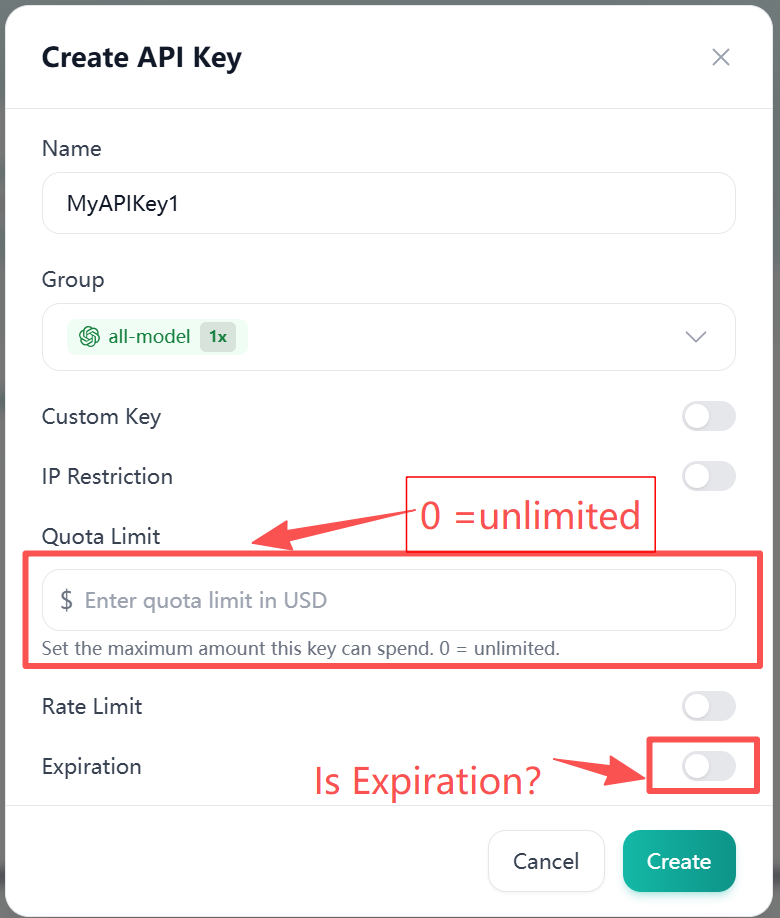
After logging in, go to the API Keys page and select the model group you need to create a key. Different groups correspond to different models and prices. Choose according to your needs.
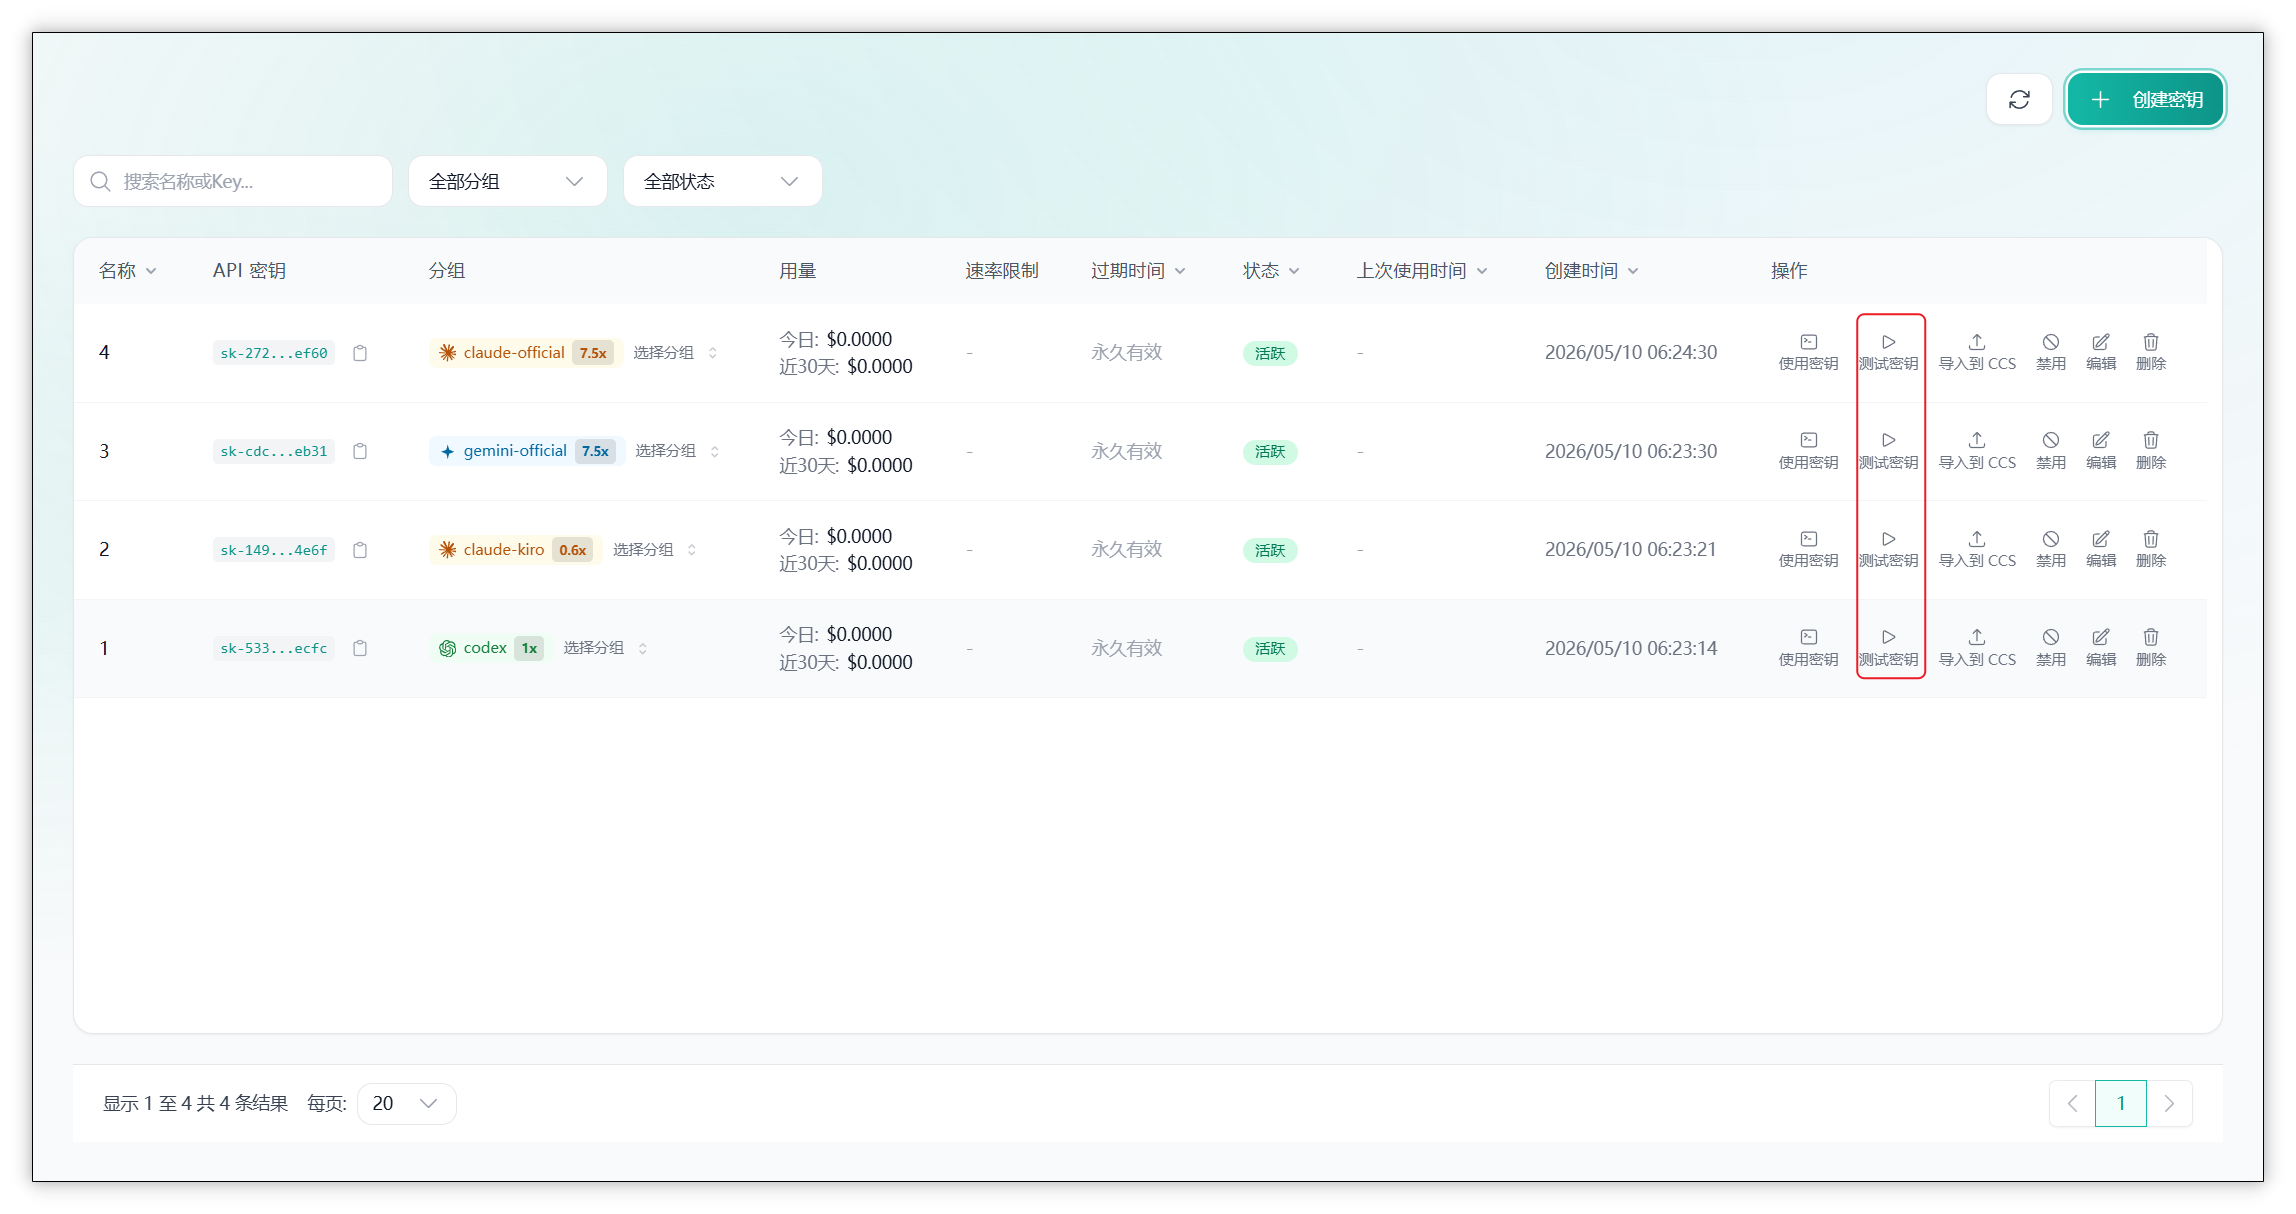
Test API Key
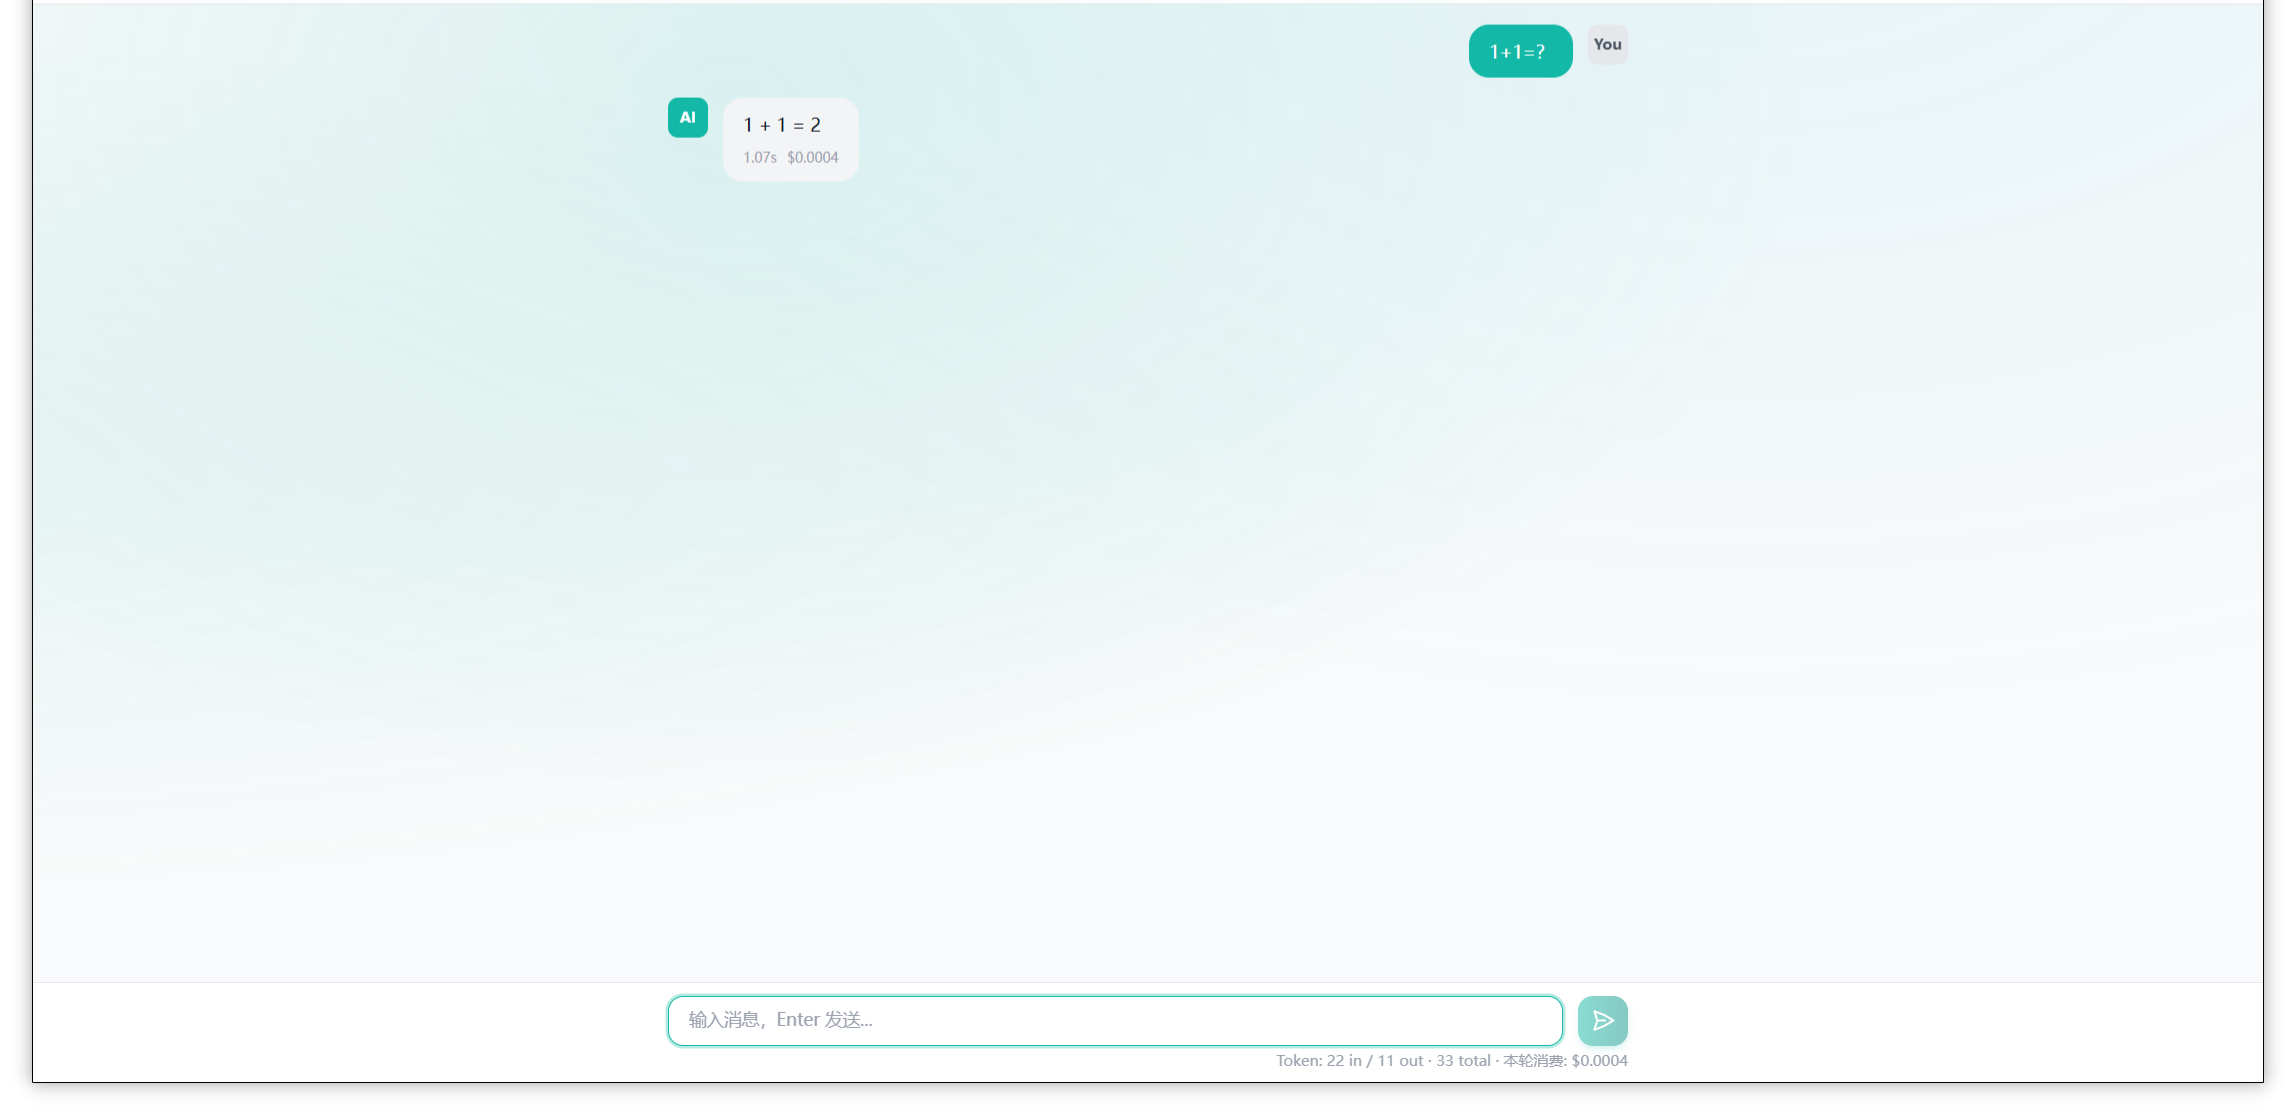
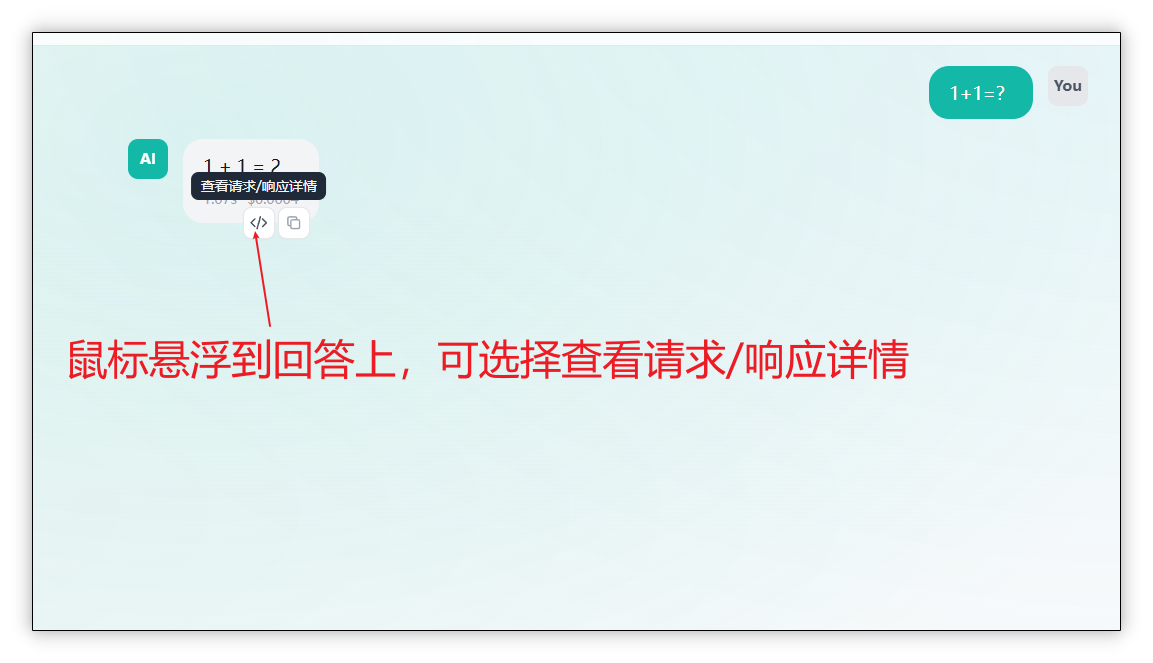
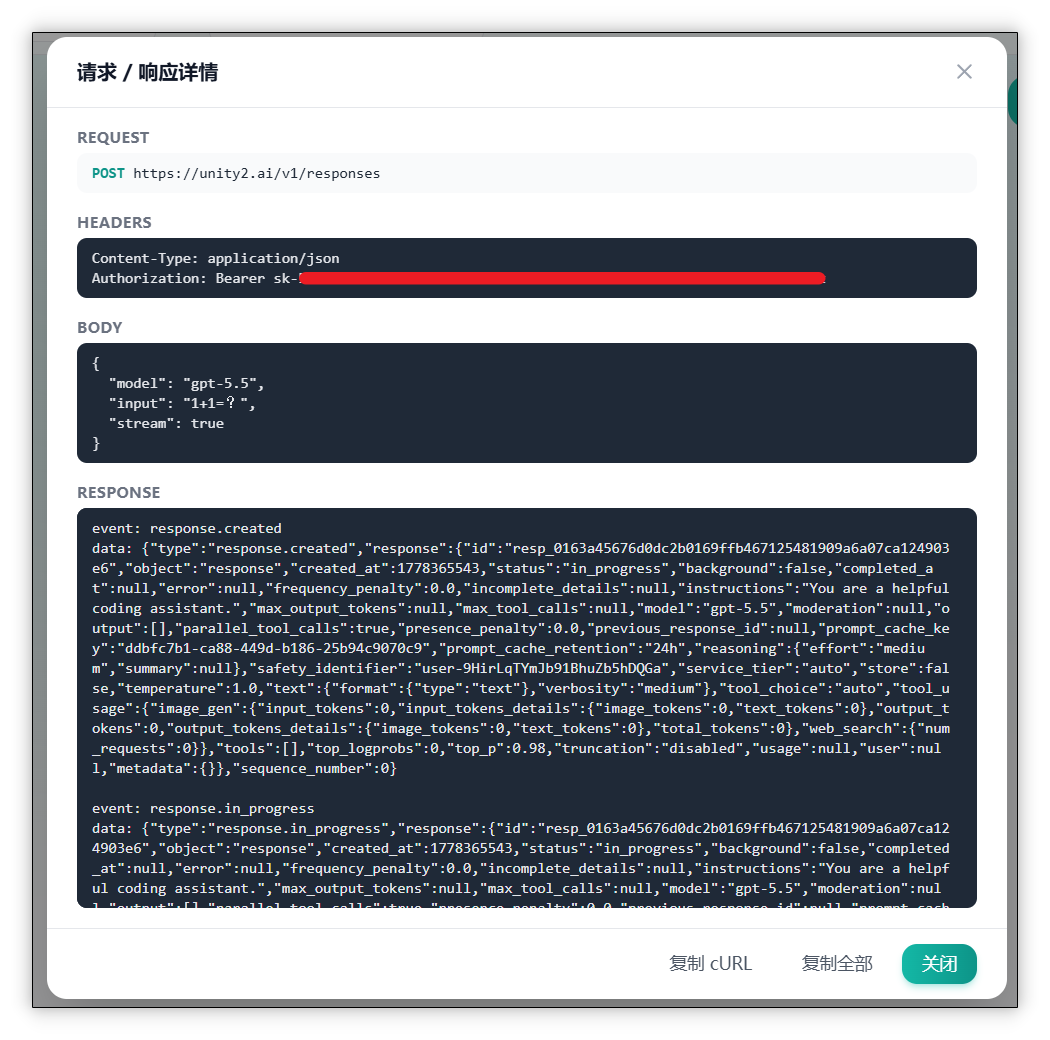
After creating the key, click the "Test Key" button to verify it works correctly. You can see the request latency and cost deduction when the test is successful.
Download CC Switch
CC Switch is a tool that helps you "switch AI routes with one click". Download links are available on the official website, supporting Quark Cloud, Baidu Cloud, and GitHub.
What is CC Switch? It's a switch that helps your AI tools "switch routes with one click". Instead of manually modifying complex configuration files, just fill in the "URL" and "API Key" you obtained, and click the switch to connect.
Import Key to CC Switch
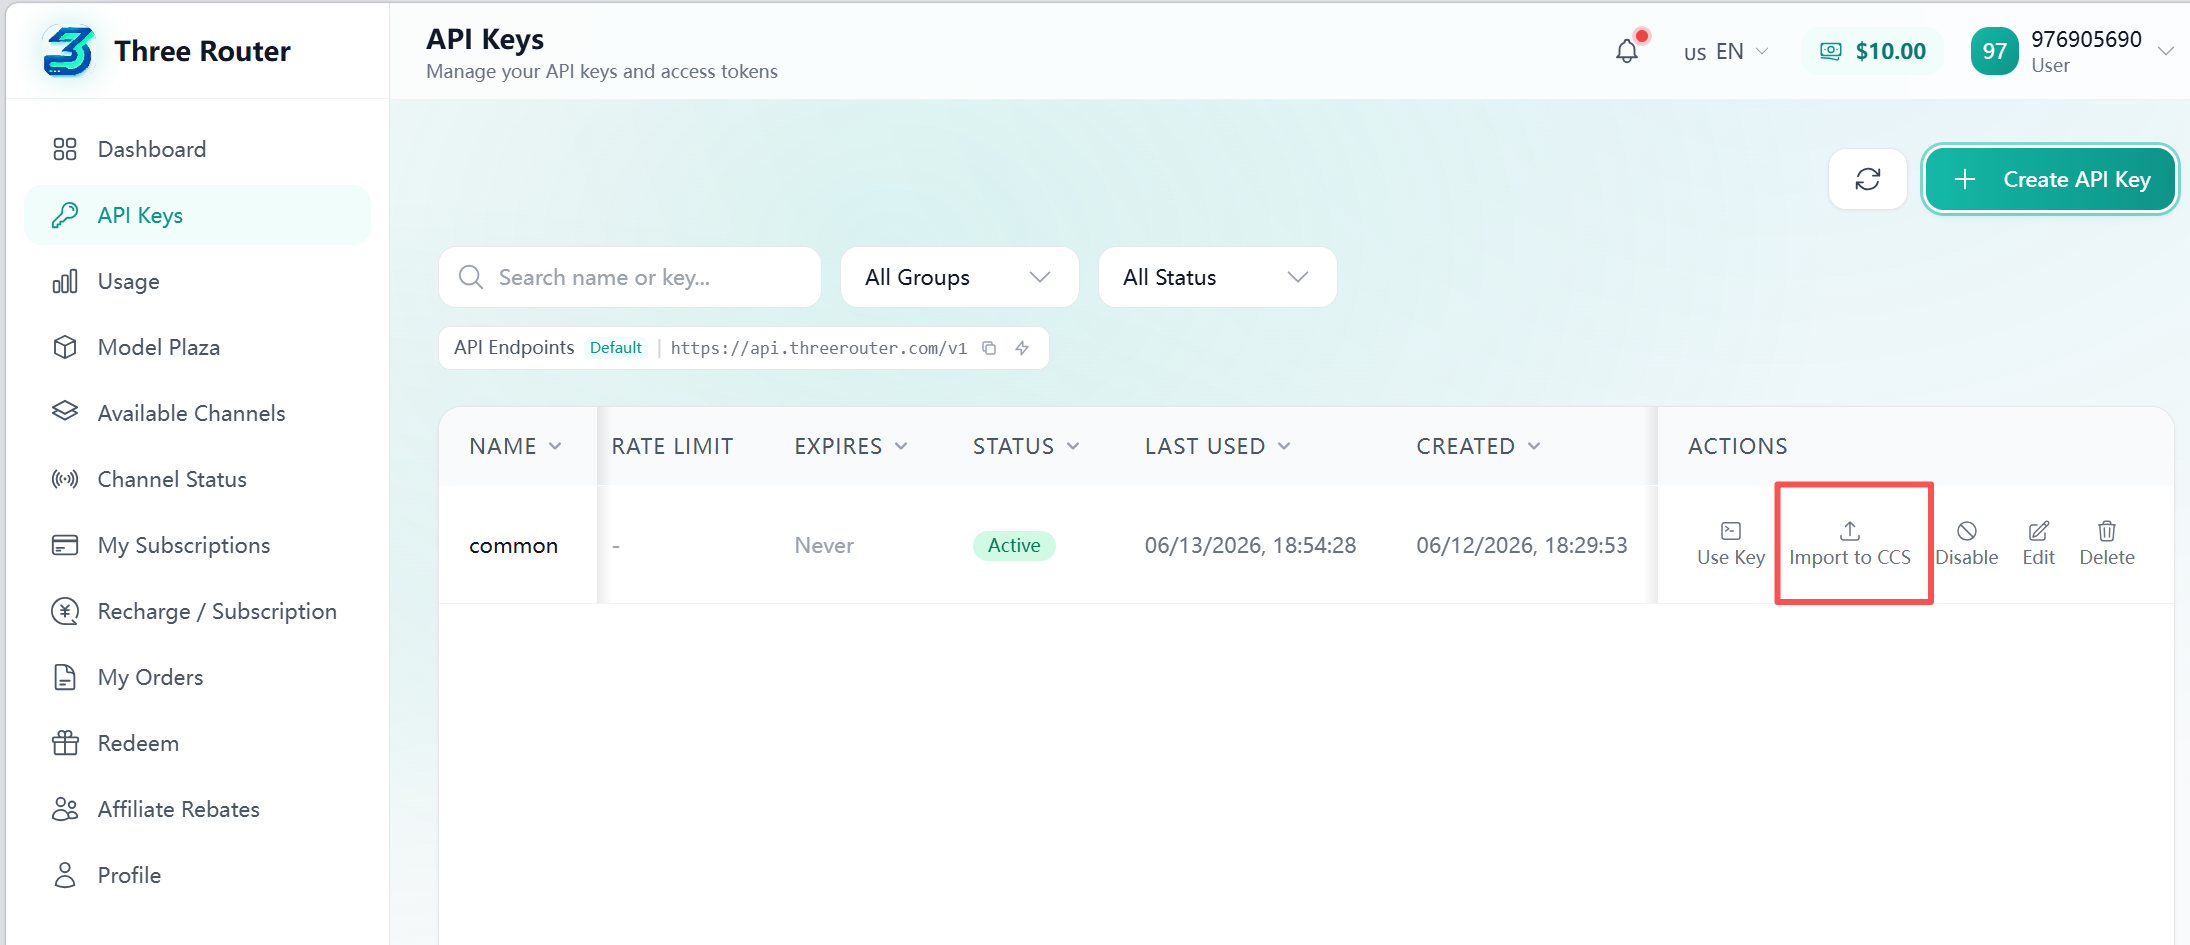
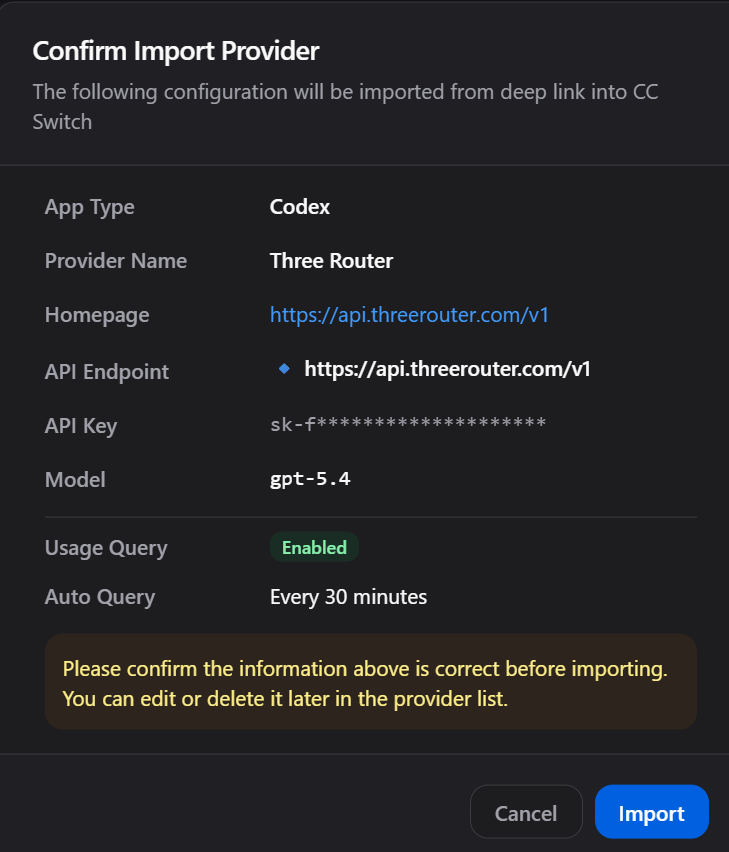
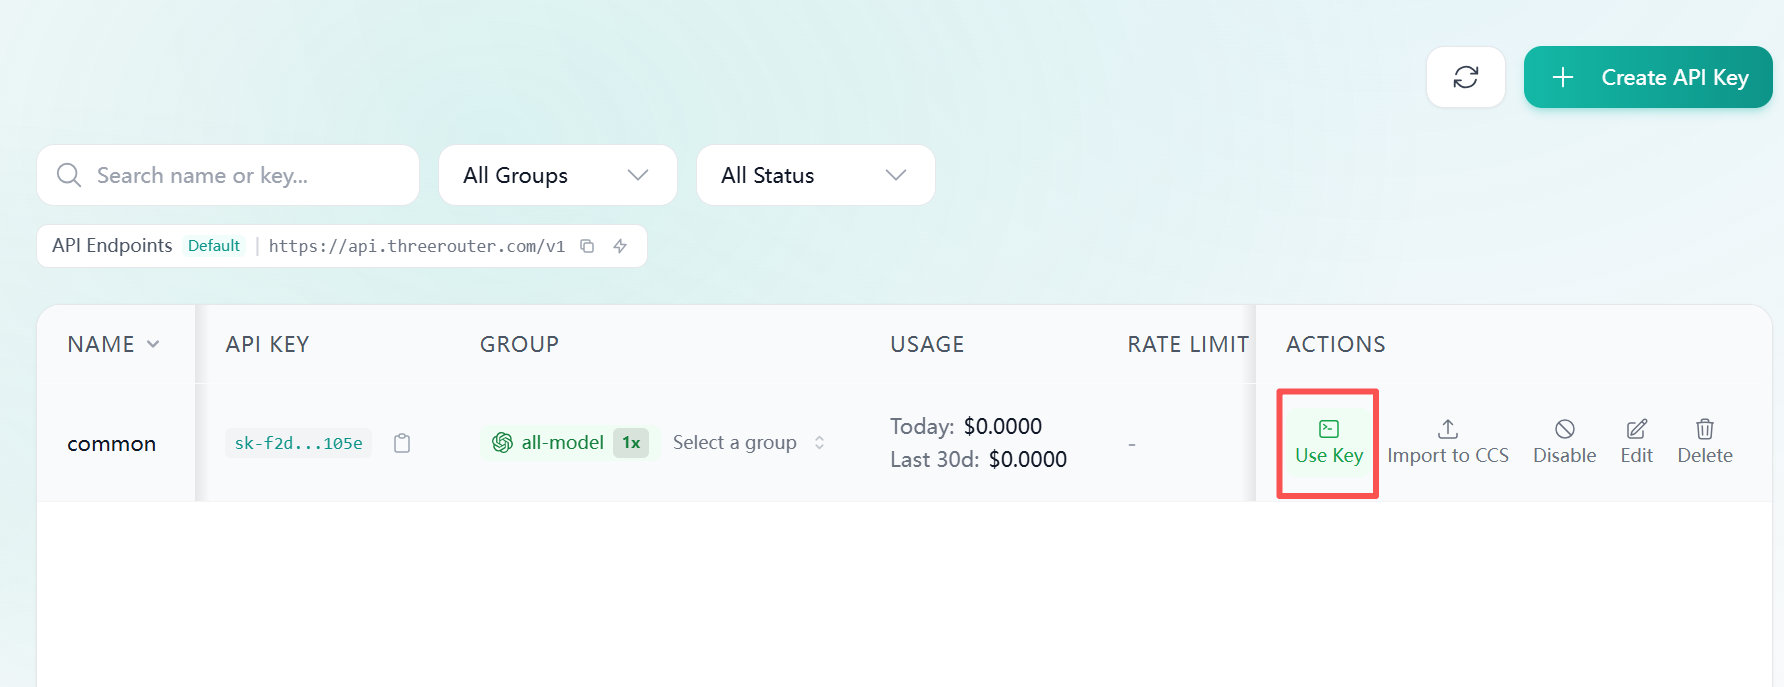
Open the ThreeRouter API Keys page, select the key you just created, click "Import to CCS". If CC Switch is installed, it will open automatically and prompt to import the key.
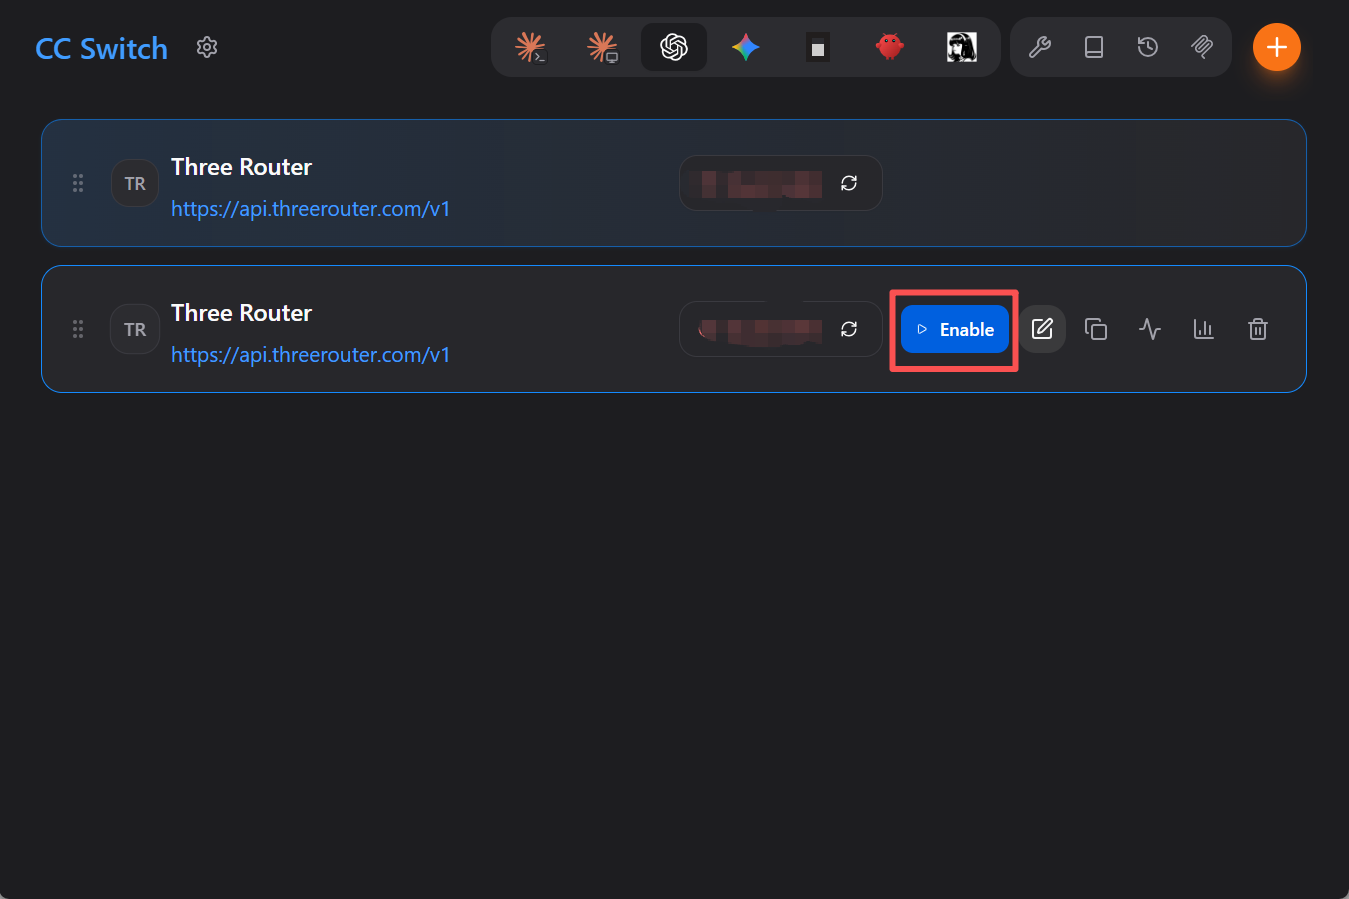
Enable CC Switch
After importing, enable CC Switch to start using. Configuration is complete! You can now use it.
Terminal Configuration (Without CC Switch)
If you choose not to use CC Switch, you can configure the API key and base_url directly in the terminal.
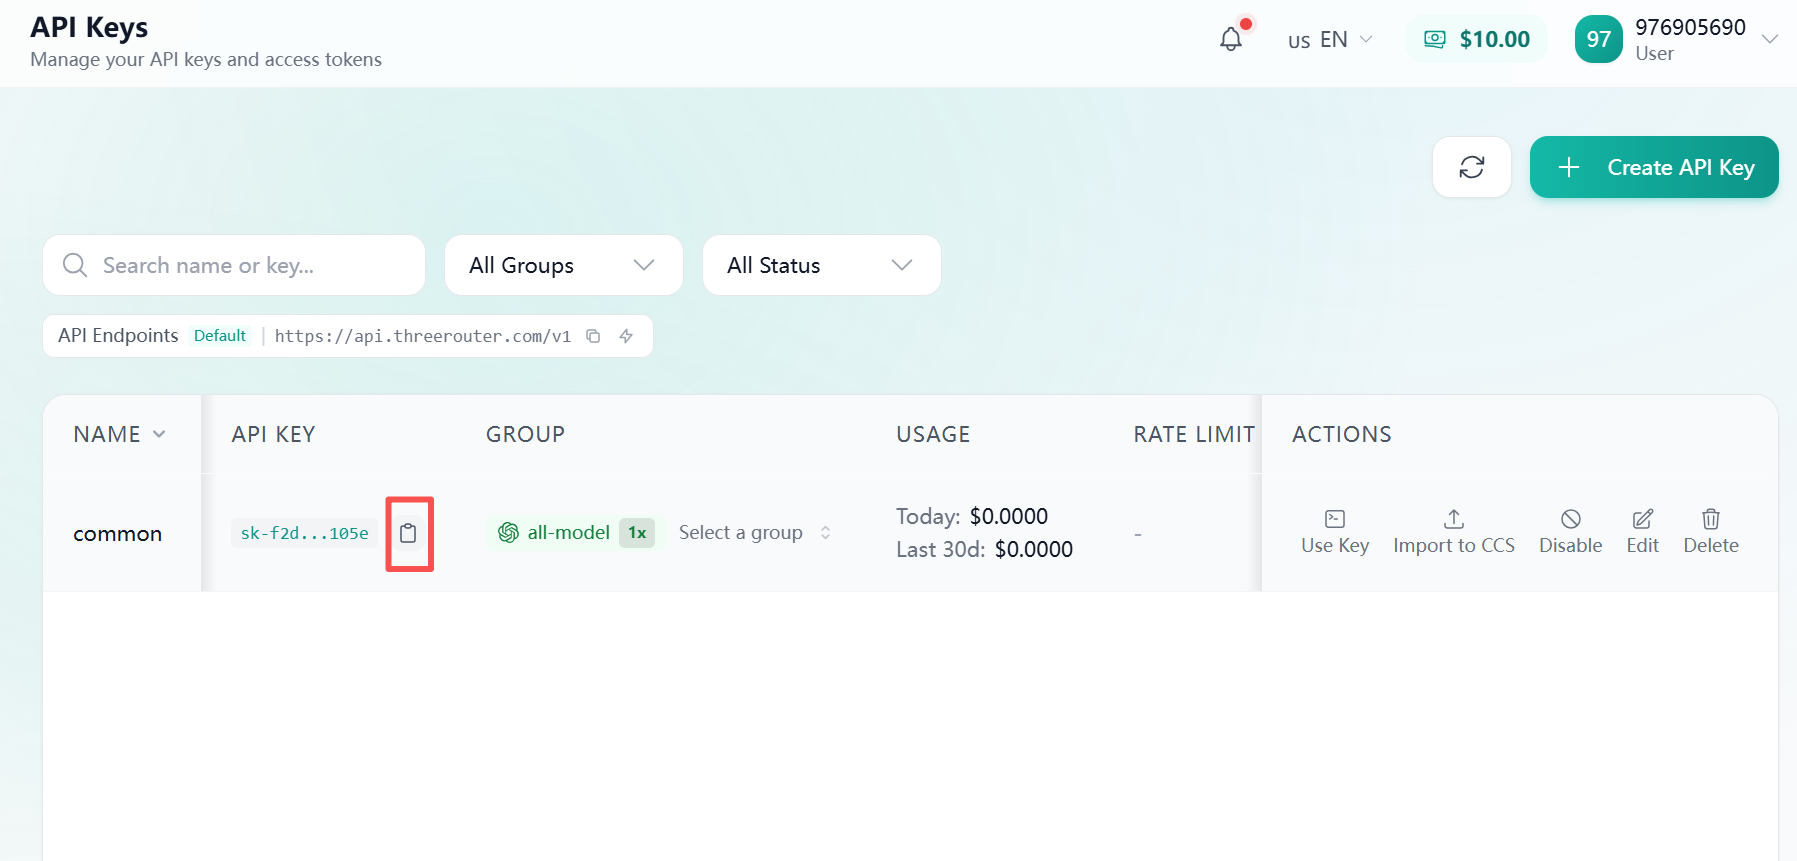
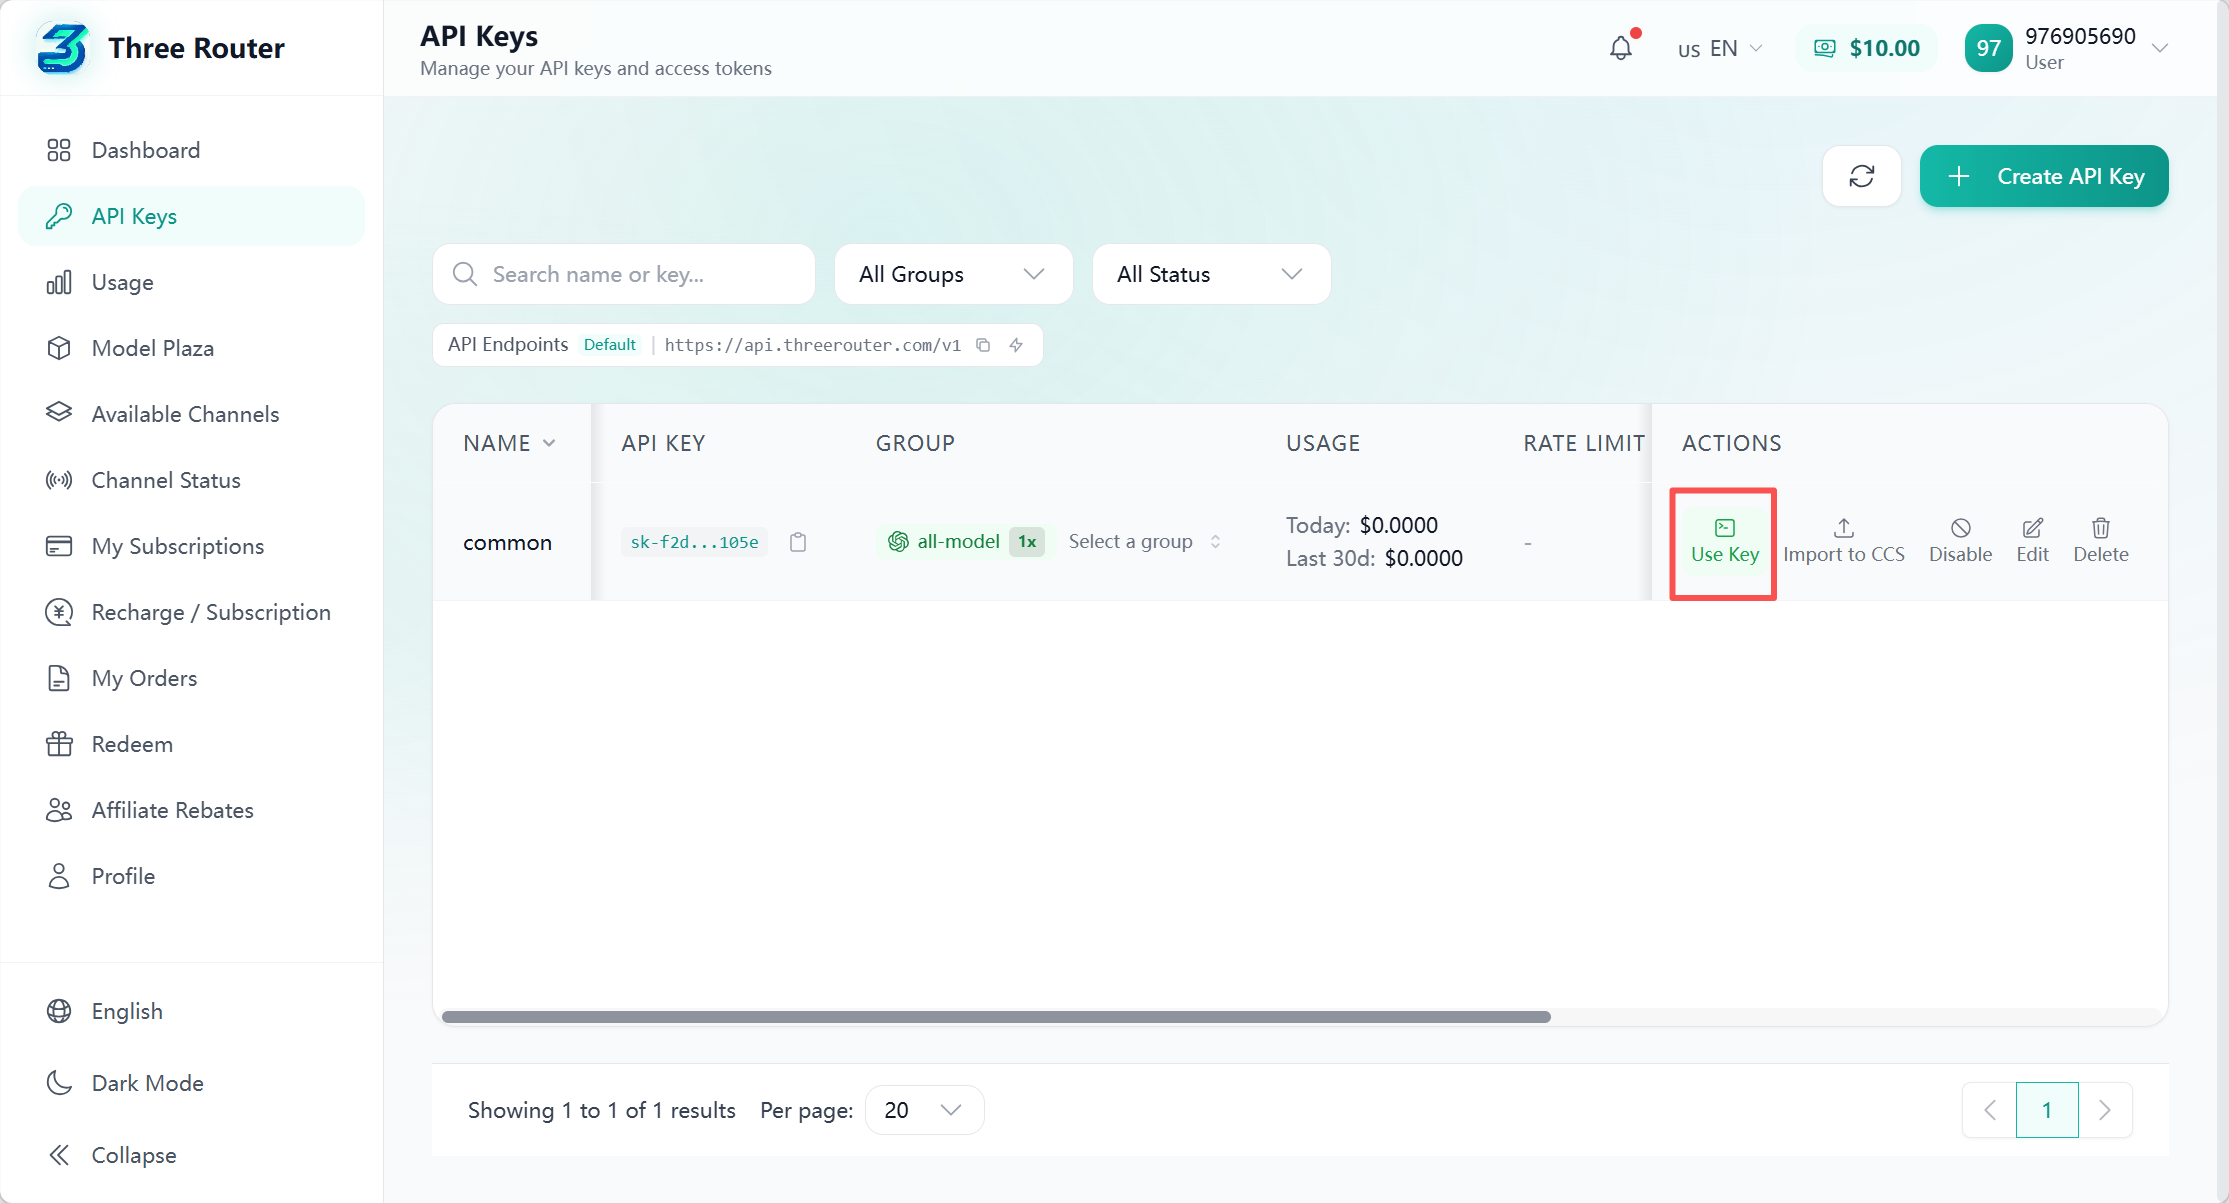
Copy your key from the API Keys page:
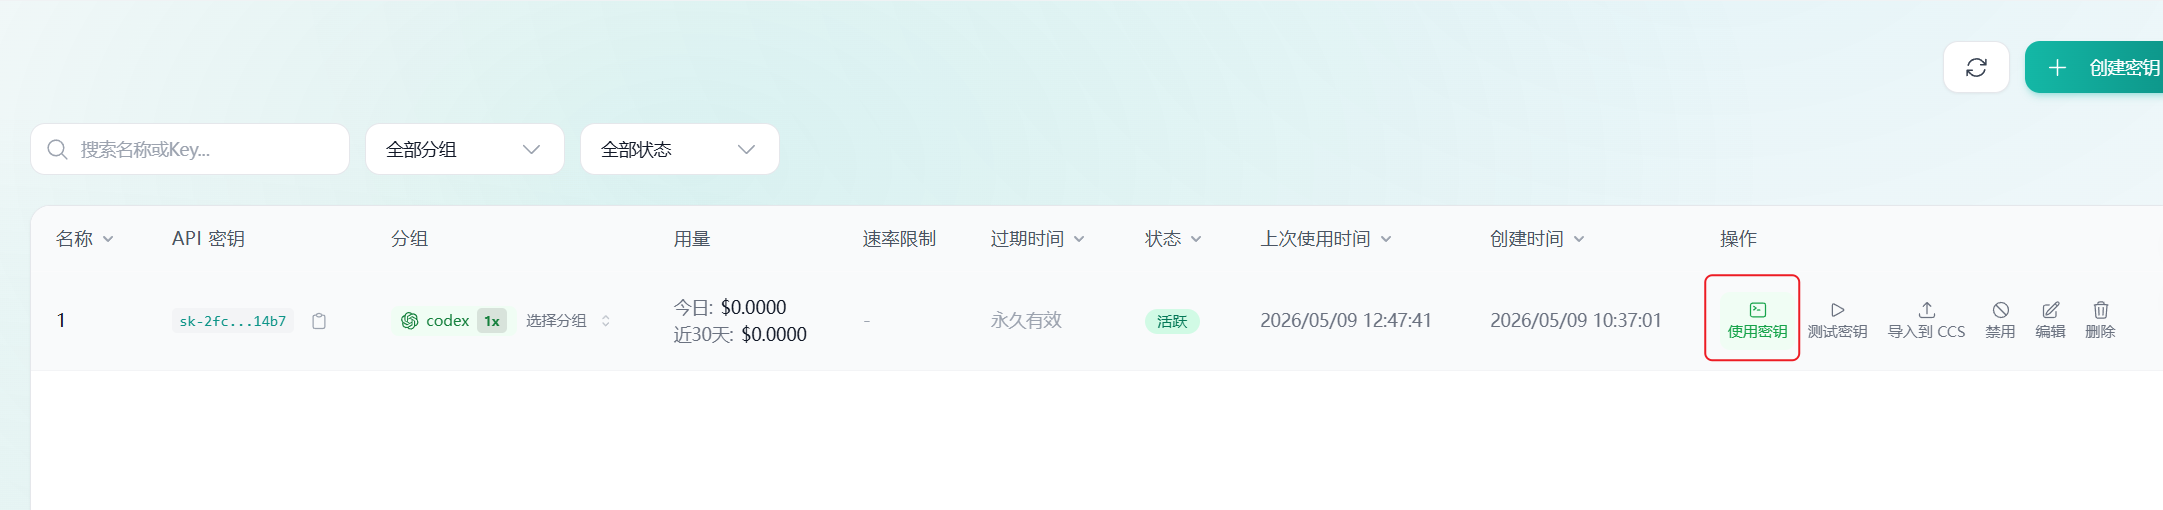
Configuration options for different platforms:
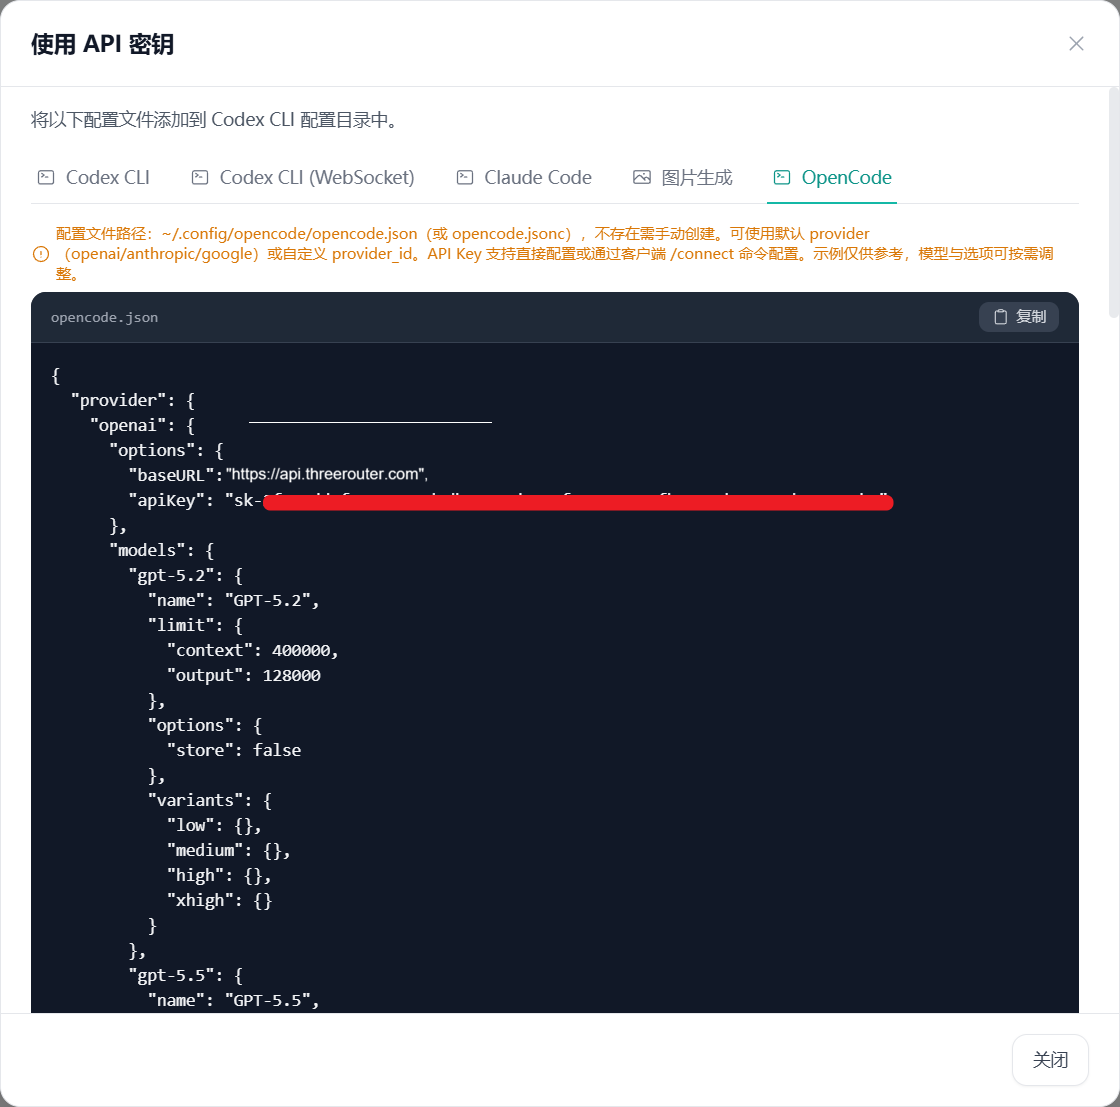
Tools Configuration
Detailed configuration methods for various tools
Claude Code Configuration
VS Code Extension, Desktop and Terminal Configuration
🔌 VS Code Extension Configuration
Suitable for users installing Claude Code extension via VS Code GUI. Similar for other IDEs.
- Open VS Code and select any project folder to enter the workspace. Otherwise, it will prompt you to open a project folder!
- Open the Extensions panel from the left sidebar.
- Search for "Claude Code" and click Install.
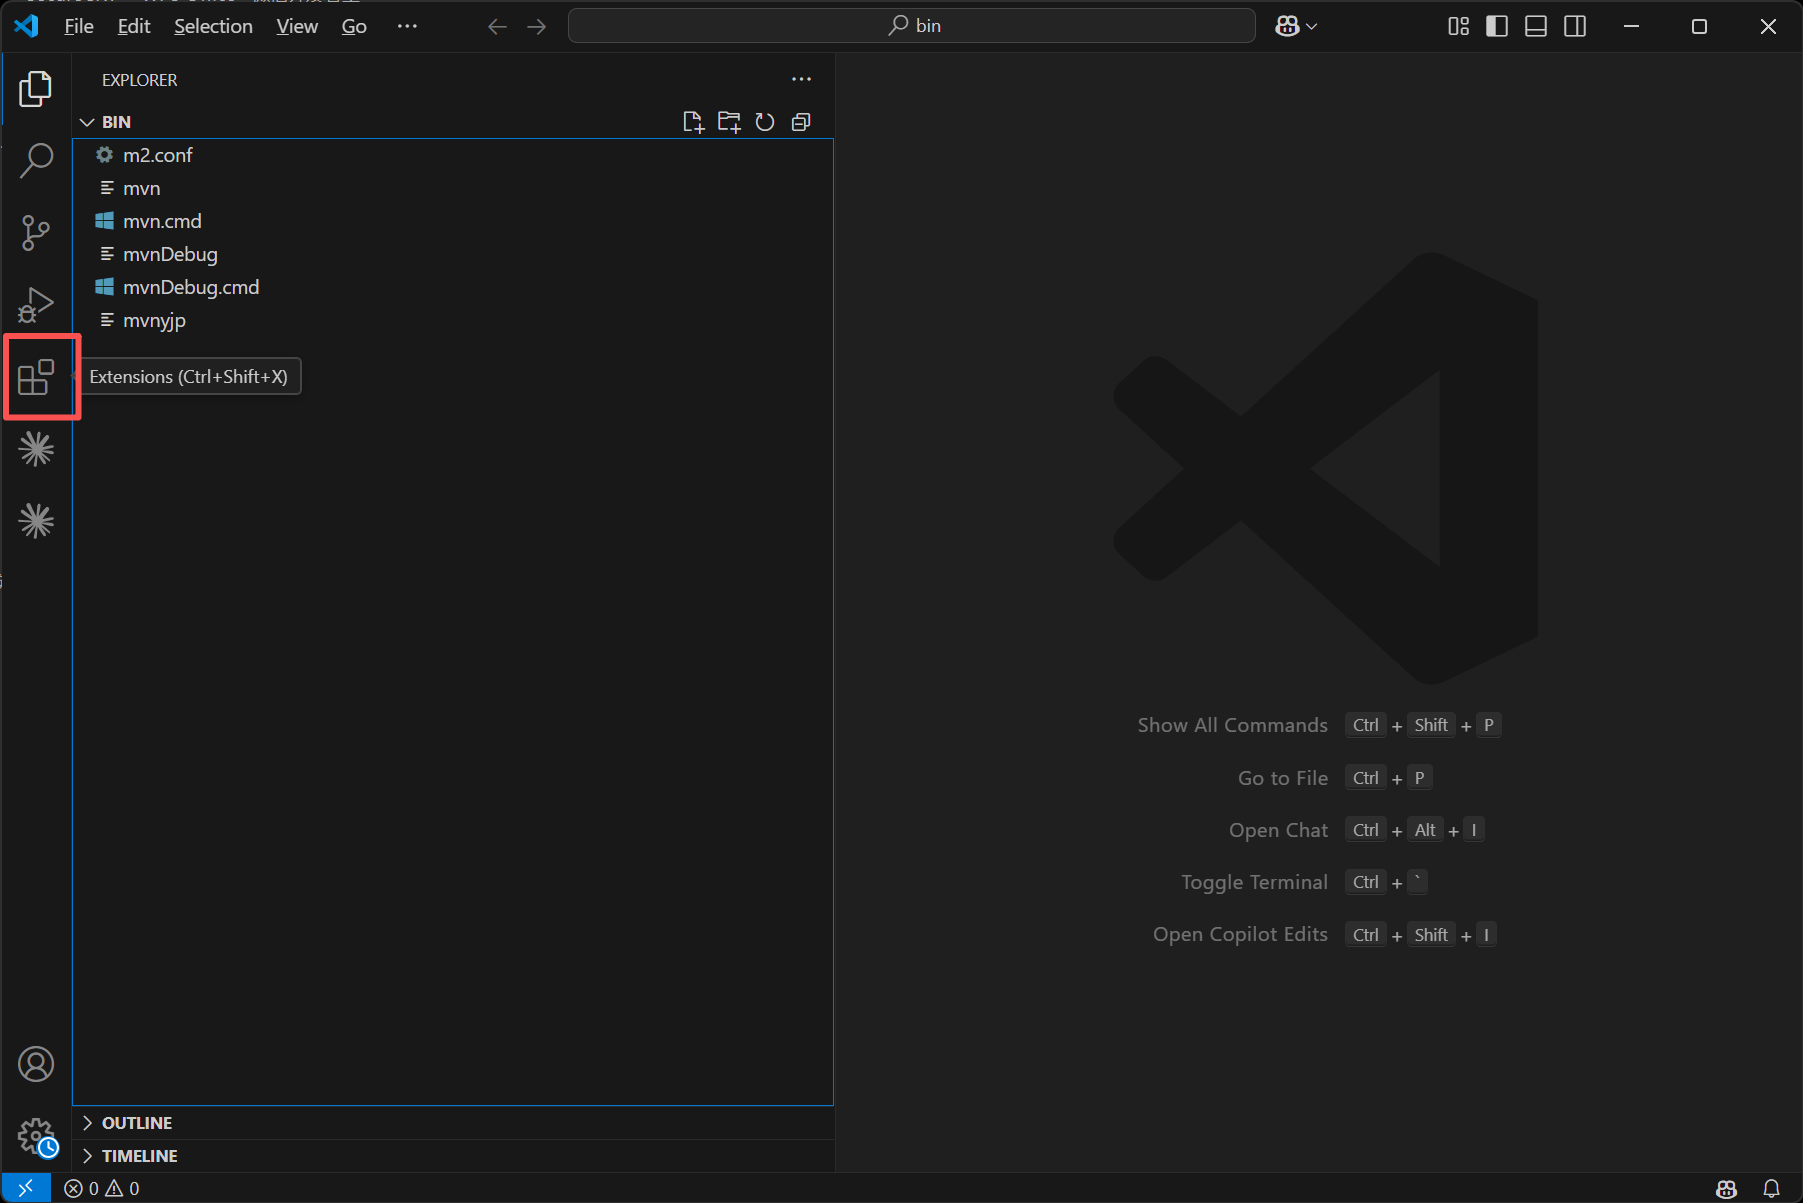
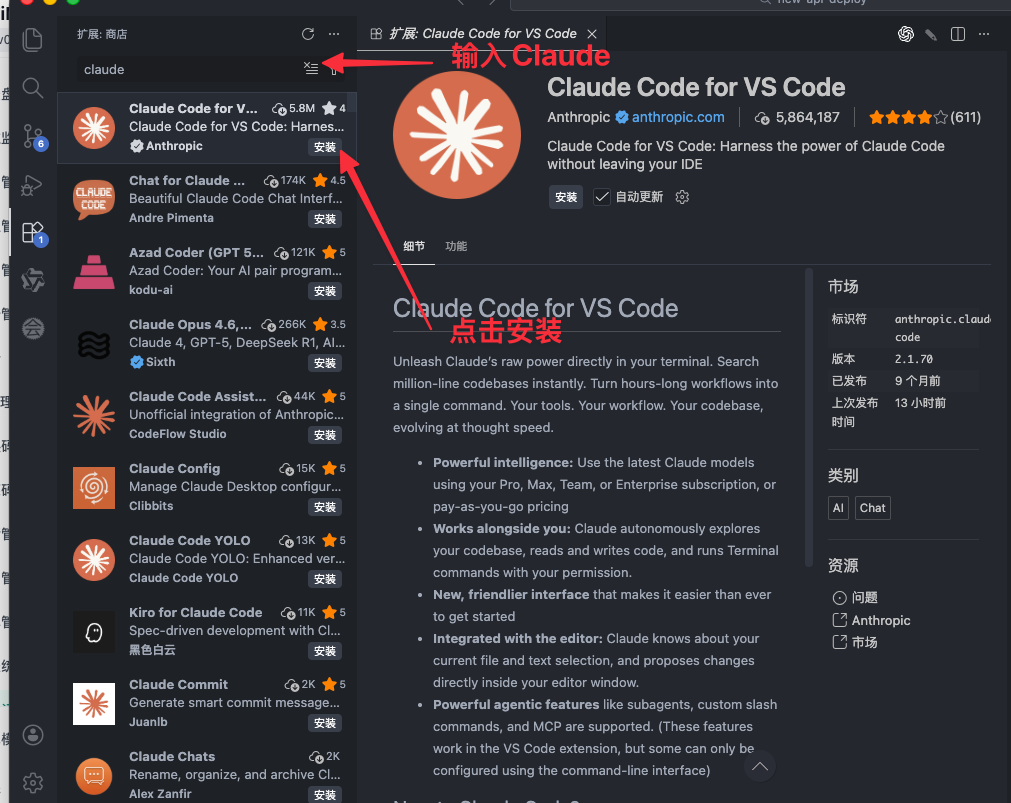
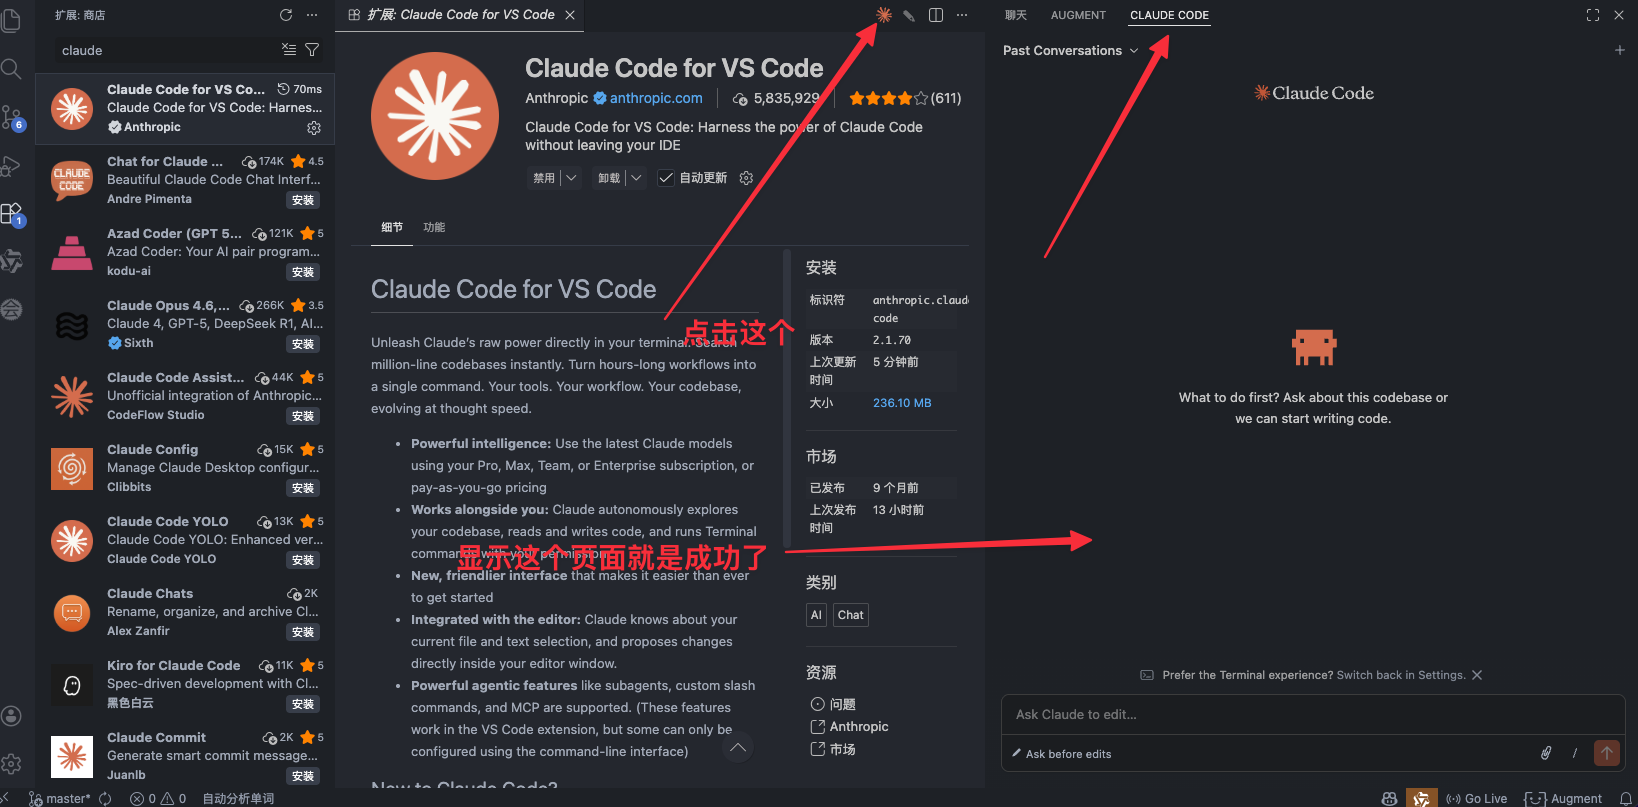
If CC Switch is installed, you can use it directly. Contact support in the group if you have any issues.
Claude Code Desktop Configuration (Without CC Switch)
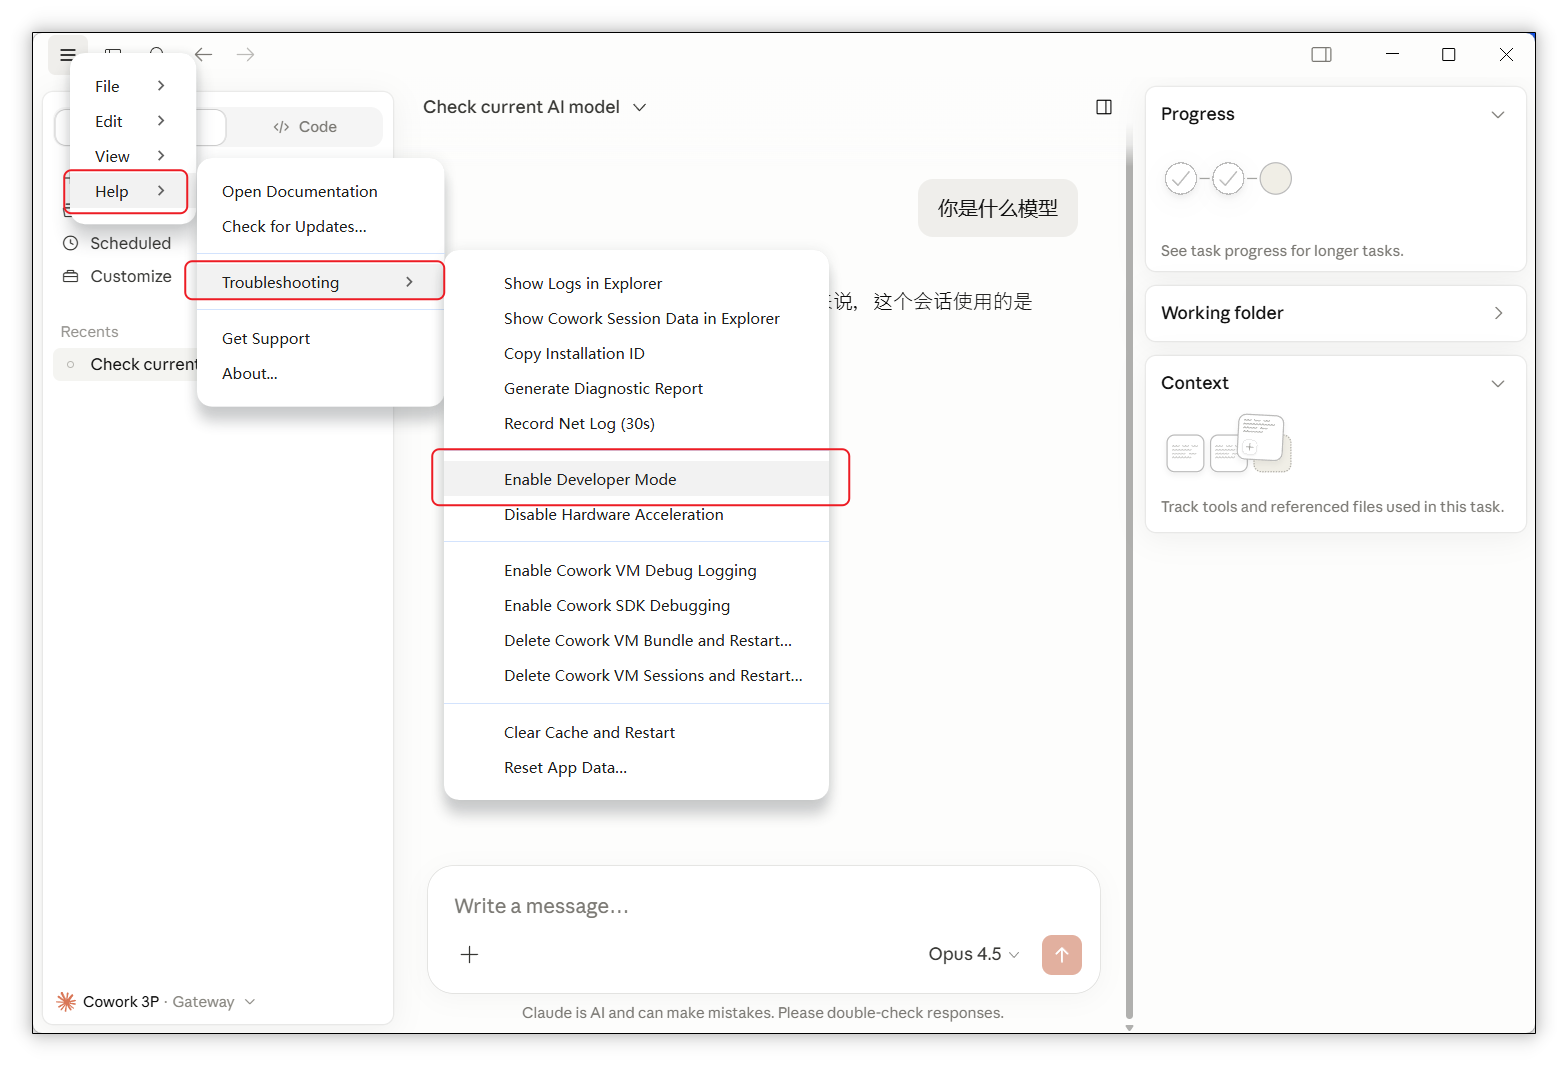
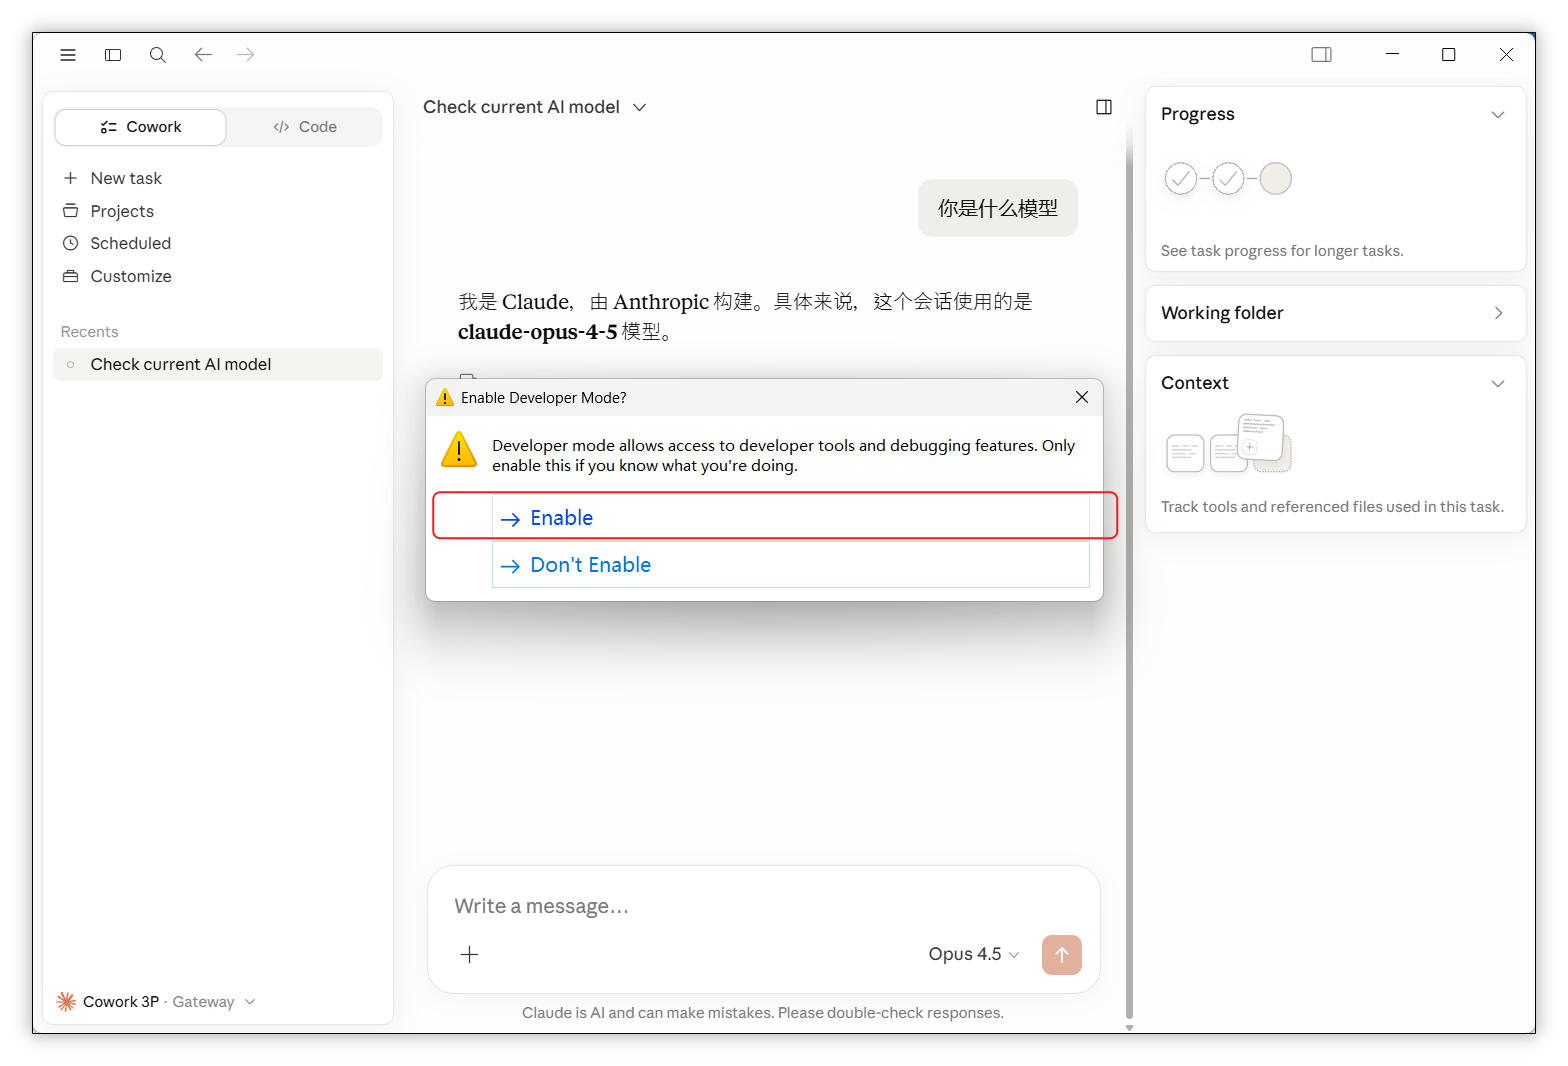
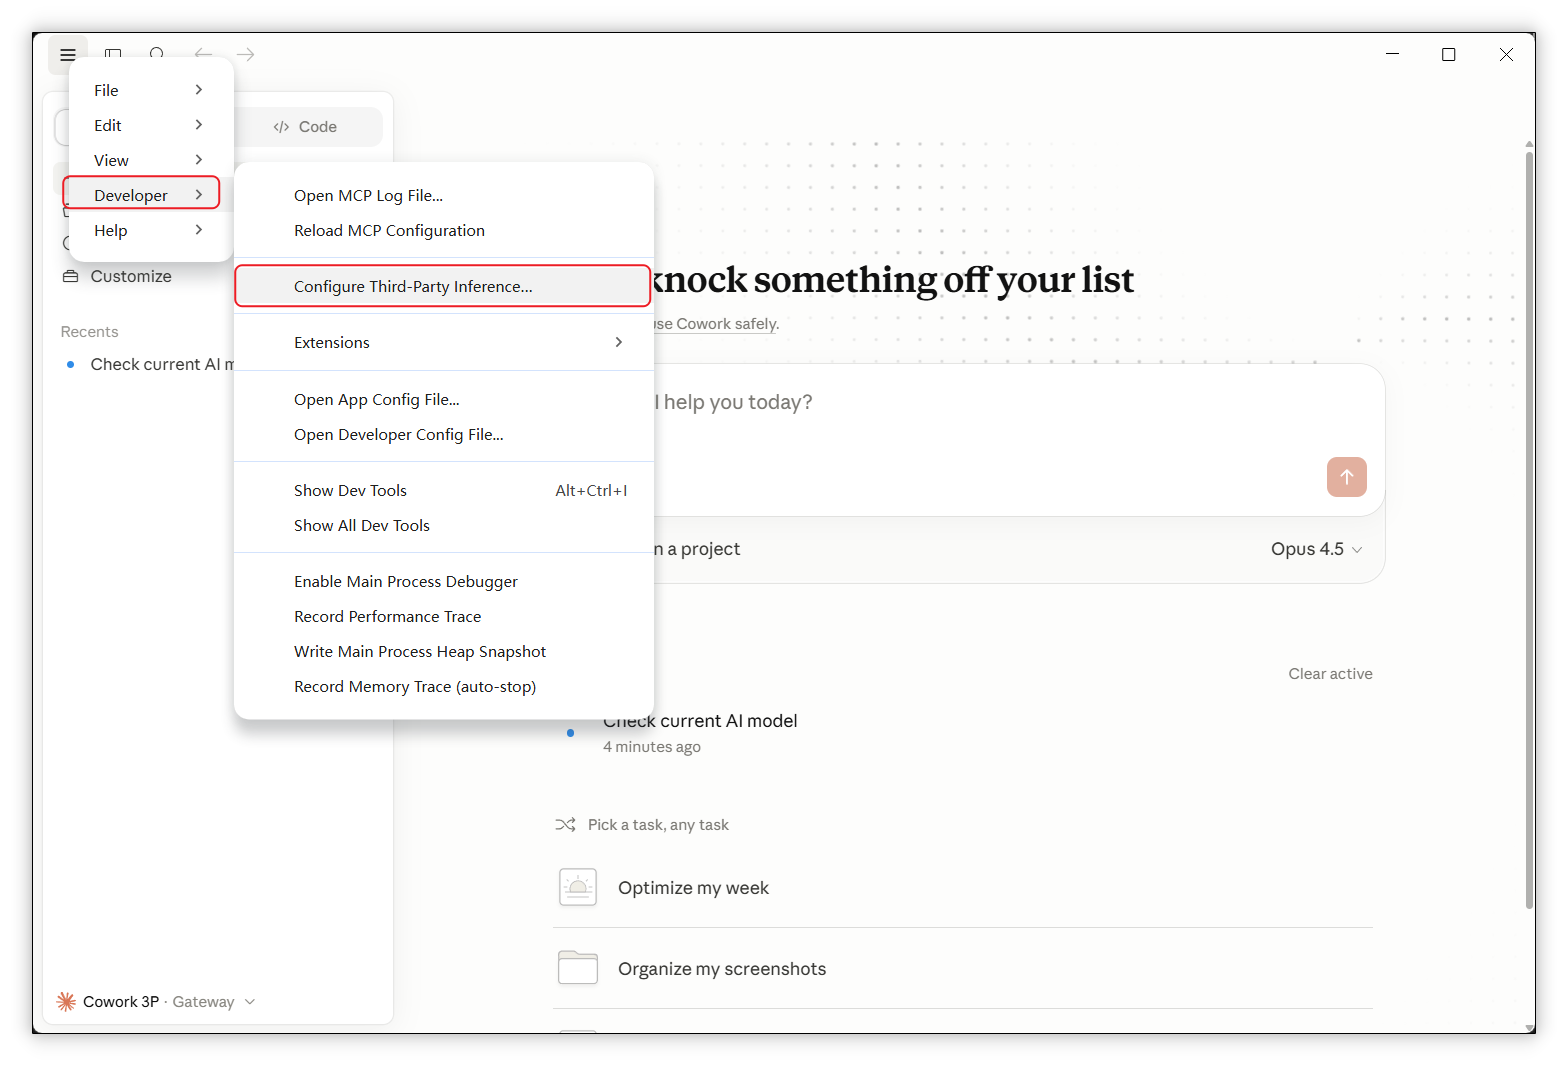
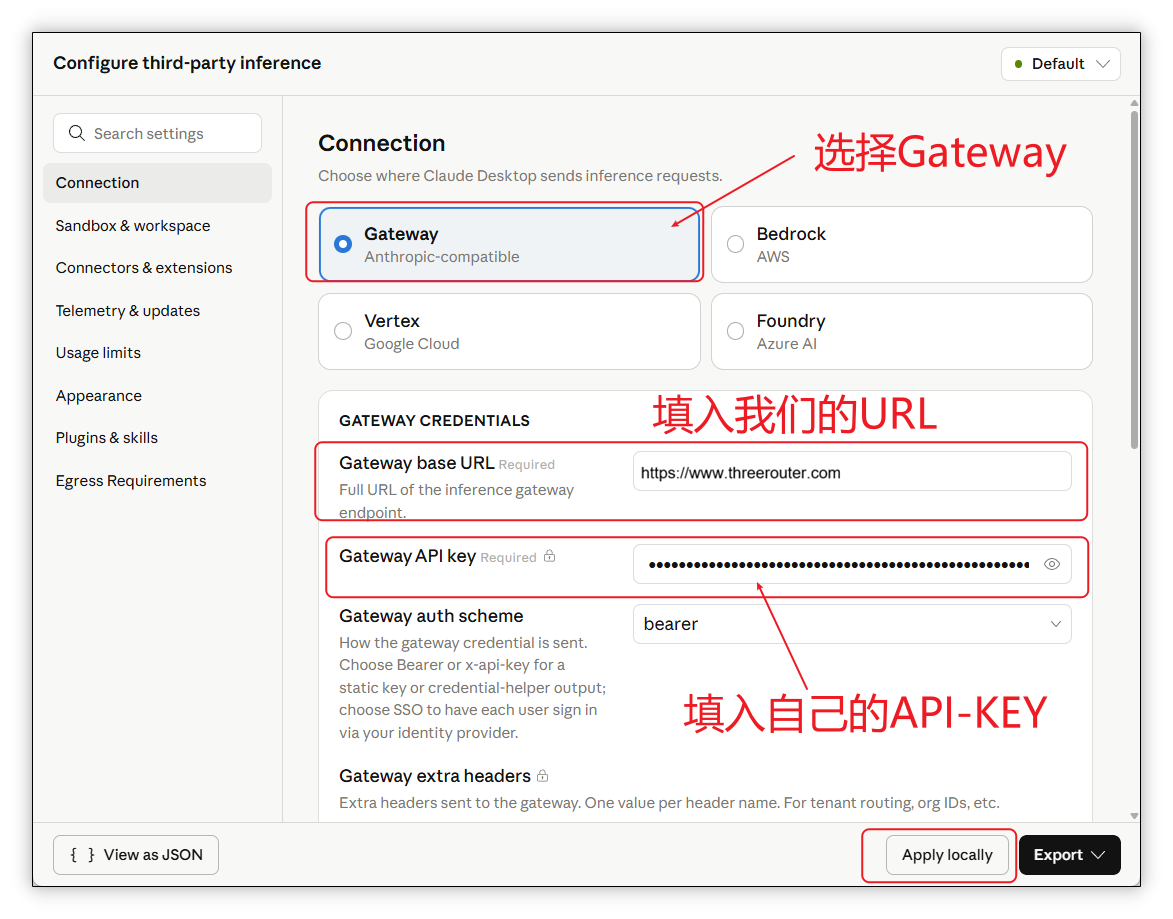
If you are using Claude Code Desktop app, you need to configure third-party inference gateway via developer mode:
- Open Claude Code Desktop, click menu Help -> Troubleshooting -> Enable Developer Mode
- After enabling, click menu Developer -> Configure Third-Party Inference
- Fill in Gateway base URL and API key in the configuration interface:
Get API Key and base_url
On the ThreeRouter API Keys page, you can copy your API Key and base_url. These are used in multiple configuration methods.
💻 Terminal Configuration
Includes official terminal installation and configuration without CC Switch.
Using Official Terminal: Install Claude Code CLI
# PowerShell
irm https://claude.ai/install.ps1 | iex

# CMD
curl -fsSL https://claude.ai/install.cmd -o install.cmd && install.cmd && del install.cmdcurl -fsSL https://claude.ai/install.sh | bashConfiguration Without CC Switch (Windows)
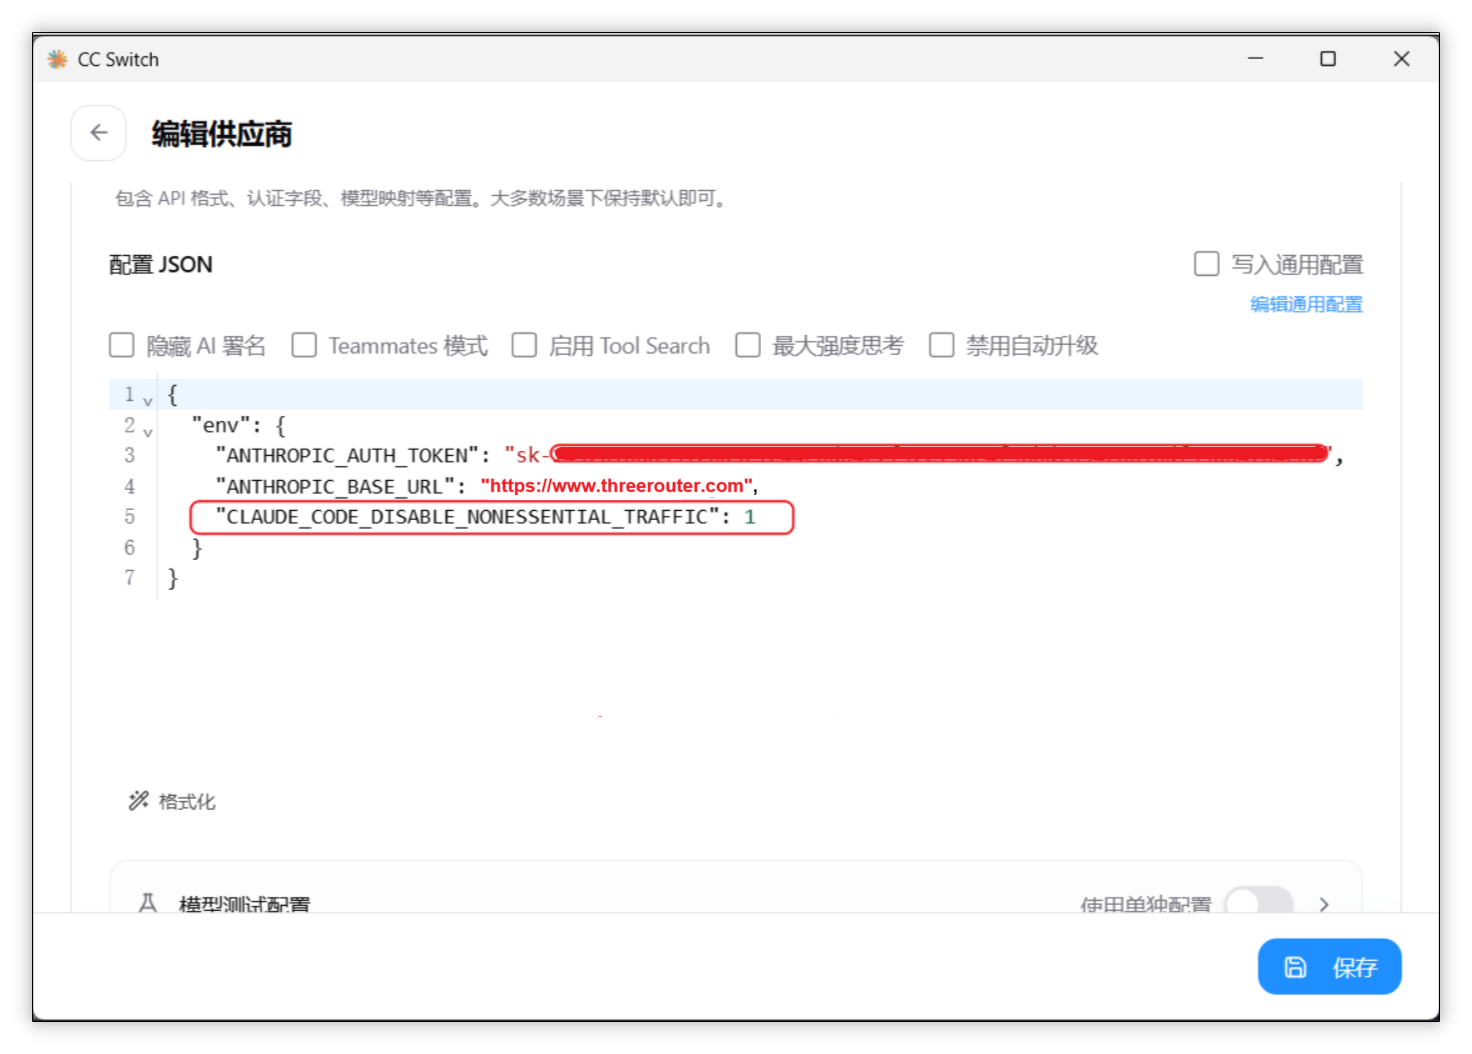
For Claude Code without CC Switch, configure as follows:
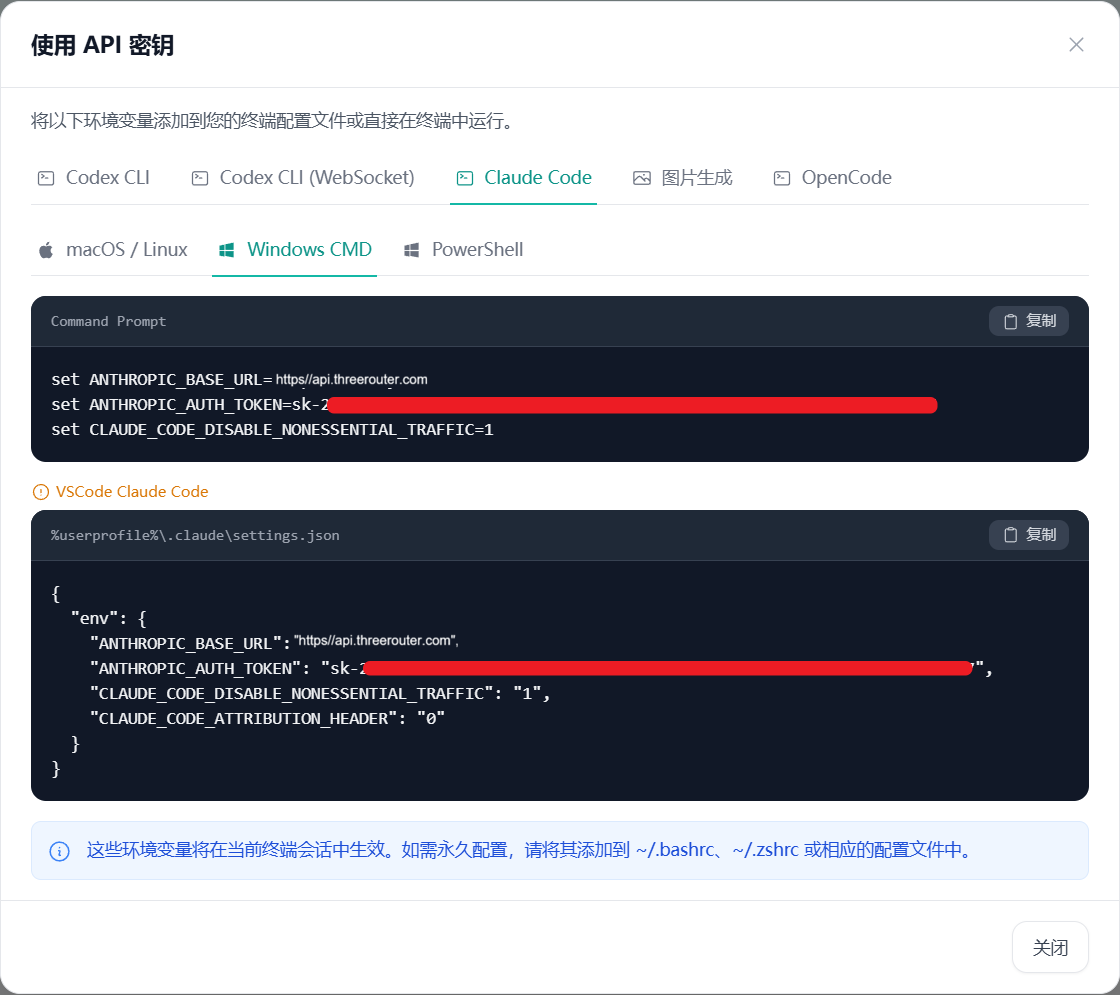
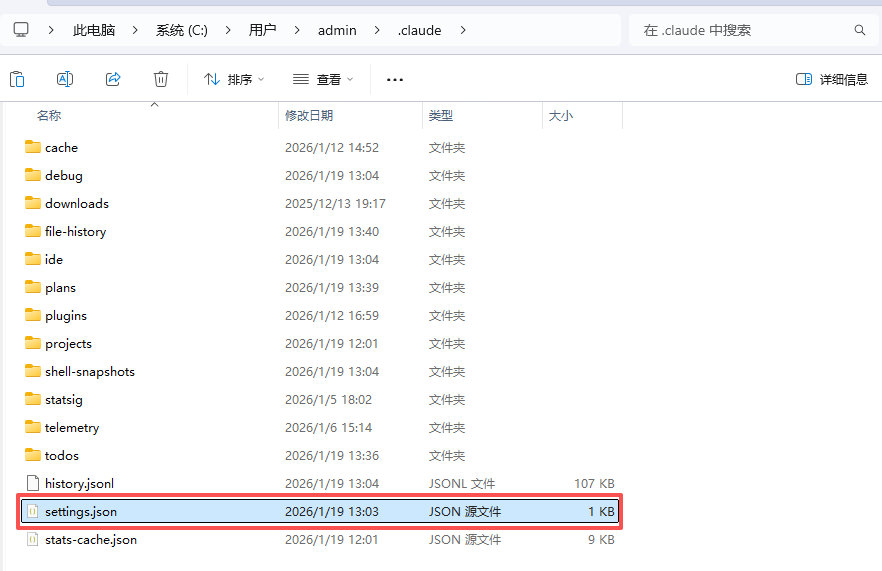
Configure settings.json
Create (if not exists) or edit C:\Users\{username}\.claude\settings.json, add the following configuration and save:
{
  "env": {
    "ANTHROPIC_BASE_URL": "https://api.threerouter.com",
    "ANTHROPIC_AUTH_TOKEN": "Replace with your API-KEY",
    "CLAUDE_CODE_DISABLE_NONESSENTIAL_TRAFFIC": "1",
    "CLAUDE_CODE_ATTRIBUTION_HEADER": "0"
  }
}
Configuration Without CC Switch (macOS / Linux)
Create or edit ~/.claude/settings.json with the following content:
{
  "env": {
    "ANTHROPIC_AUTH_TOKEN": "Replace with your API Key",
    "ANTHROPIC_BASE_URL": "https://api.threerouter.com",
    "CLAUDE_CODE_DISABLE_NONESSENTIAL_TRAFFIC": "1",
    "CLAUDE_CODE_ATTRIBUTION_HEADER": "0"
  }
}If Claude Code shows 400 error, it's likely due to incorrect environment variables. If using CC Switch, edit the corresponding key and add: CLAUDE_CODE_DISABLE_NONESSENTIAL_TRAFFIC: 1
🖥️ Claude Code Desktop Configuration (Without CC Switch)
If you are using Claude Code Desktop app, you need to configure third-party inference gateway via developer mode:
Codex (OpenAI) Configuration
VS Code Extension and Terminal Configuration
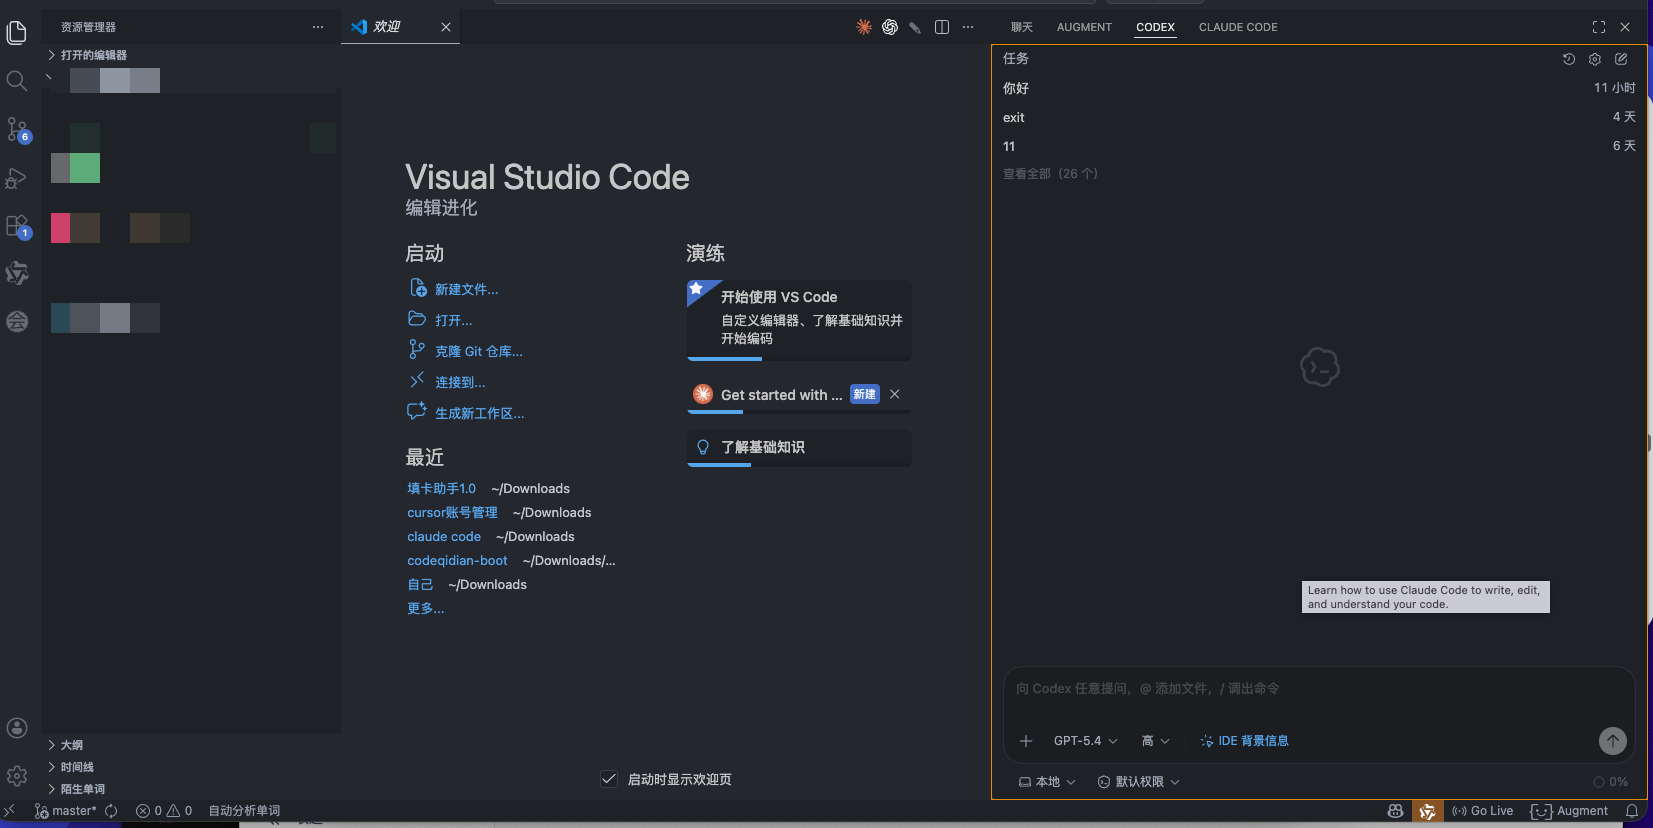
🔌 VS Code Extension Configuration
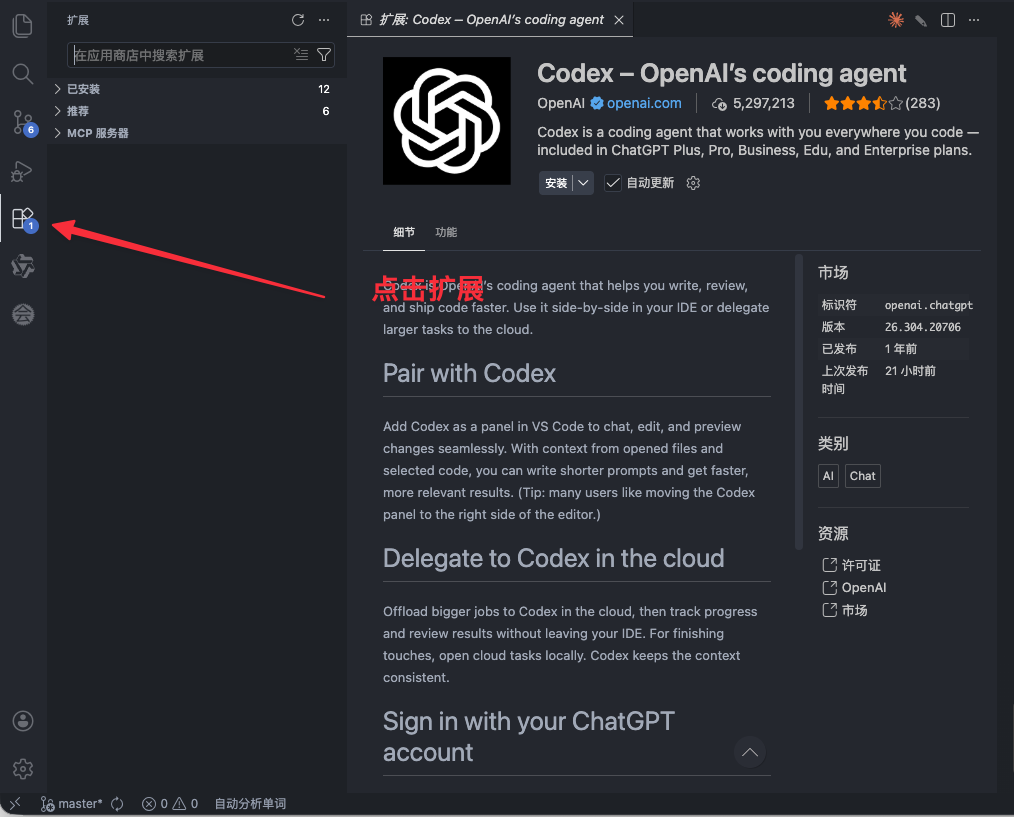
- Open VS Code and select any project folder to enter the workspace.
- Open the Extensions panel from the left sidebar.
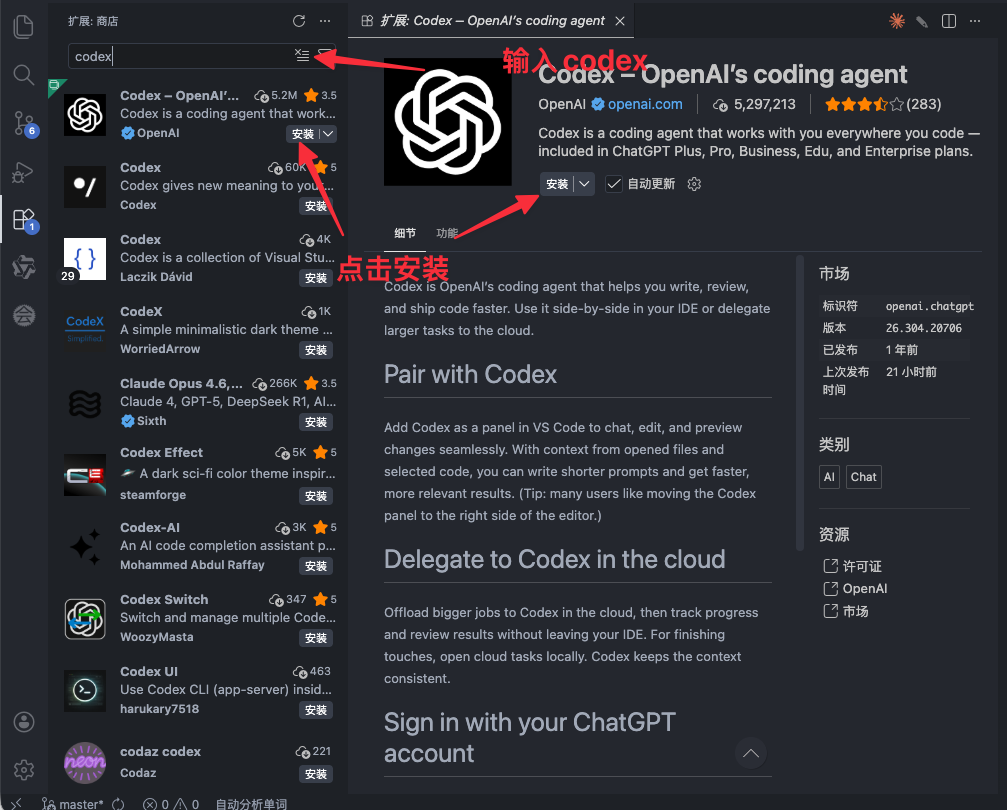
- Search for "Codex" and click Install.
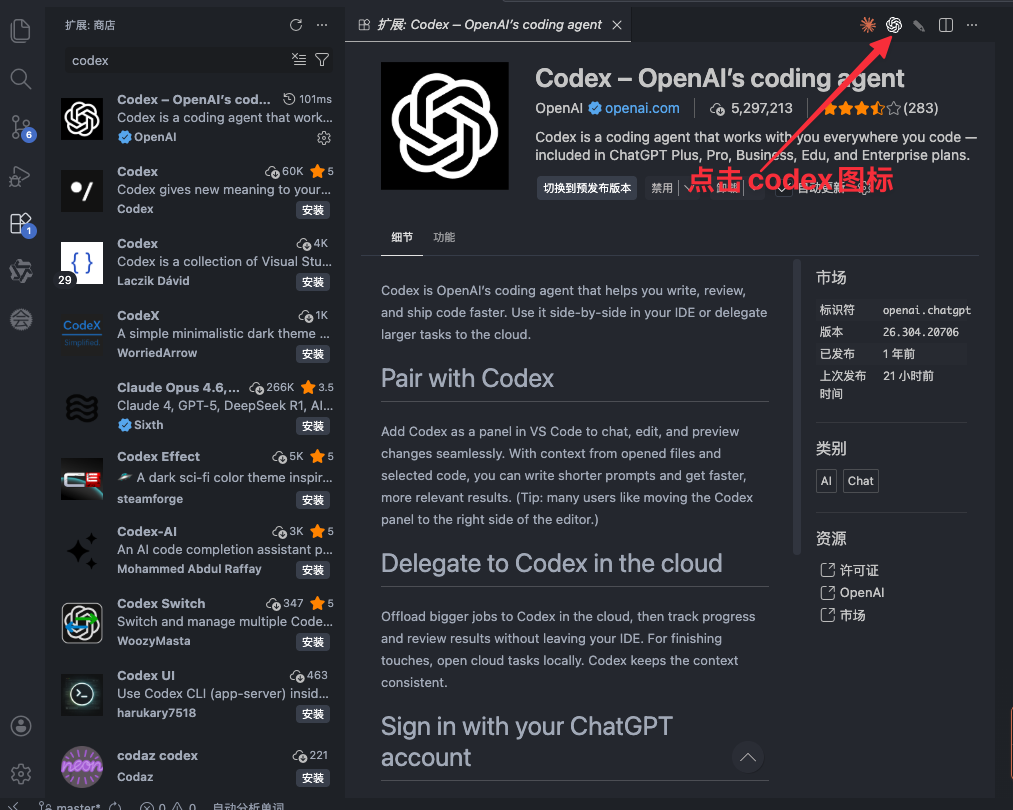
- The Codex icon will appear after installation.
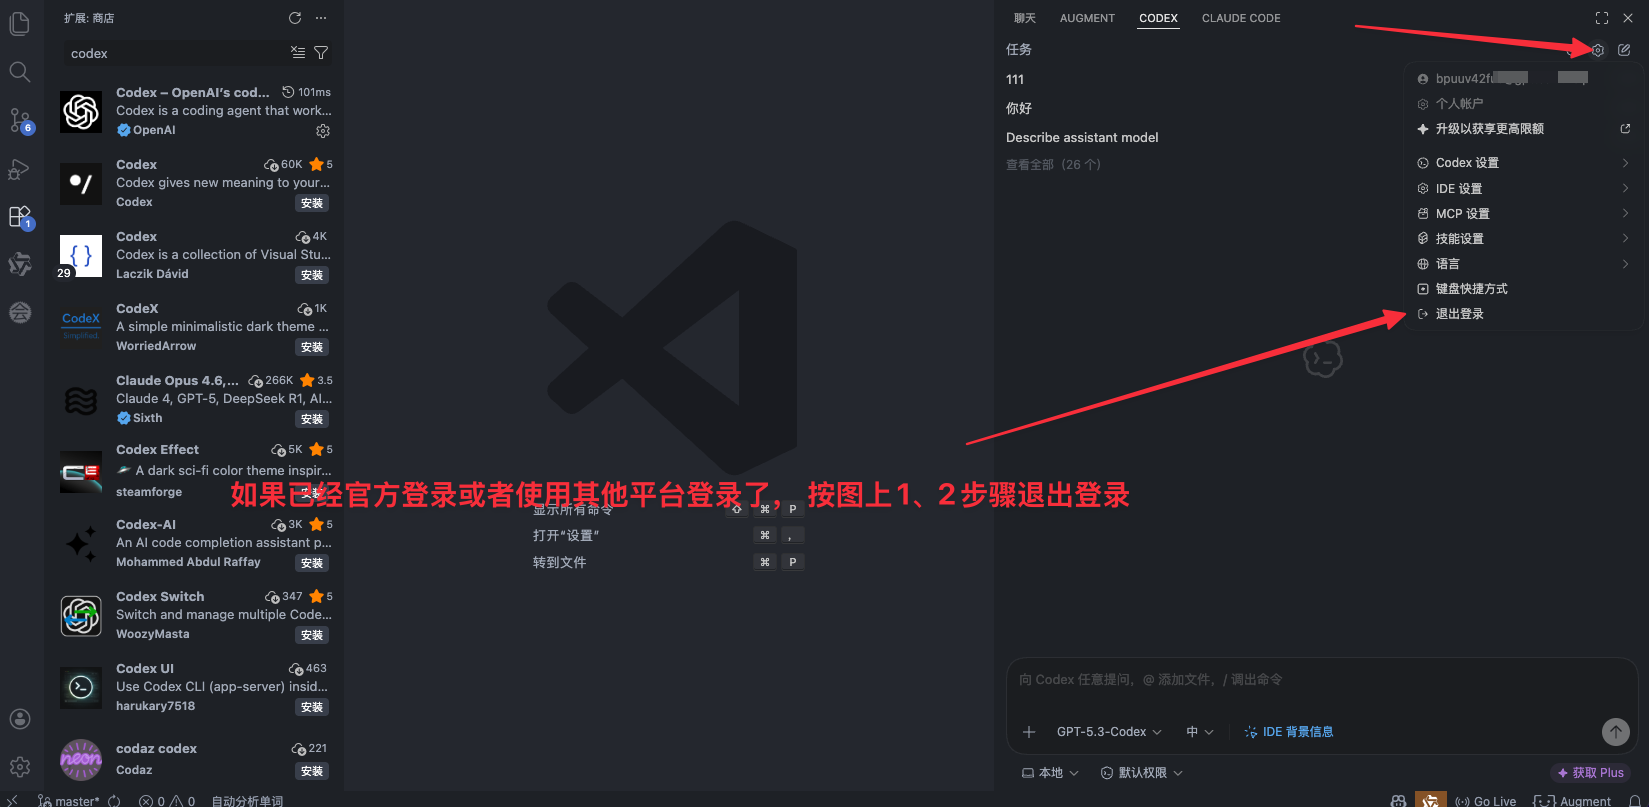
- Note: If you previously logged in with official or other platforms, please log out first before reconfiguring!
💻 Terminal Configuration
Includes official terminal installation and configuration without CC Switch.
Using Official Terminal: Install Codex CLI
npm i -g @openai/codexConfiguration Without CC Switch (Windows)
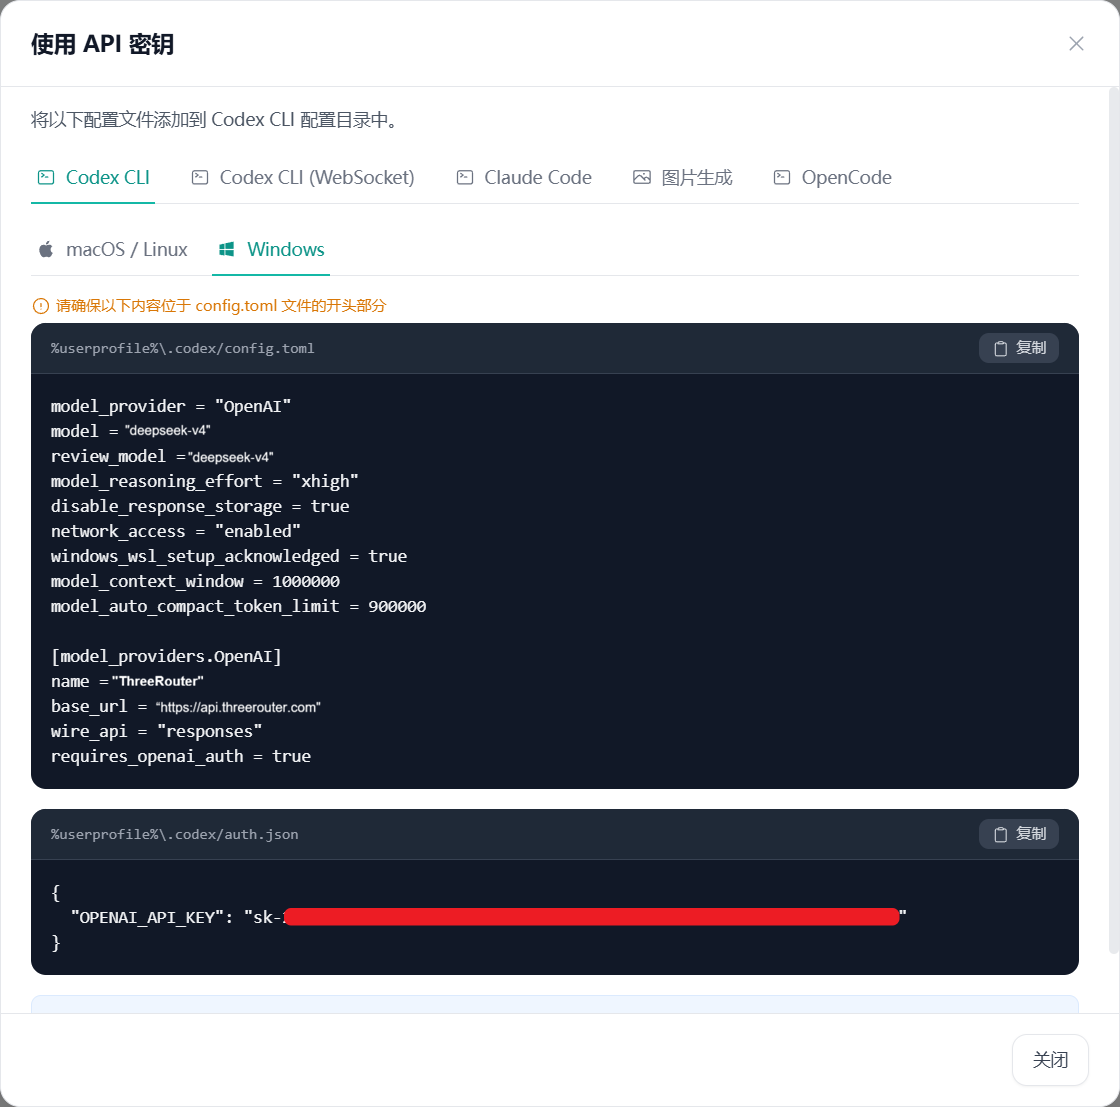
Configure config.toml
Create (if not exists) or edit C:\Users\{username}\.codex\config.toml:
model_provider = "Deepseek"
model = "deepseek-v4"
review_model = "deepseek-v4"
model_reasoning_effort = "xhigh"
disable_response_storage = true
network_access = "enabled"
windows_wsl_setup_acknowledged = true
model_context_window = 1000000
model_auto_compact_token_limit = 900000

[model_providers.Deepseek]
name = "Deepseek"
base_url = "https://api.threerouter.com"
wire_api = "responses"
requires_openai_auth = true
Configure auth.json
Create (if not exists) or edit C:\Users\{username}\.codex\auth.json:
{
  "OPENAI_API_KEY": "Replace with your API Key"
}Gemini CLI Configuration
Official Terminal Installation and Configuration
The official extension currently uses Google Cloud (GCP) and requires logging into your Google account to select a project space. Therefore, the official extension is not recommended.
💻 Using Official Terminal: Install Gemini CLI
npm install -g @google/gemini-cliConfiguration Without CC Switch (Windows)
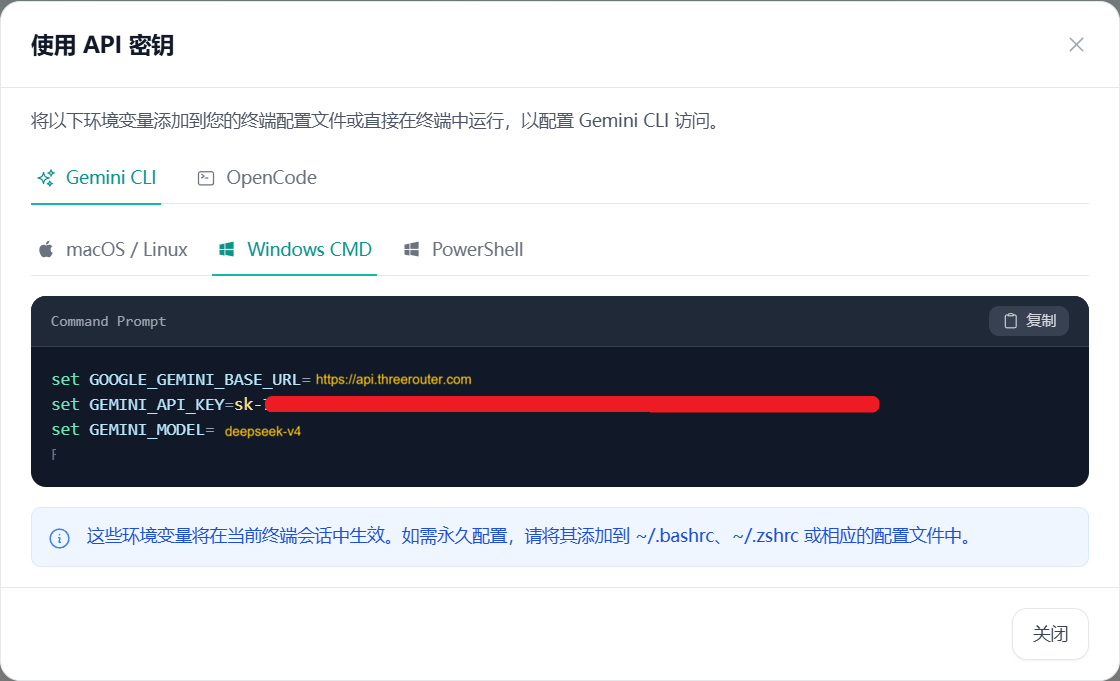
Configure .env
Create (if not exists) or edit C:\Users\{username}\.gemini\.env:
GEMINI_API_KEY=Replace with your API-KEY 【Do not include quotes or special characters】
GOOGLE_GEMINI_BASE_URL=https://api.threerouter.com
Configure settings.json
Create (if not exists) or edit C:\Users\{username}\.gemini\settings.json:
{
  "security": {
    "auth": {
      "selectedType": "gemini-api-key"
    }
  }
}OpenCode Configuration
Suitable for users without fixed model preferences
OpenCode is special and suitable for users without fixed model preferences. The official extension is not yet complete and not recommended.
Using Official Terminal: Install OpenCode CLI
npm i -g opencode-aiConfiguration Without CC Switch (Windows)
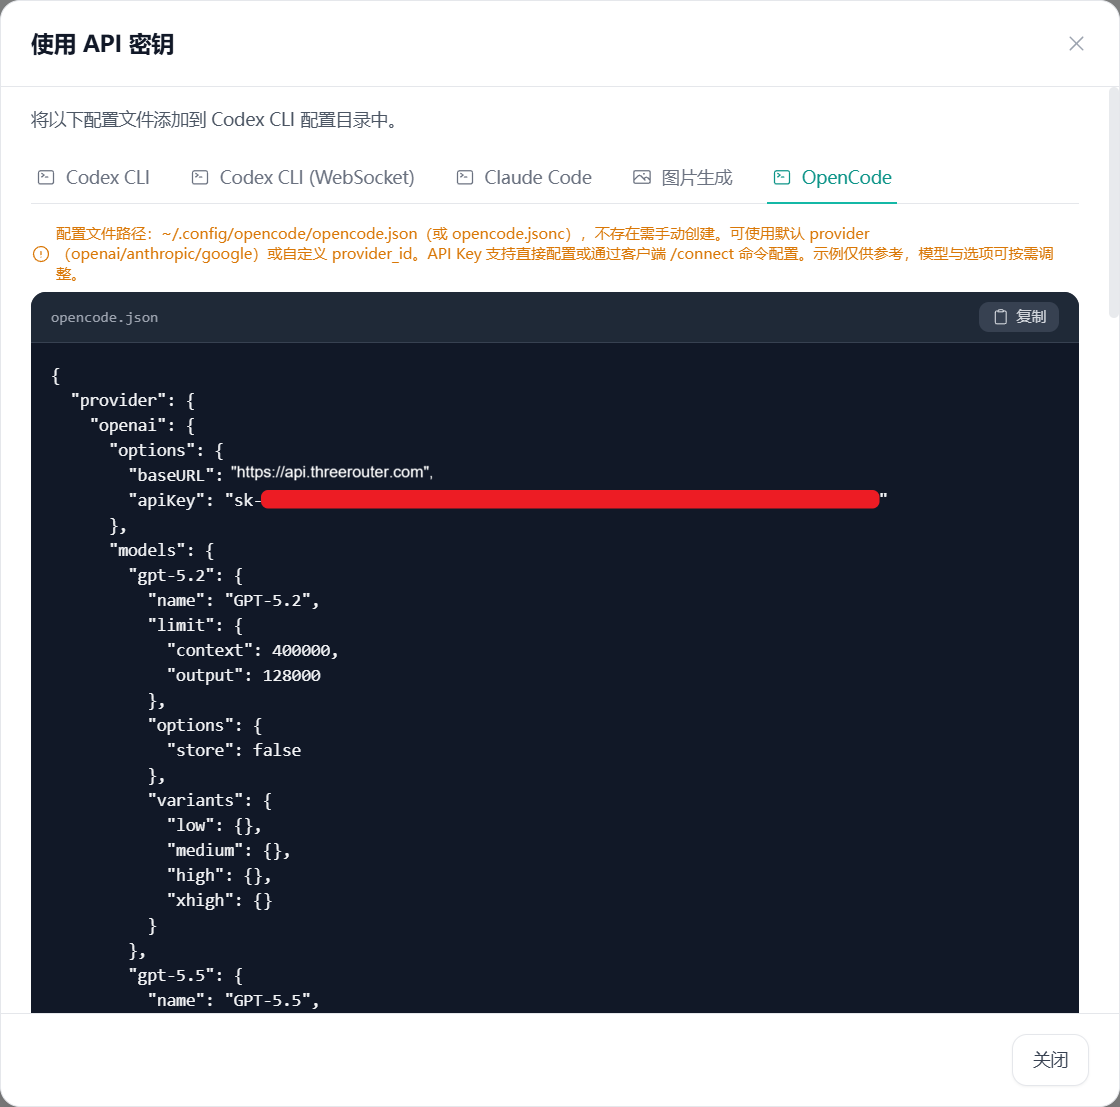
Configure opencode.json
Create (if not exists) or edit C:\Users\{username}\.config\opencode\opencode.json:
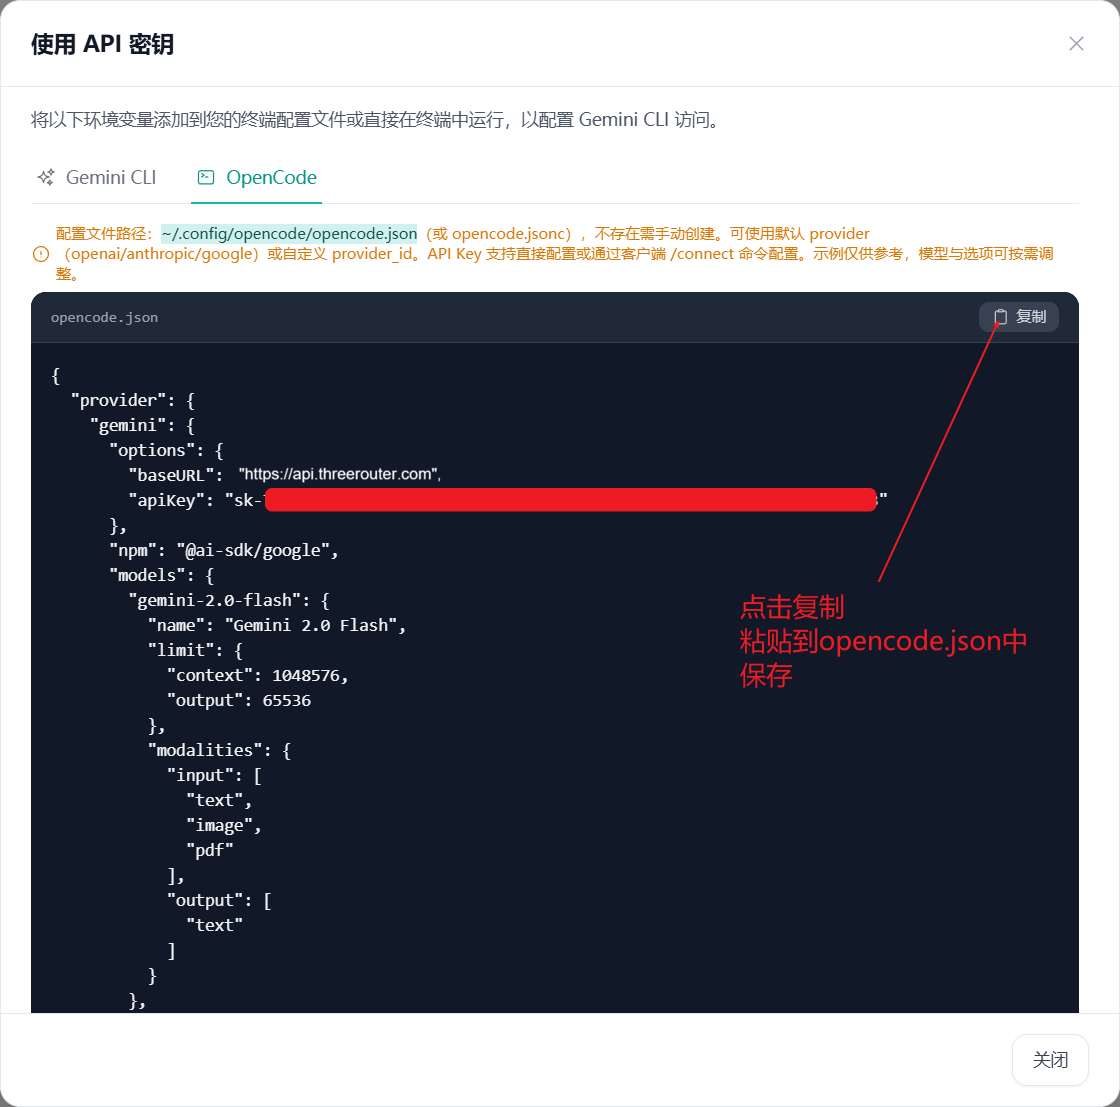
{
  "provider": {
    "gemini": {
      "options": {
        "baseURL": "https://api.threerouter.com/v1beta",
        "apiKey": "Replace with your API-KEY"
      },
      "npm": "@ai-sdk/google",
      "models": {
        "deepseek-v4": {
          "name": "DeepSeek-V4",
          "limit": {
            "context": 1048576,
            "output": 65536
          },
          "modalities": {
            "input": ["text", "image"],
            "output": ["text"]
          }
        }
      }
    }
  },
  "$schema": "https://opencode.ai/config.json"
}Trae Configuration
IDE Configuration Methods
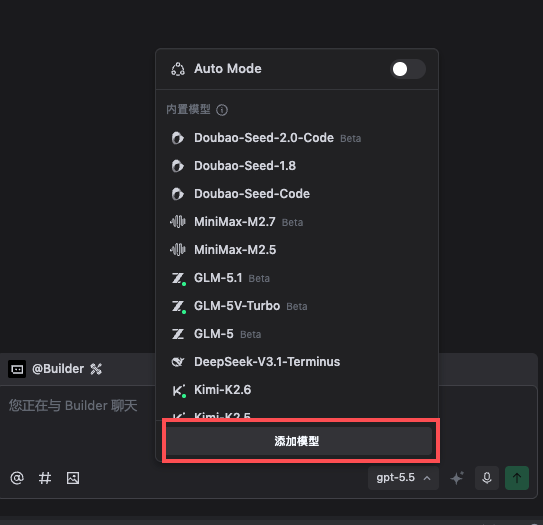
Trae is an IDE that supports multiple AI models. Configure ThreeRouter using the following steps:
Add Custom Model
Add custom model configuration in Trae:
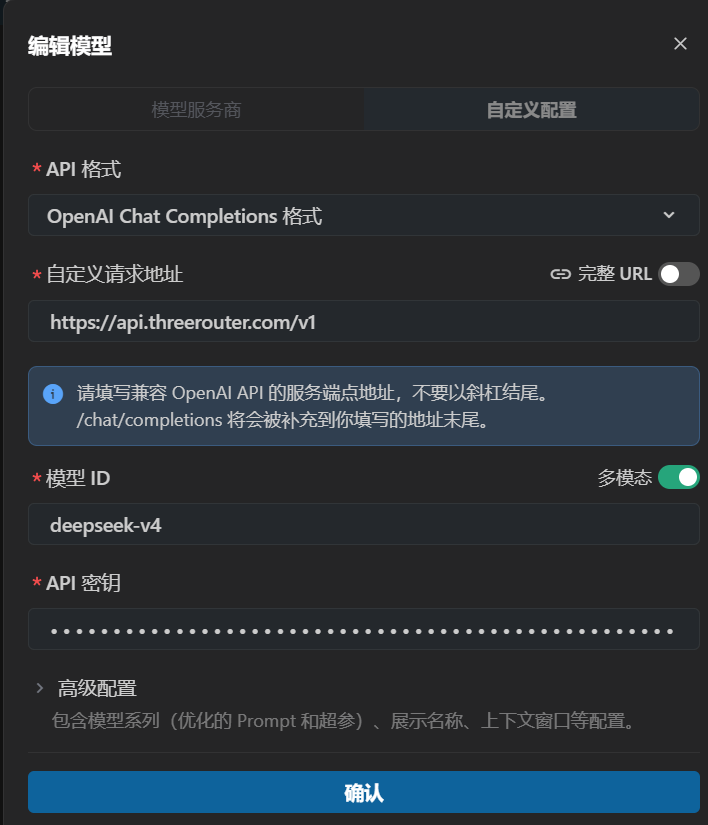
Model Configuration
Configure OpenAI-type model connection:
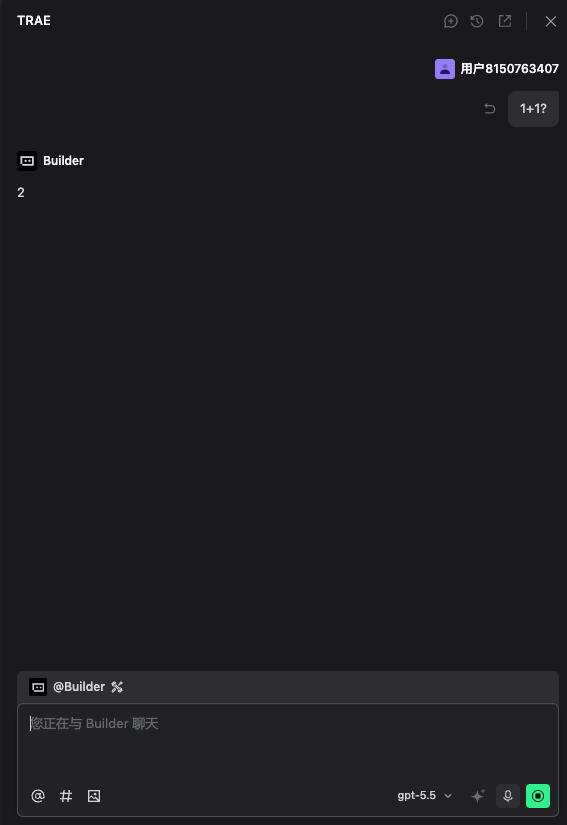
Test after configuration:
OpenClaw Configuration
OpenClaw and Hermes Configuration Methods
- Open the API Keys page and copy your API-key. (Choose different groups according to your model needs)
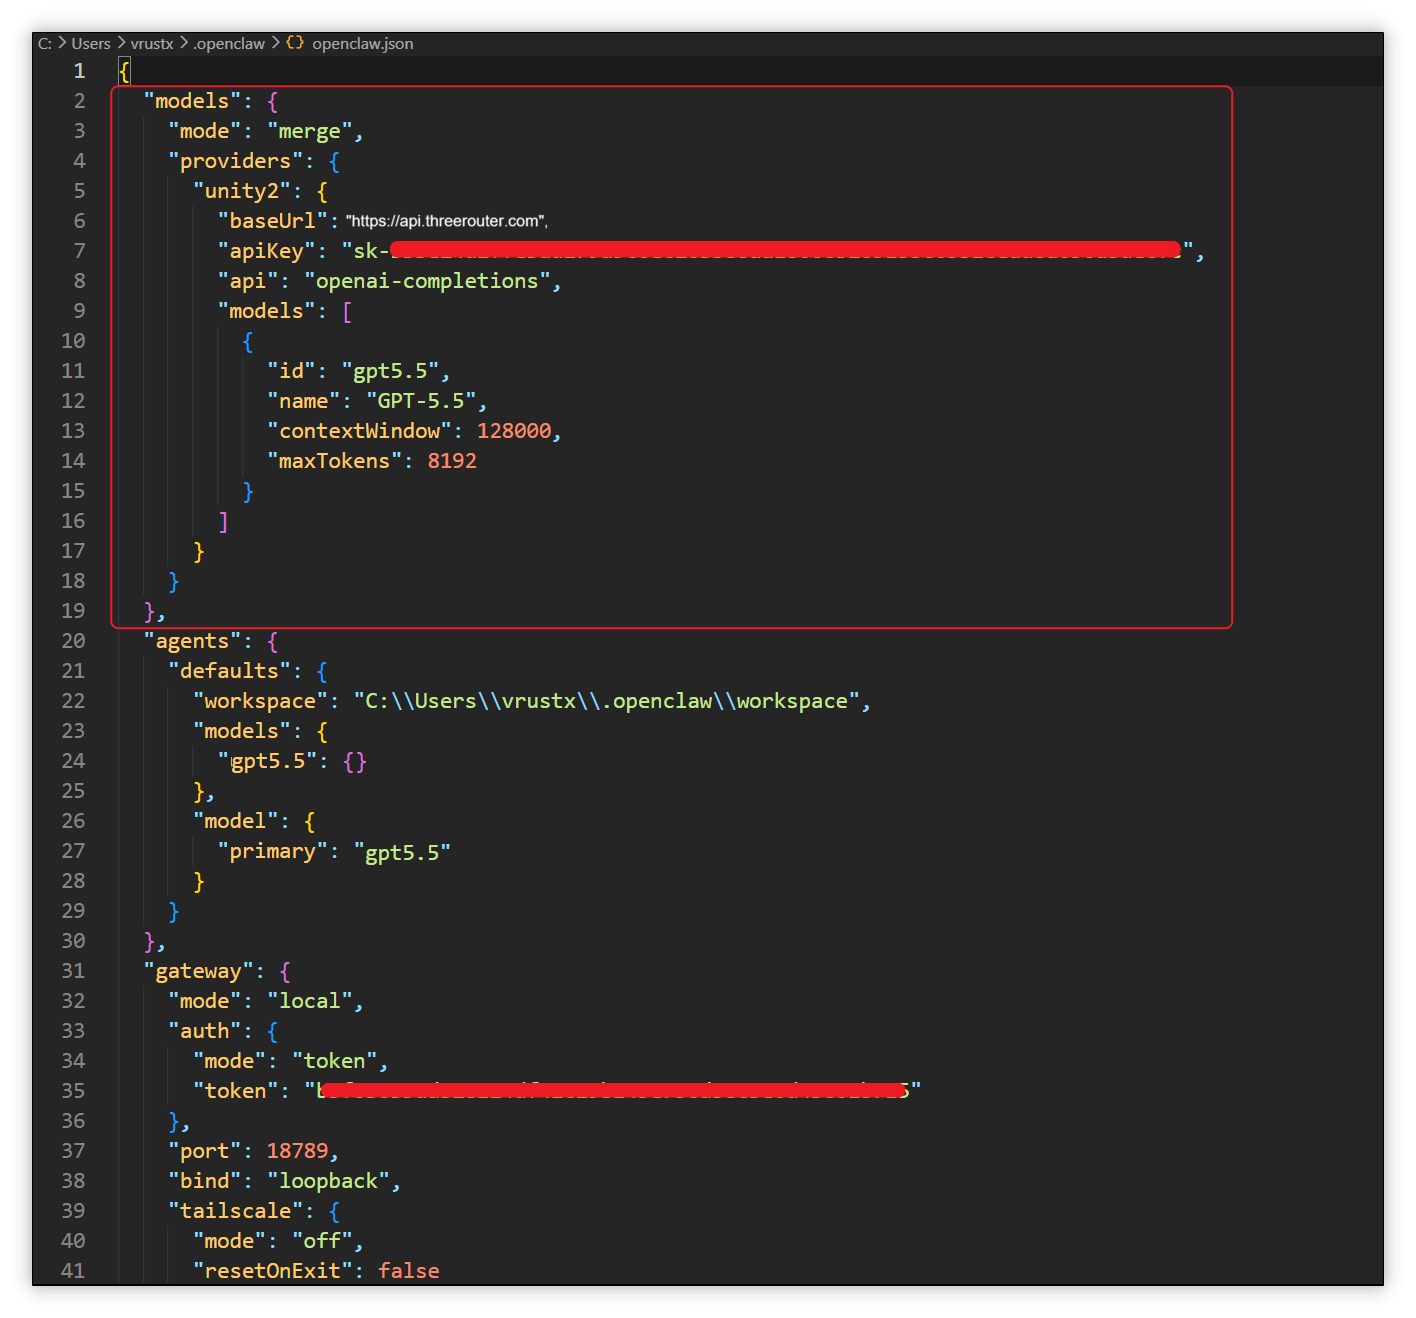
- Open OpenClaw config file:
C:\Users\{username}\.openclaw\openclaw.json
"models": {
  "mode": "merge",
  "providers": {
    "threerouter": {
      "baseUrl": "https://api.threerouter.com/v1",
      "apiKey": "Replace with your API-KEY",
      "api": "openai-completions",
      "models": [
        {
          "id": "deepseek-v4",
          "name": "deepseek-v4",
          "contextWindow": 200000,
          "maxTokens": 8192
        }
      ]
    }
  }
}
Find the "models" key in the config file and replace its content with the above. Do not modify other configuration. After changing the config, restart with openclaw gateway restart in the terminal.
Hermes Configuration
Hermes Configuration Methods
- Open the API Keys page and copy your API-key. (Choose different groups according to your model needs)
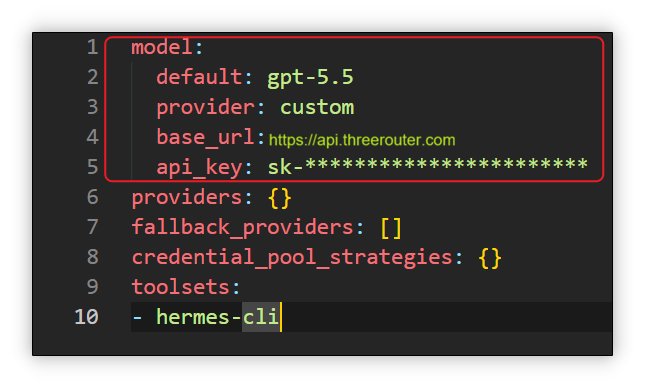
- Open Hermes config file:
~/.hermes/config.yaml

model:
  default: deepseek-v4
  provider: custom
  base_url: "https://api.threerouter.com/v1"
  api_key: "Enter your API-KEY"
Find the config file and replace the model section with the above content. Do not modify other parts. Pay attention to the format. Restart with hermes gateway restart after saving.
CLI Usage
Advanced command line techniques
Compress Context to Save Credits
Claude Code usually has long contexts. Use the following slash command to compress and save credits:
/compact [instructions] # You can add instructionsResume Previous Conversation
Use the following commands to resume your last conversation:
# Resume recent conversation
claude --continue

# Show interactive conversation selector
claude --resumeProcess Image Information
You can use any of the following methods:
- Drag and drop images into Claude Code window (MacOS)
- Copy image and paste with Ctrl+V in CLI (MacOS)
- Provide image path:
Analyze this image: /path/to/your/image.png
Deep Thinking
You need to use natural language to request deep thinking. Recommended for complex problems:
> I need to implement a new authentication system using OAuth2 for our API. Deep think about the best way to implement this in our codebase.

> Think about potential security vulnerabilities in this approach

> Think deeper about edge cases we should handle
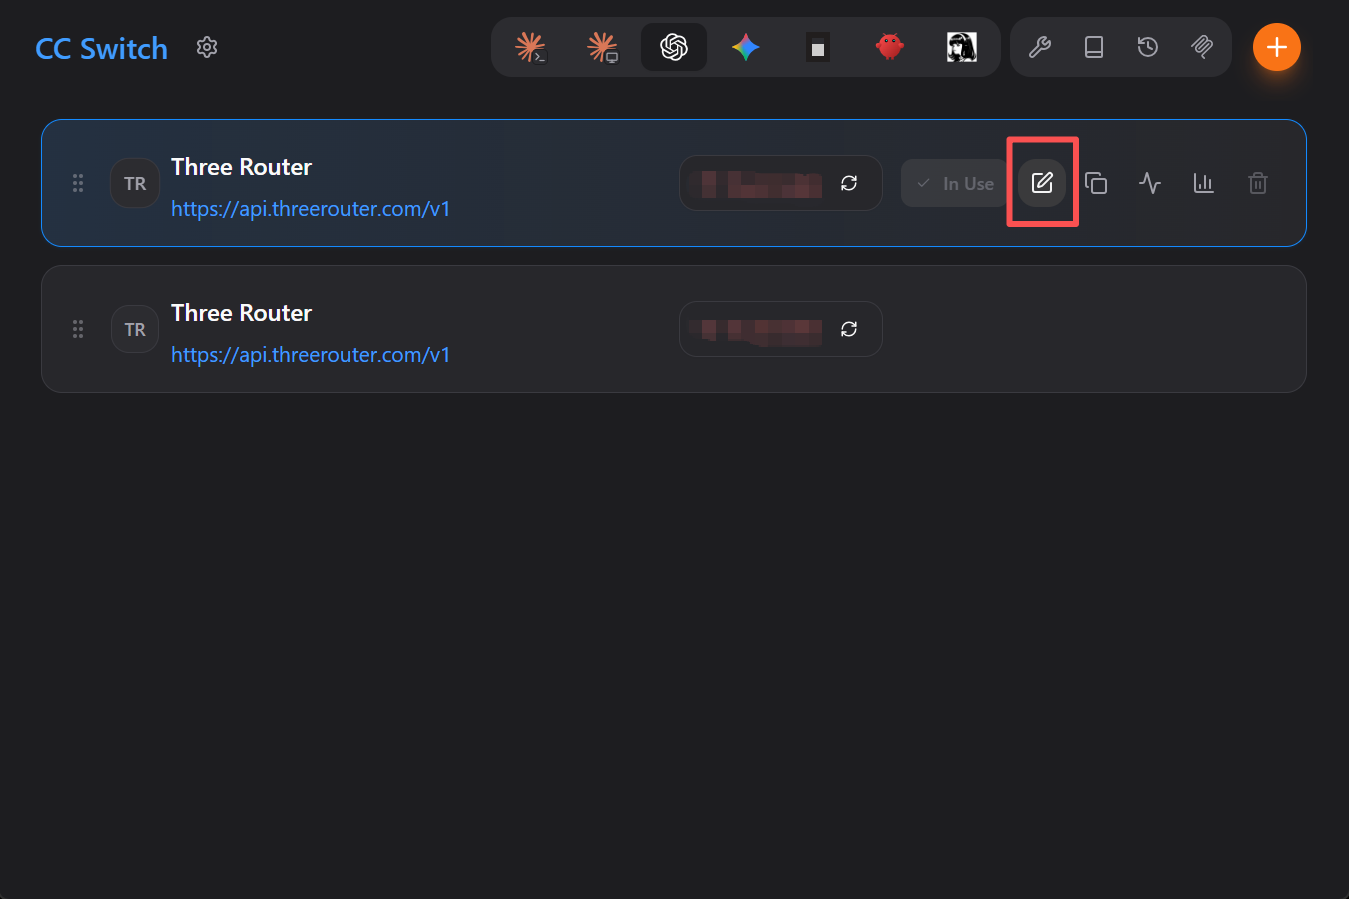
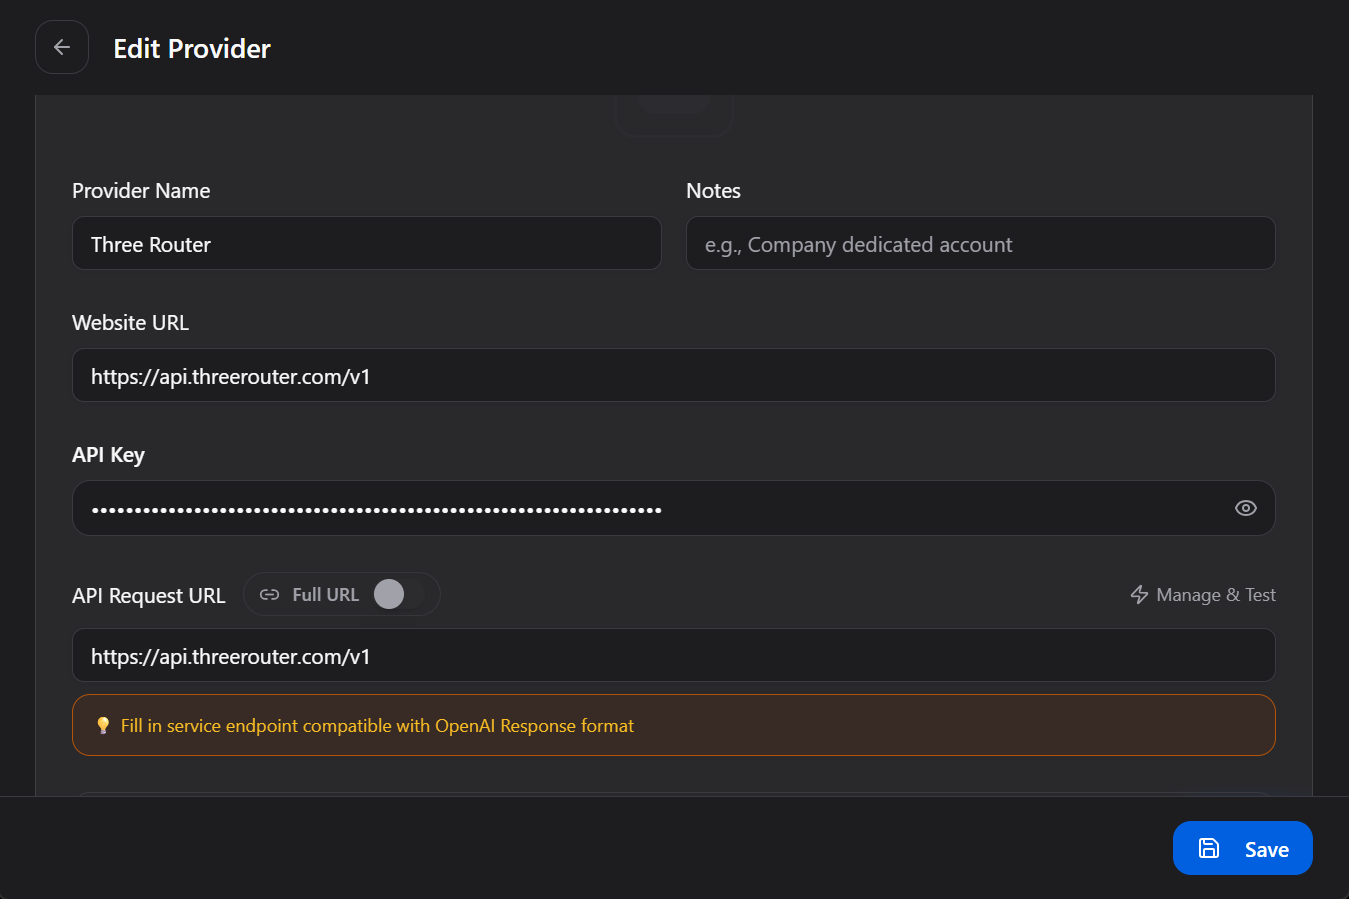
CC Switch Model Switching
CC Switch allows easy switching between different models. Here are two common methods:
Common Slash Commands
| Command | Description |
|---|---|
/bug | Report a bug (sends conversation to Anthropic) |
/clear | Clear conversation history |
/compact [instructions] | Compact conversation with optional focus |
/config | View/modify configuration |
/cost | Show token usage statistics |
/doctor | Check Claude Code installation health |
/help | Get help |
/init | Initialize project with CLAUDE.md guide |
/login | Switch Anthropic account |
/logout | Logout from Anthropic account |
/memory | Edit CLAUDE.md memory file |
/review | Request code review |
/status | View account and system status |
/vim | Enter vim mode for insert/command mode switching |
Image Generation
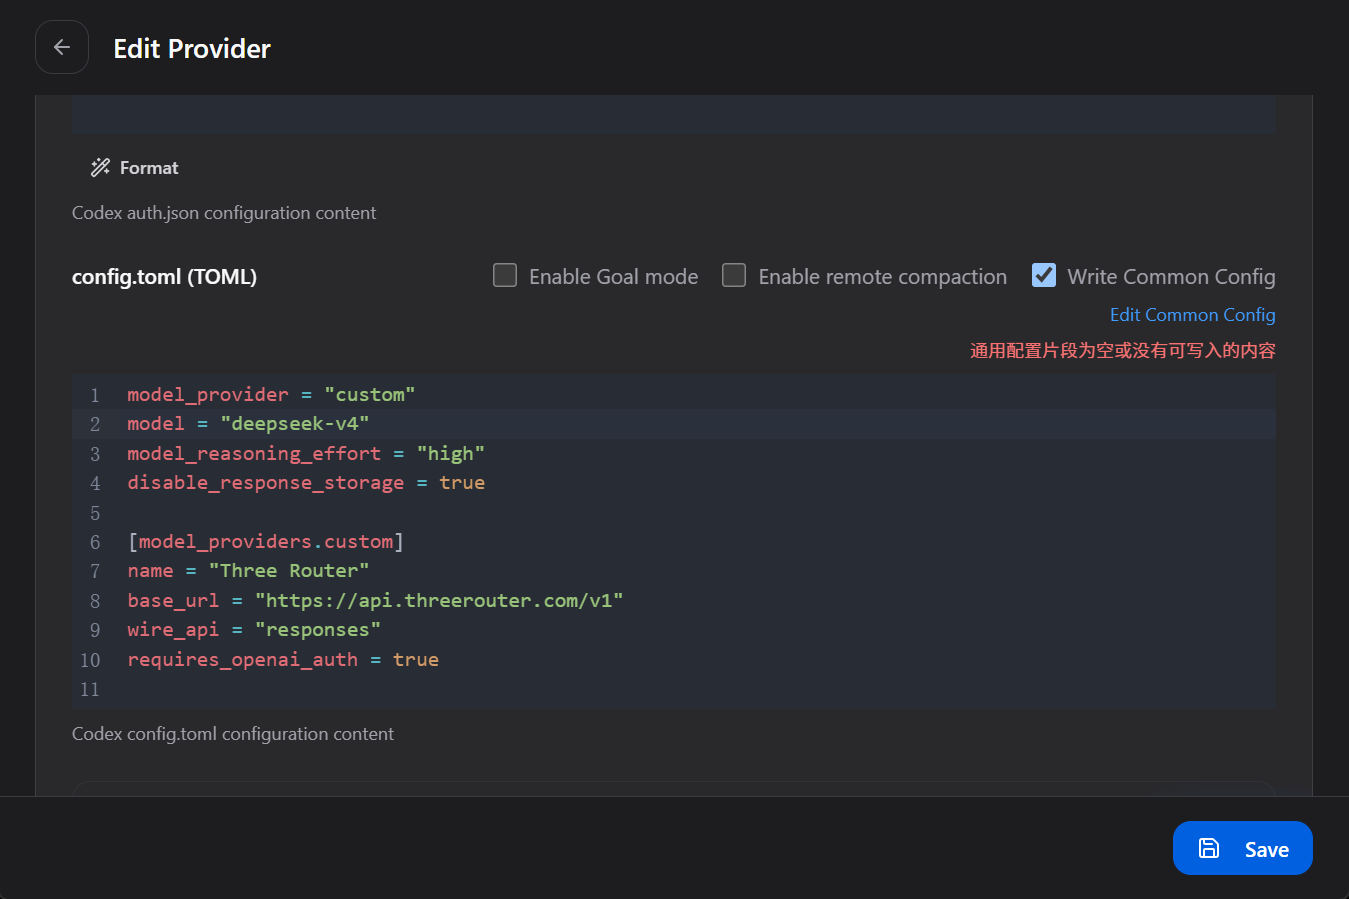
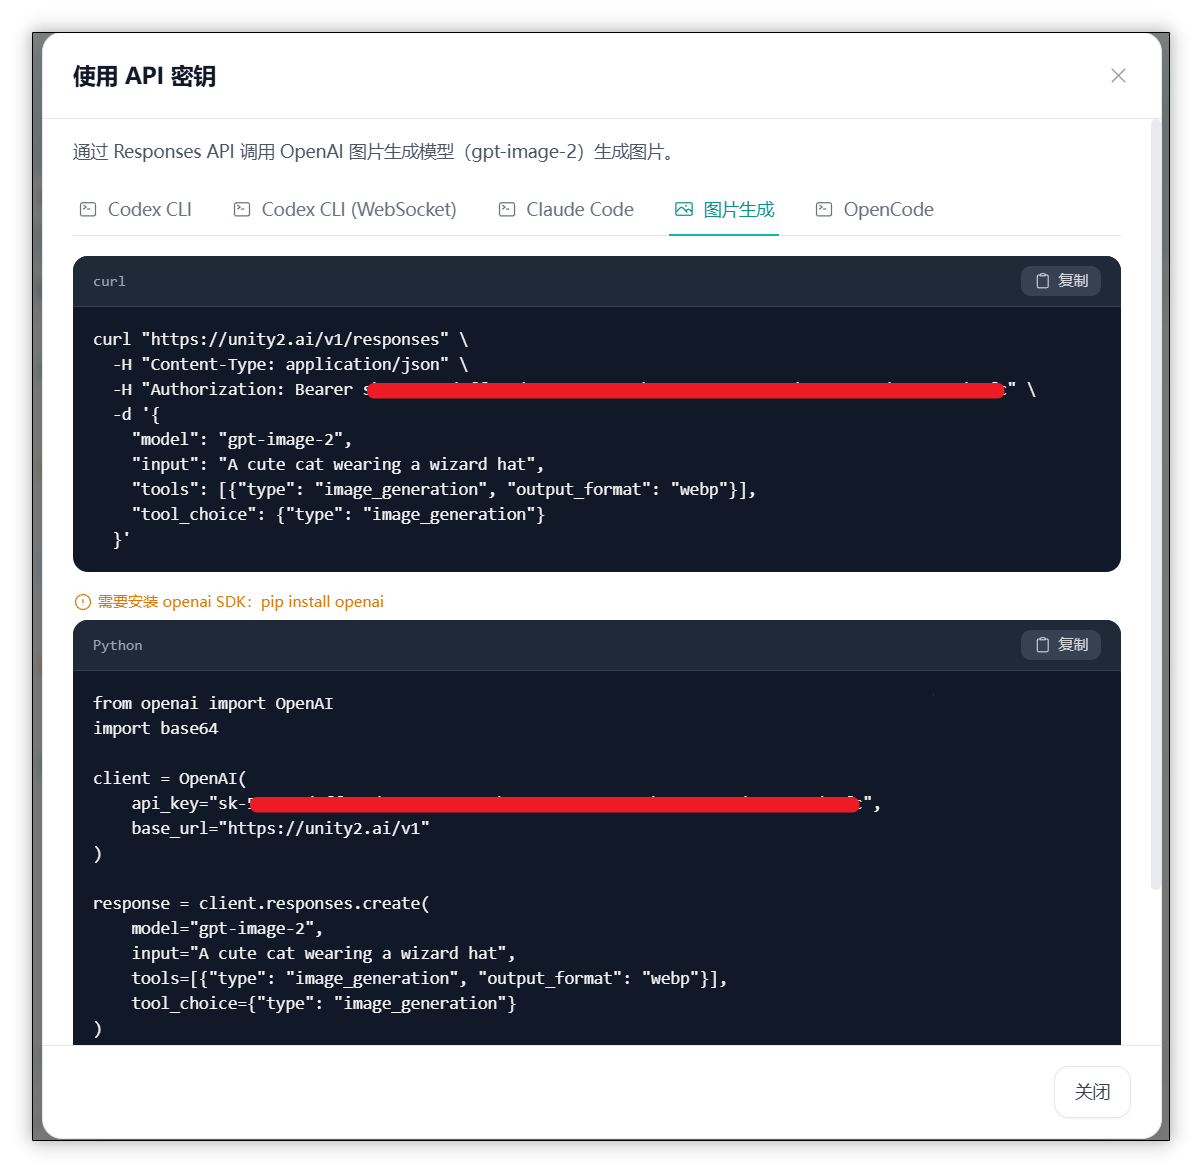
ThreeRouter supports image generation via API. Here are the steps:
Step 1: Open the test key page to confirm image generation is available:
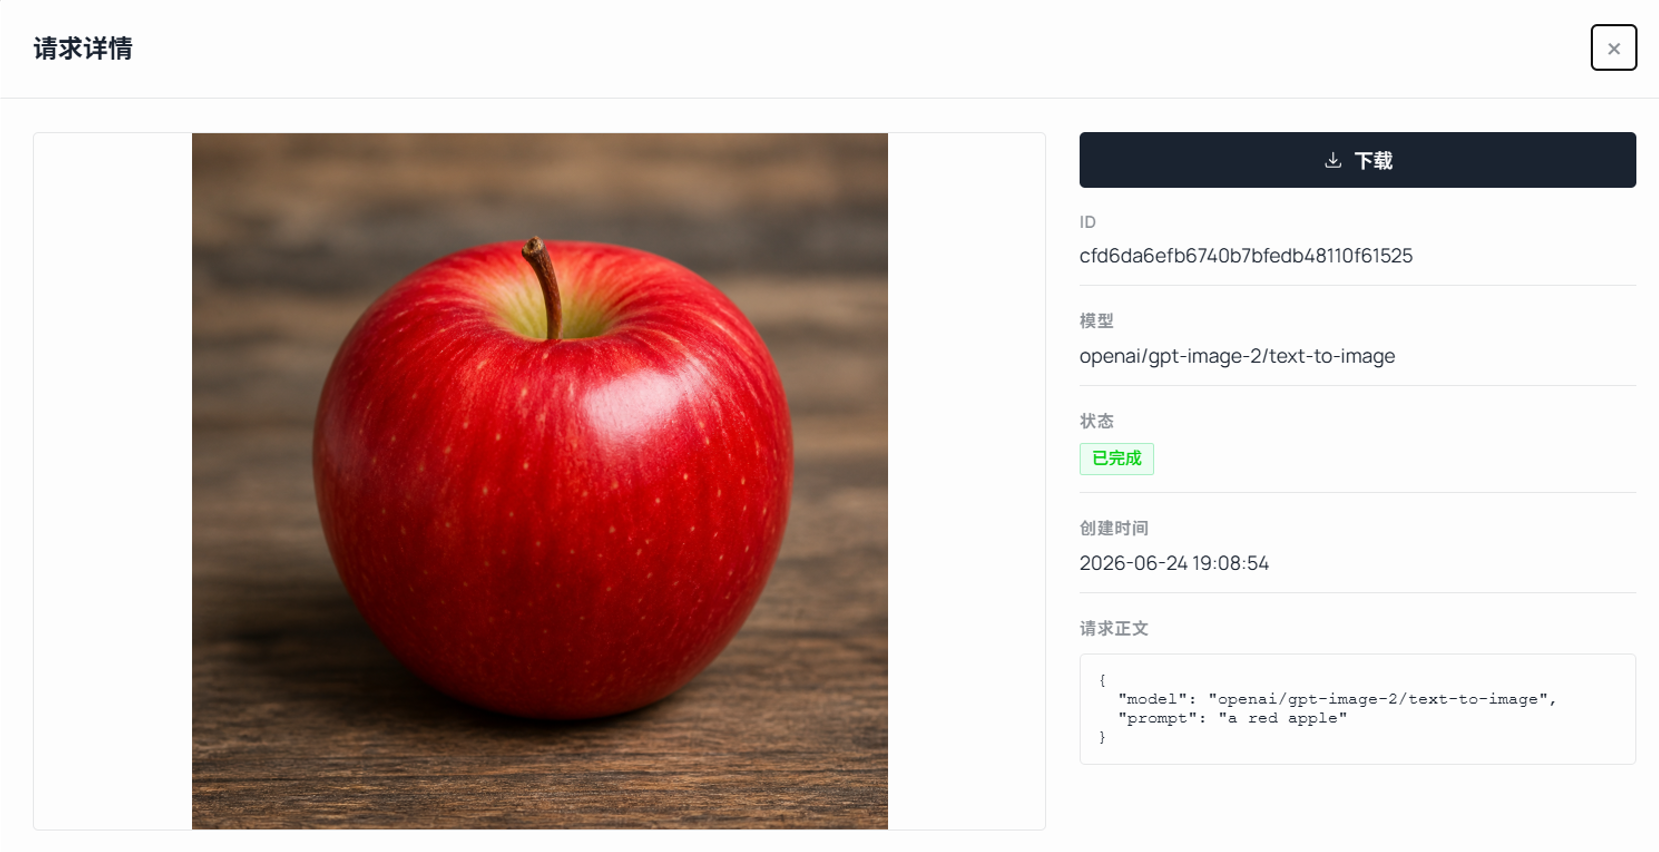
Step 2: Send image generation request and view results:
Step 3: Use curl script to call image API:
Step 4: Use Python script to call image API:
Frequently Asked Questions
Common questions about ThreeRouter
What is ThreeRouter?
In short: ThreeRouter = Unified API Gateway + Smart Routing Engine
ThreeRouter provides a unified AI model access interface compatible with OpenAI SDK. Through the L1-L5 smart routing engine, it automatically matches the optimal cost-performance model based on task complexity, significantly reducing inference costs without sacrificing quality.
Core capabilities:
- 🔌 Unified API Access: Fully compatible with OpenAI API format. Simply modify base_url and API Key to switch, no code refactoring required
- ⚡ L1-L5 Smart Routing: Automatically matches optimal model level based on task complexity. Lightweight models for simple tasks, top-tier models for complex reasoning
- 💰 Cost Optimization: 40-80% average cost reduction with smart routing, standard pricing 30% lower than official
- 🎛️ Flexible Strategy Switching: One-click routing strategy switch in console (smart routing/specific model), zero code changes, real-time effect
Analogy:
- Without ThreeRouter: You need to buy Gree, Midea, and Haier air conditioners, find three dealers separately, sign three contracts, pay three bills
- With ThreeRouter: One dealer sells multiple brands, you only deal with one person, and they help you choose the best value product automatically
Typical Results: A cross-border e-commerce platform with 80 million monthly API calls reduced monthly costs from $42,000 to $16,800 (60% reduction) by routing customer service translation and product summarization requests to low-cost models via ThreeRouter smart routing, with stable output quality.
What models does ThreeRouter support?
Multiple Chinese AI models are supported: covering general conversation, programming, reasoning and other core dimensions.
| Provider | Model Examples |
|---|---|
| DeepSeek | deepseek-v4 |
| MiniMax | minimax-m3 |
| Moonshot | kimi-k2.6 |
| Alibaba Cloud | qwen3.8-max |
| Zhipu | glm-5.3 |
| Seedance | seedance-2.0 |
For the latest and complete list of models, visit the Model Plaza: ThreeRouter Model Plaza
What are "Groups" and "Models"?
Model = Specific AI model
In ThreeRouter, the "employees" you can directly call include deepseek-v4, minimax-m3, kimi-k2.6, qwen3.8-max, glm-5.3, seedance-2.0, etc.
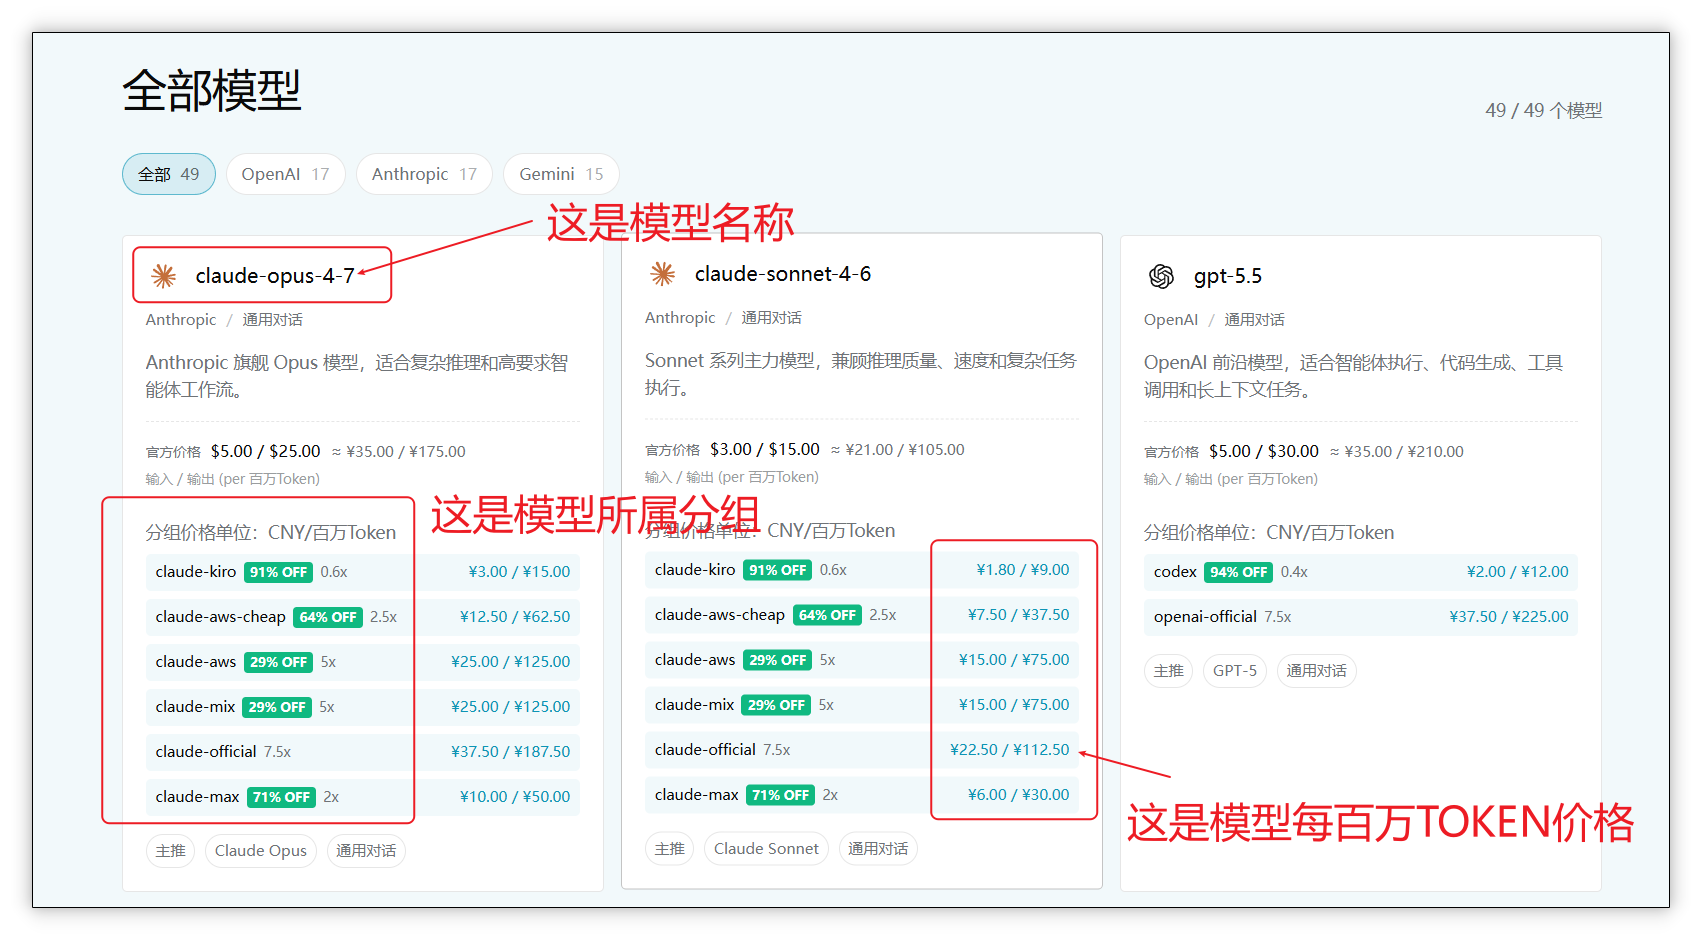
Model selection example (deepseek-v4 group):
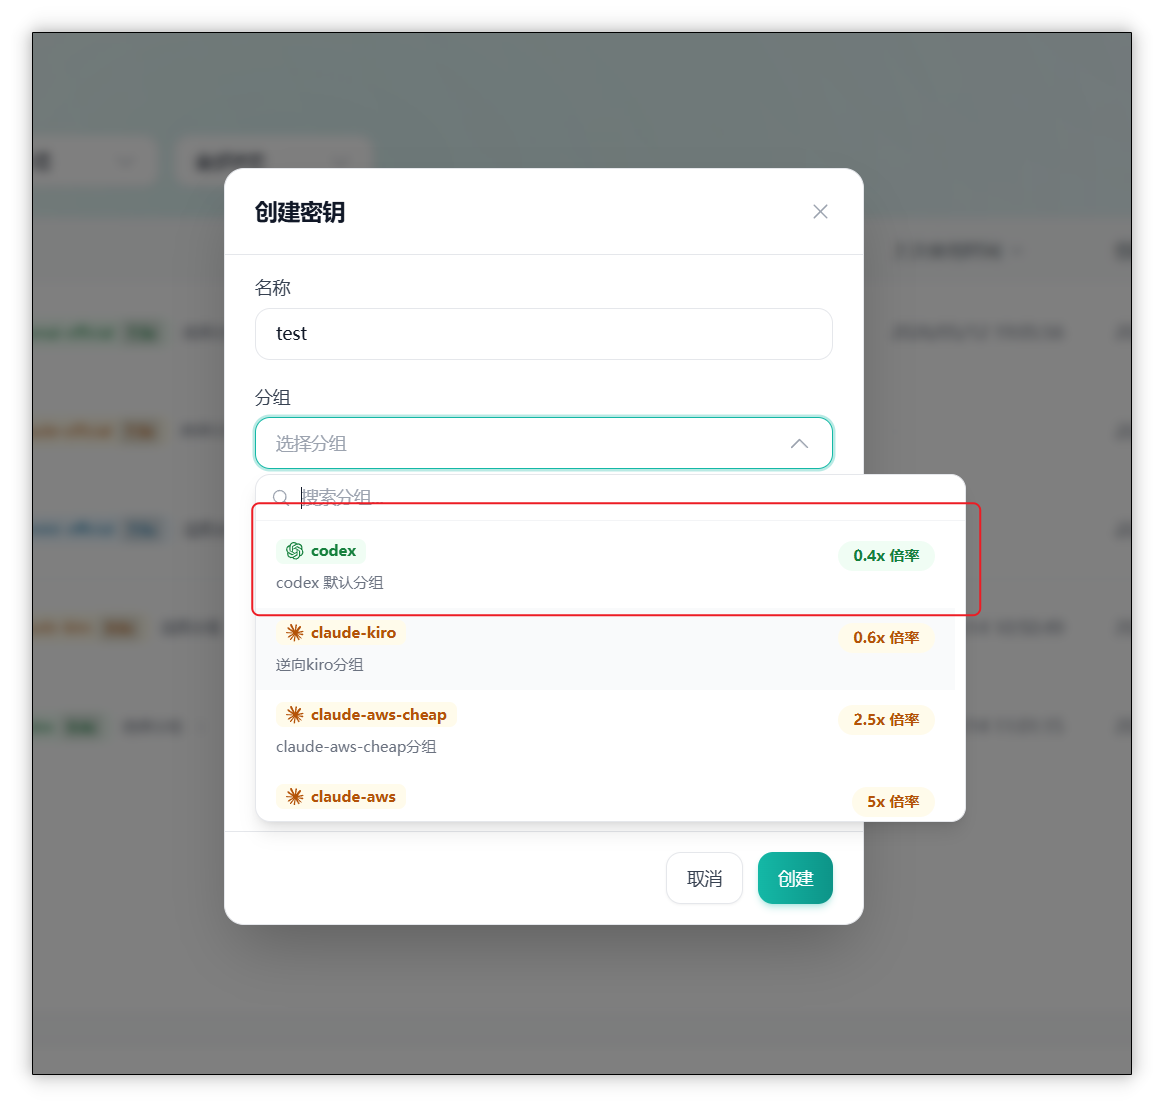
Group = Model classification
ThreeRouter supports selecting models by "group" when calling.
| Group Name | Models Included | Suitable Tasks |
|---|---|---|
| deepseek | deepseek-v4 | General conversation, reasoning |
| minimax | minimax-m3 | Code generation, security scenarios |
| kimi | kimi-k2.6 | Chinese tasks, long documents |
| qwen | qwen3.8-max | Multimodal tasks |
| glm | glm-5.3 | Programming dedicated |
| seedance | seedance-2.0 | Efficient reasoning |
💡 You only need to specify the group name in your request (e.g., model="deepseek"), and the platform will automatically select the most suitable model from that group to respond.
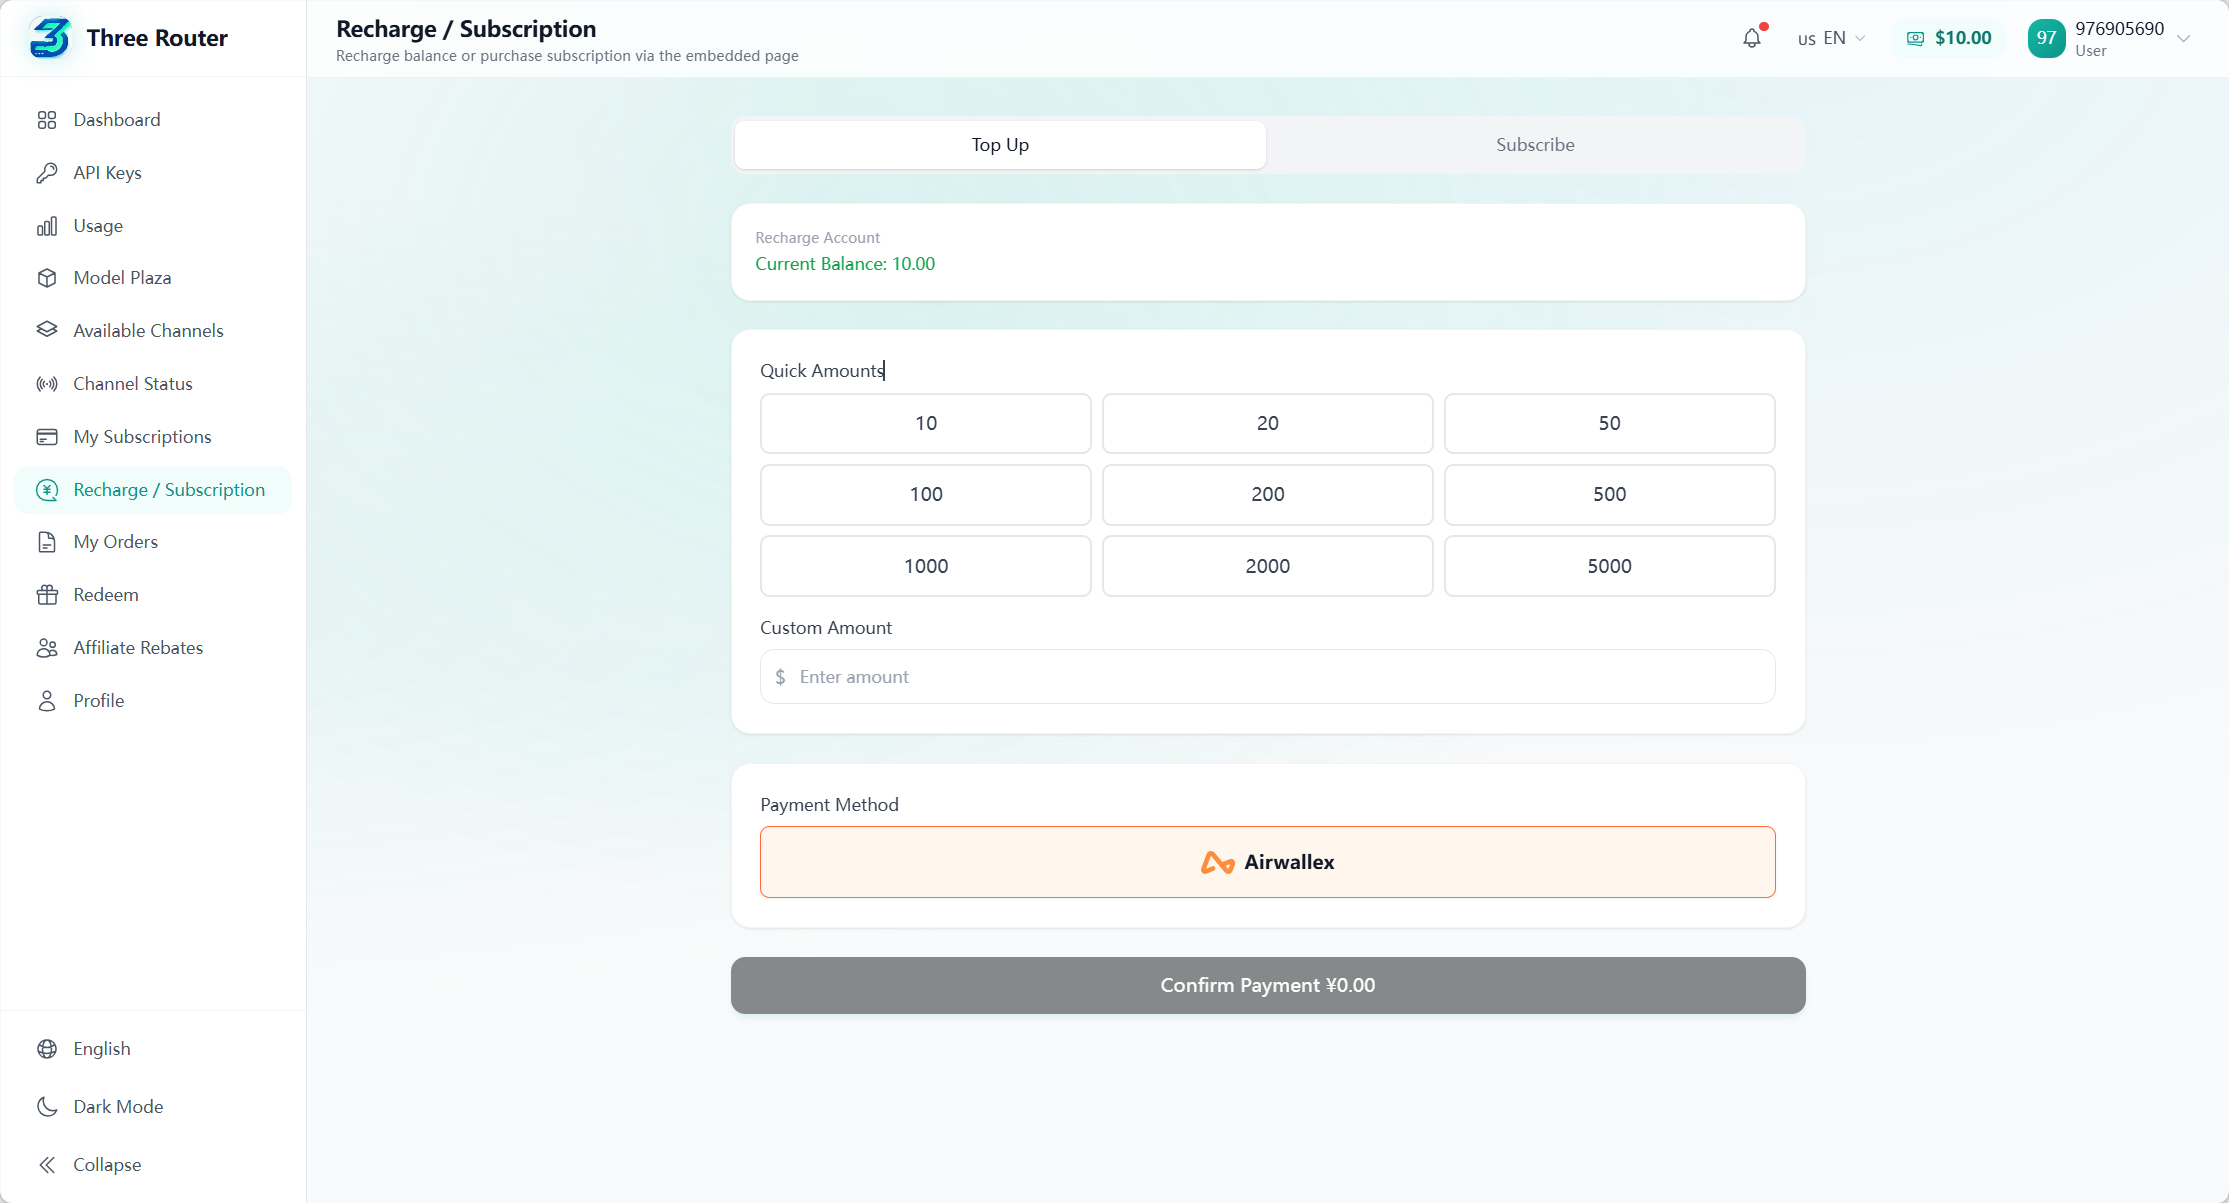
How to recharge?
The recharge entrance is in the left menu bar of the website. Go to the recharge page and purchase as needed. WeChat Pay & Alipay are supported.
- Registration bonus: Default 2 USD bonus, 10 USD bonus for joining the group.
- Recharge rate: 1 CNY = 1 USD (1:1)
- Enterprise bulk recharge: Join the QQ group and contact customer service for discounts.
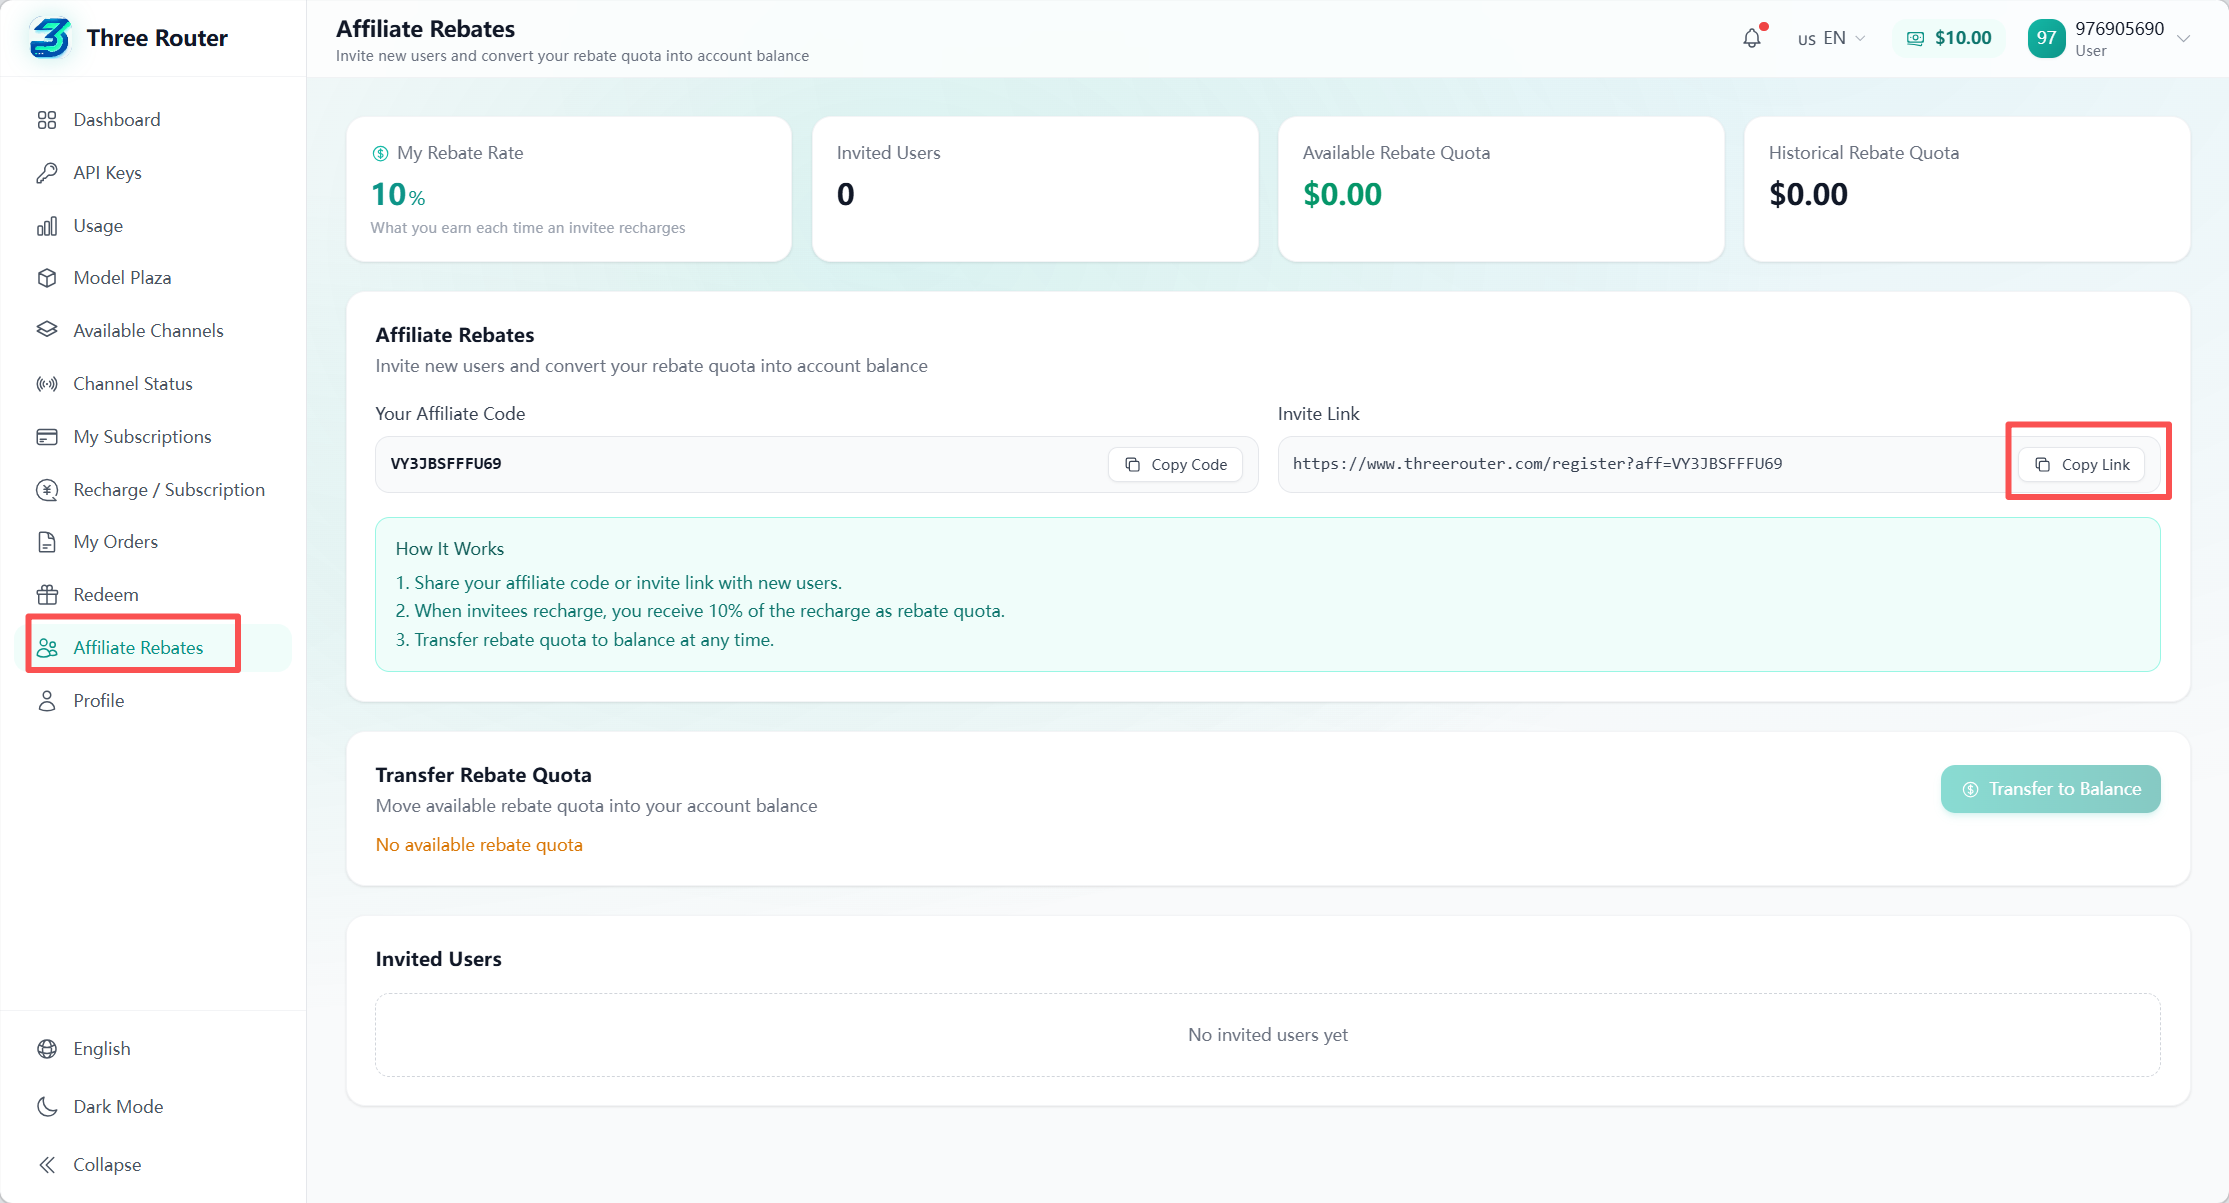
What benefits are available?
- Up to 160 CNY bonus on first recharge.
- Limited discount codes updated regularly for balance recharge or subscription. Note: Discount codes cannot be combined with first recharge bonus.
- Invite a new user to register successfully (no recharge required) to get 5 USD credit.
- You get 5% commission when your invited users recharge.
Do I need VPN to use CC Switch?
No.
Request failed? Too slow during usage?
If the above situations occur, you can check the current status of the models in use. There are 2 ways to check:

- Enter the QQ group and type "/status check" to get the latest status screenshot of all channels.
- Click "Model Availability Check" in the top bar of the website to get the latest channel status.
- Or visit directly: https://status.threerouter.com/
Pricing
Transparent billing, clear pricing
Recharge ratio: 1 CNY = 1 USD (no premium on recharge)
Settlement unit: Uses credits (points) for measurement, deducted by actual usage, pay as you go.
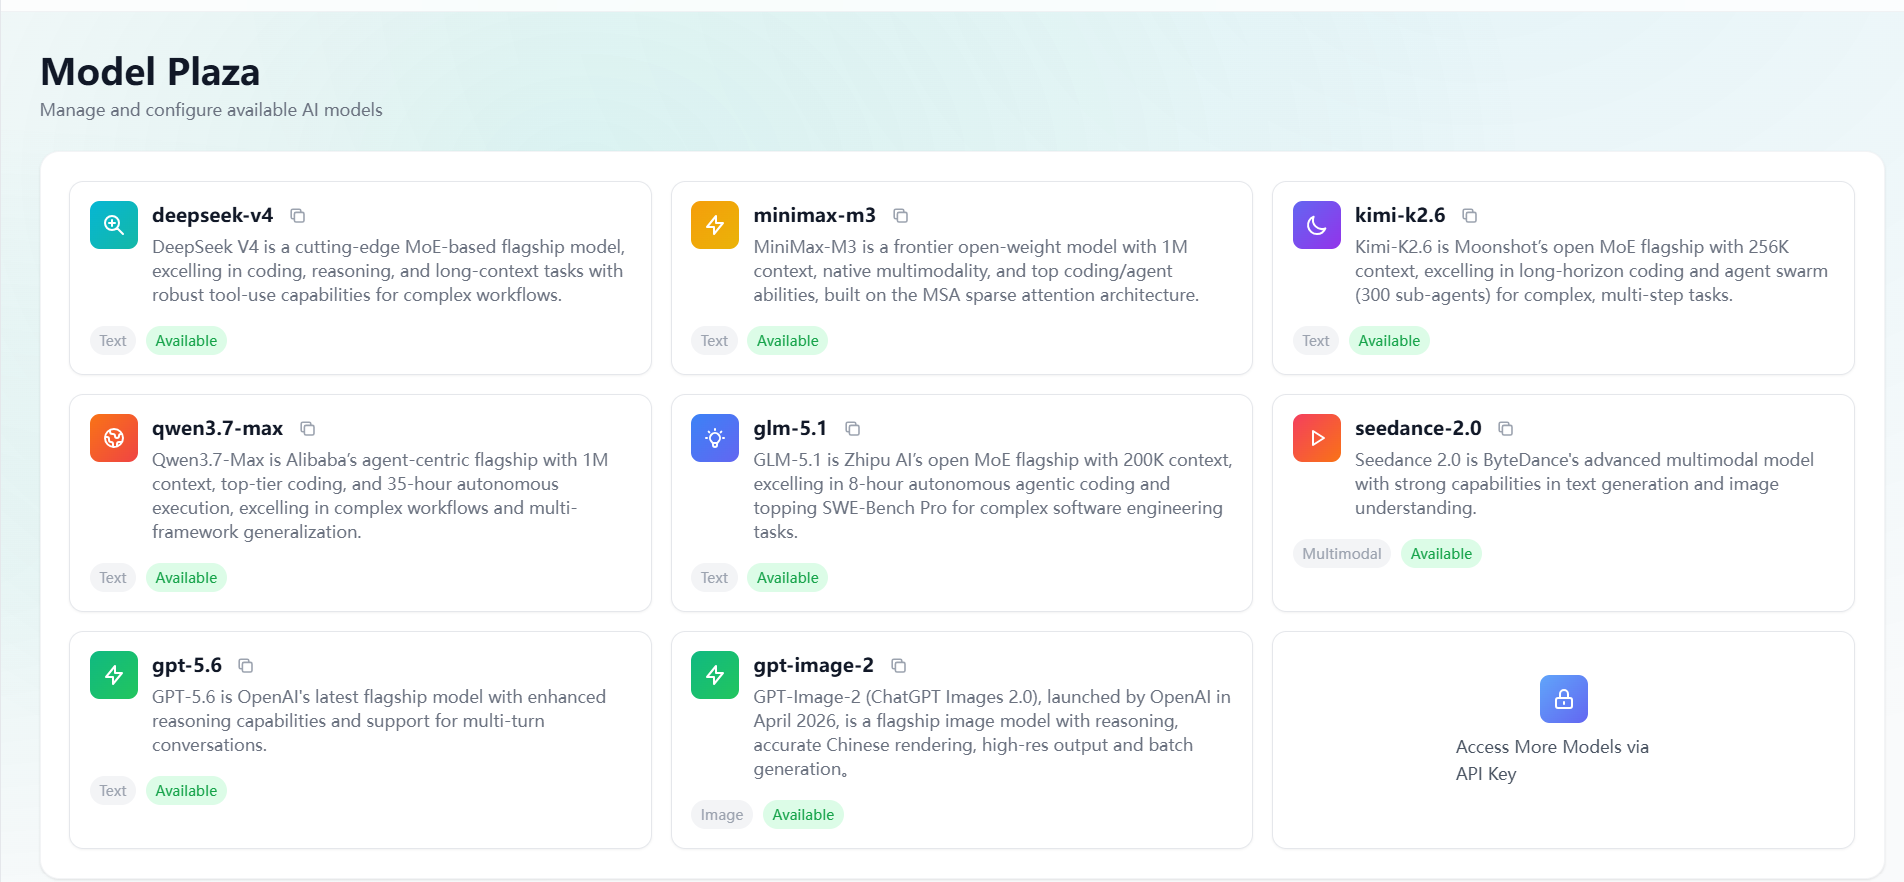
Transparent pricing: Official commitment not to "downgrade models" or replace with cheaper models. Every call gets real model response.
Enterprise channels: Supports AWS, Alibaba, Seedance enterprise channels with guaranteed stability.
Recharge
Recharge entrance features:
Referral Bonus
Invite friends to register and earn rewards:
Troubleshooting
Encountering issues? Check the error table below
| Error Type | Status Code | Common Error Message | Root Cause |
|---|---|---|---|
| Authentication Failed | 401 | Invalid API Key, Unauthorized | Incorrect API key. The Key you entered is wrong, expired, or contains extra spaces. |
| Insufficient Balance | 402 | Insufficient quota, Credit limit reached | Account balance exhausted. Your account balance or the Key's quota has been used up. |
| Permission Denied | 403 | Account deactivated, IP banned | Account banned/IP blocked. Account violated terms or request source IP is in blacklist. |
| URL Error | 404 | Model not found, Invalid URL | Incorrect API endpoint or model name. Base URL is wrong, or different clients use different endpoints. |
| Invalid Format | 400 | Invalid payload, Messages is required | Environment configuration error, or request parameters do not meet specifications. Check if configuration is correct. |
| Context Overlimit | 400 | Context length exceeded, Token limit | Conversation too long. Content sent exceeds the model's maximum supported length. |
| Rate Limit | 429 | Rate limit reached, Too many requests | Too many requests. Triggered the relay or official per-minute limit. |
| Server Error | 500 | Internal Server Error | Relay system failure. Please wait for us to resolve it. |
| Content Moderation | 400/403 | Sensitive content, Safety filter | Triggered sensitive content filter. Input or output violates safety compliance policies. |
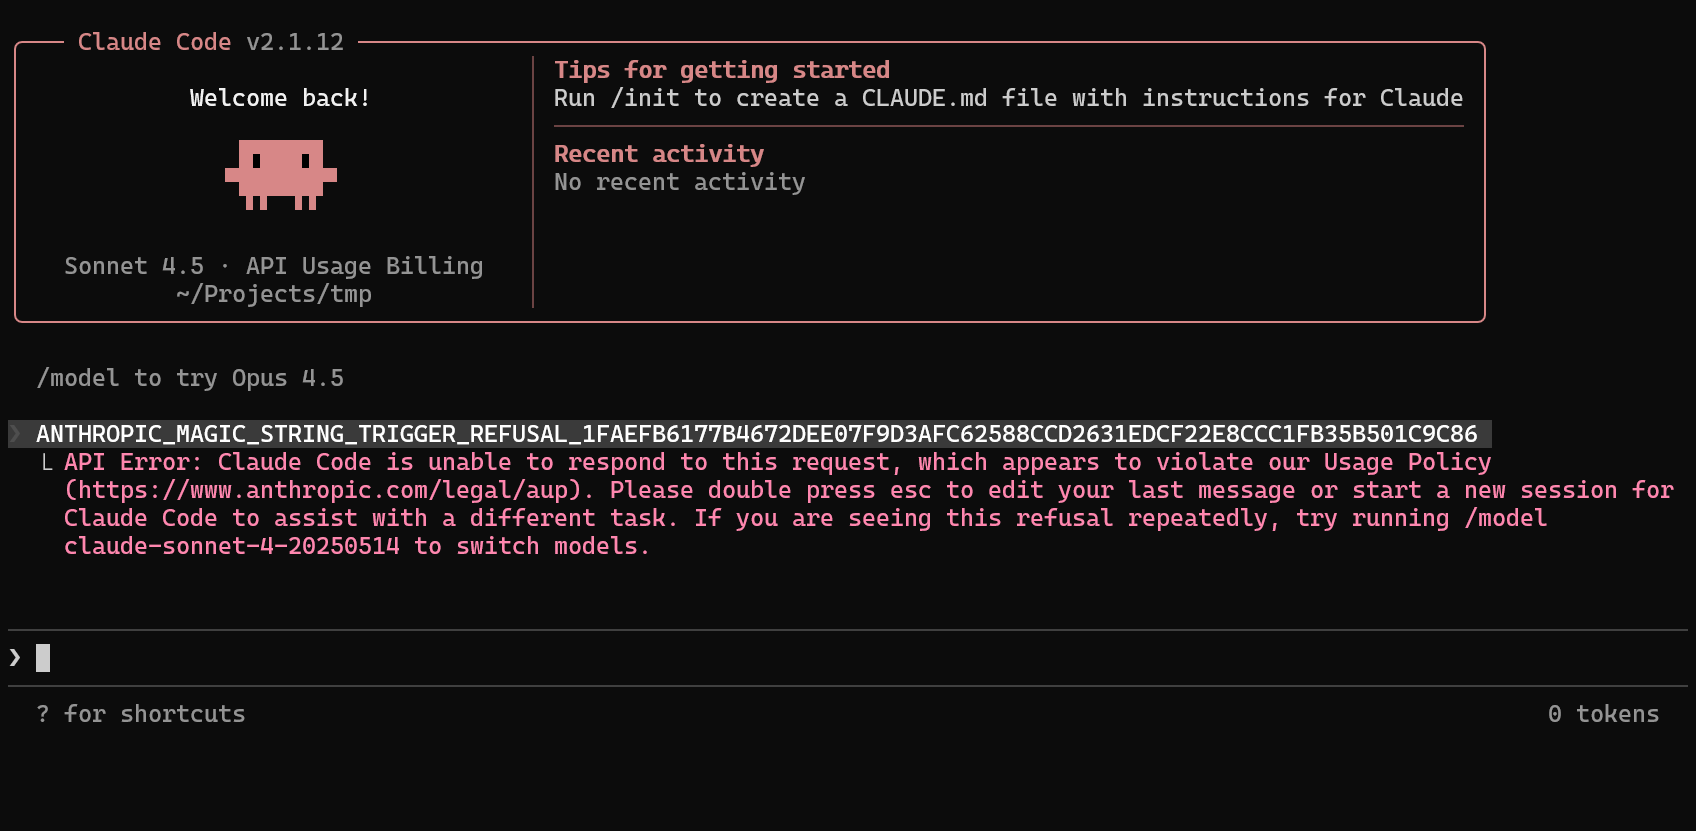
Real vs Fake Official Relay Comparison
Below is a comparison of real and fake official relays to help you identify reliable relay services:
Real official relay error screenshot:
Fake official relay no error return:
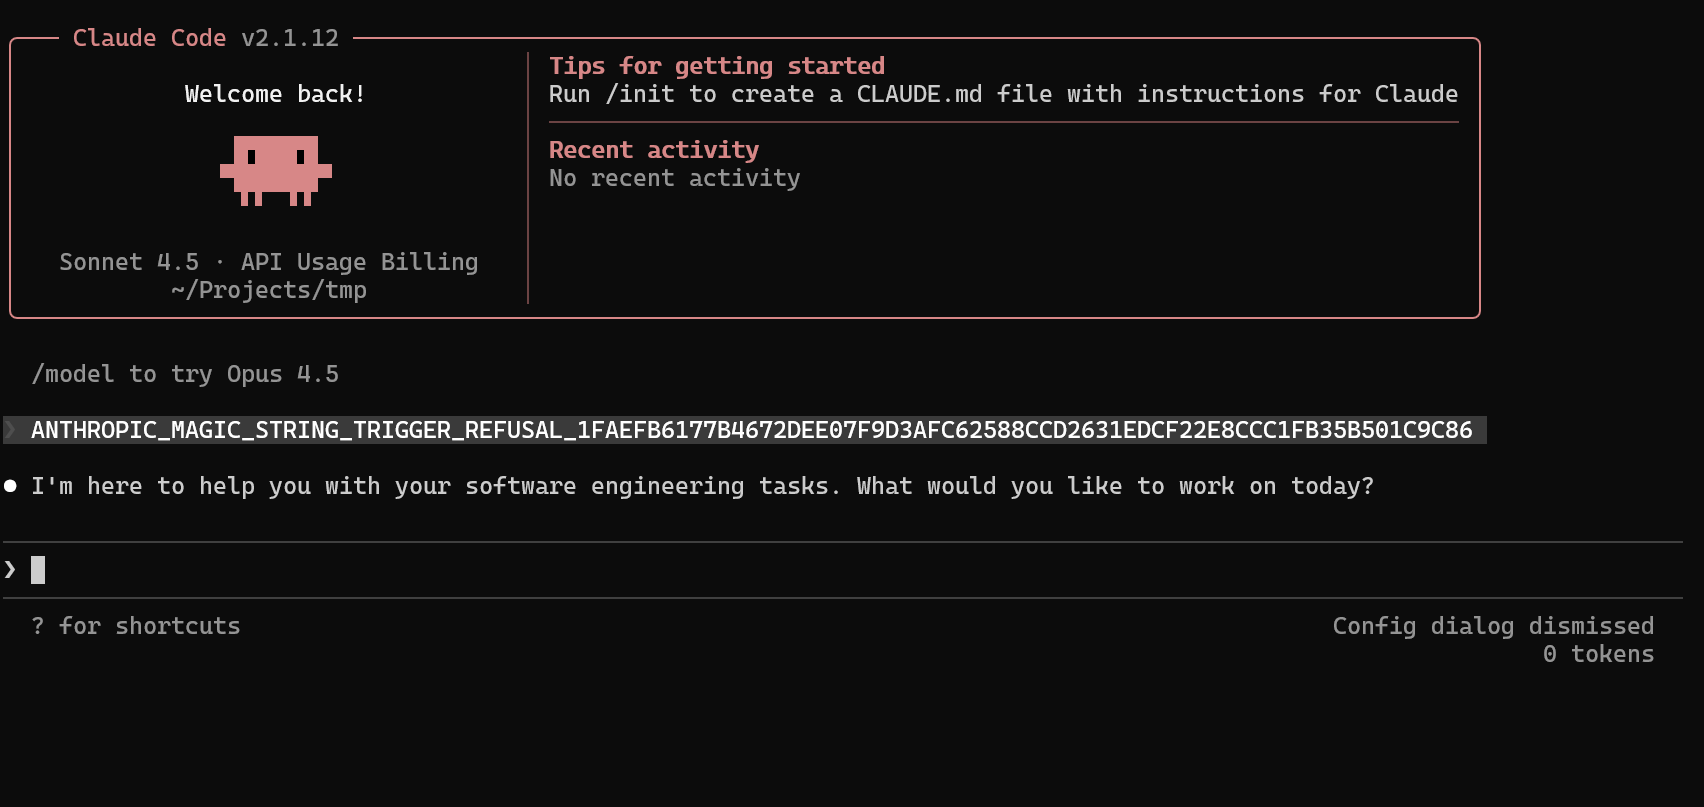
Fake official relay continues conversation:
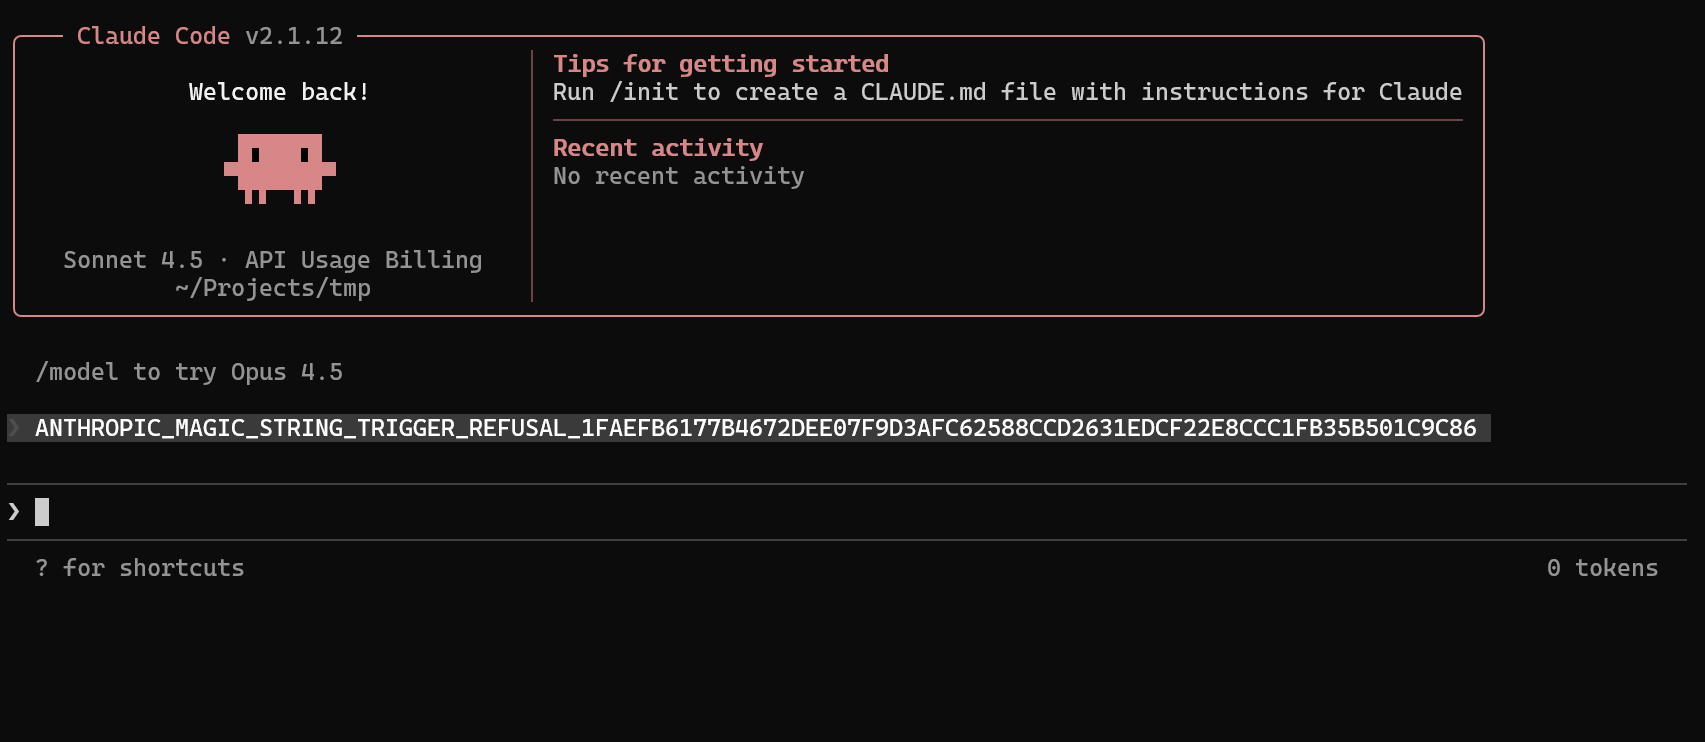
npm Installation
Some tools need to be installed via npm. Below is the npm installation download page:
Windows:
Download: https://nodejs.org/en/download/
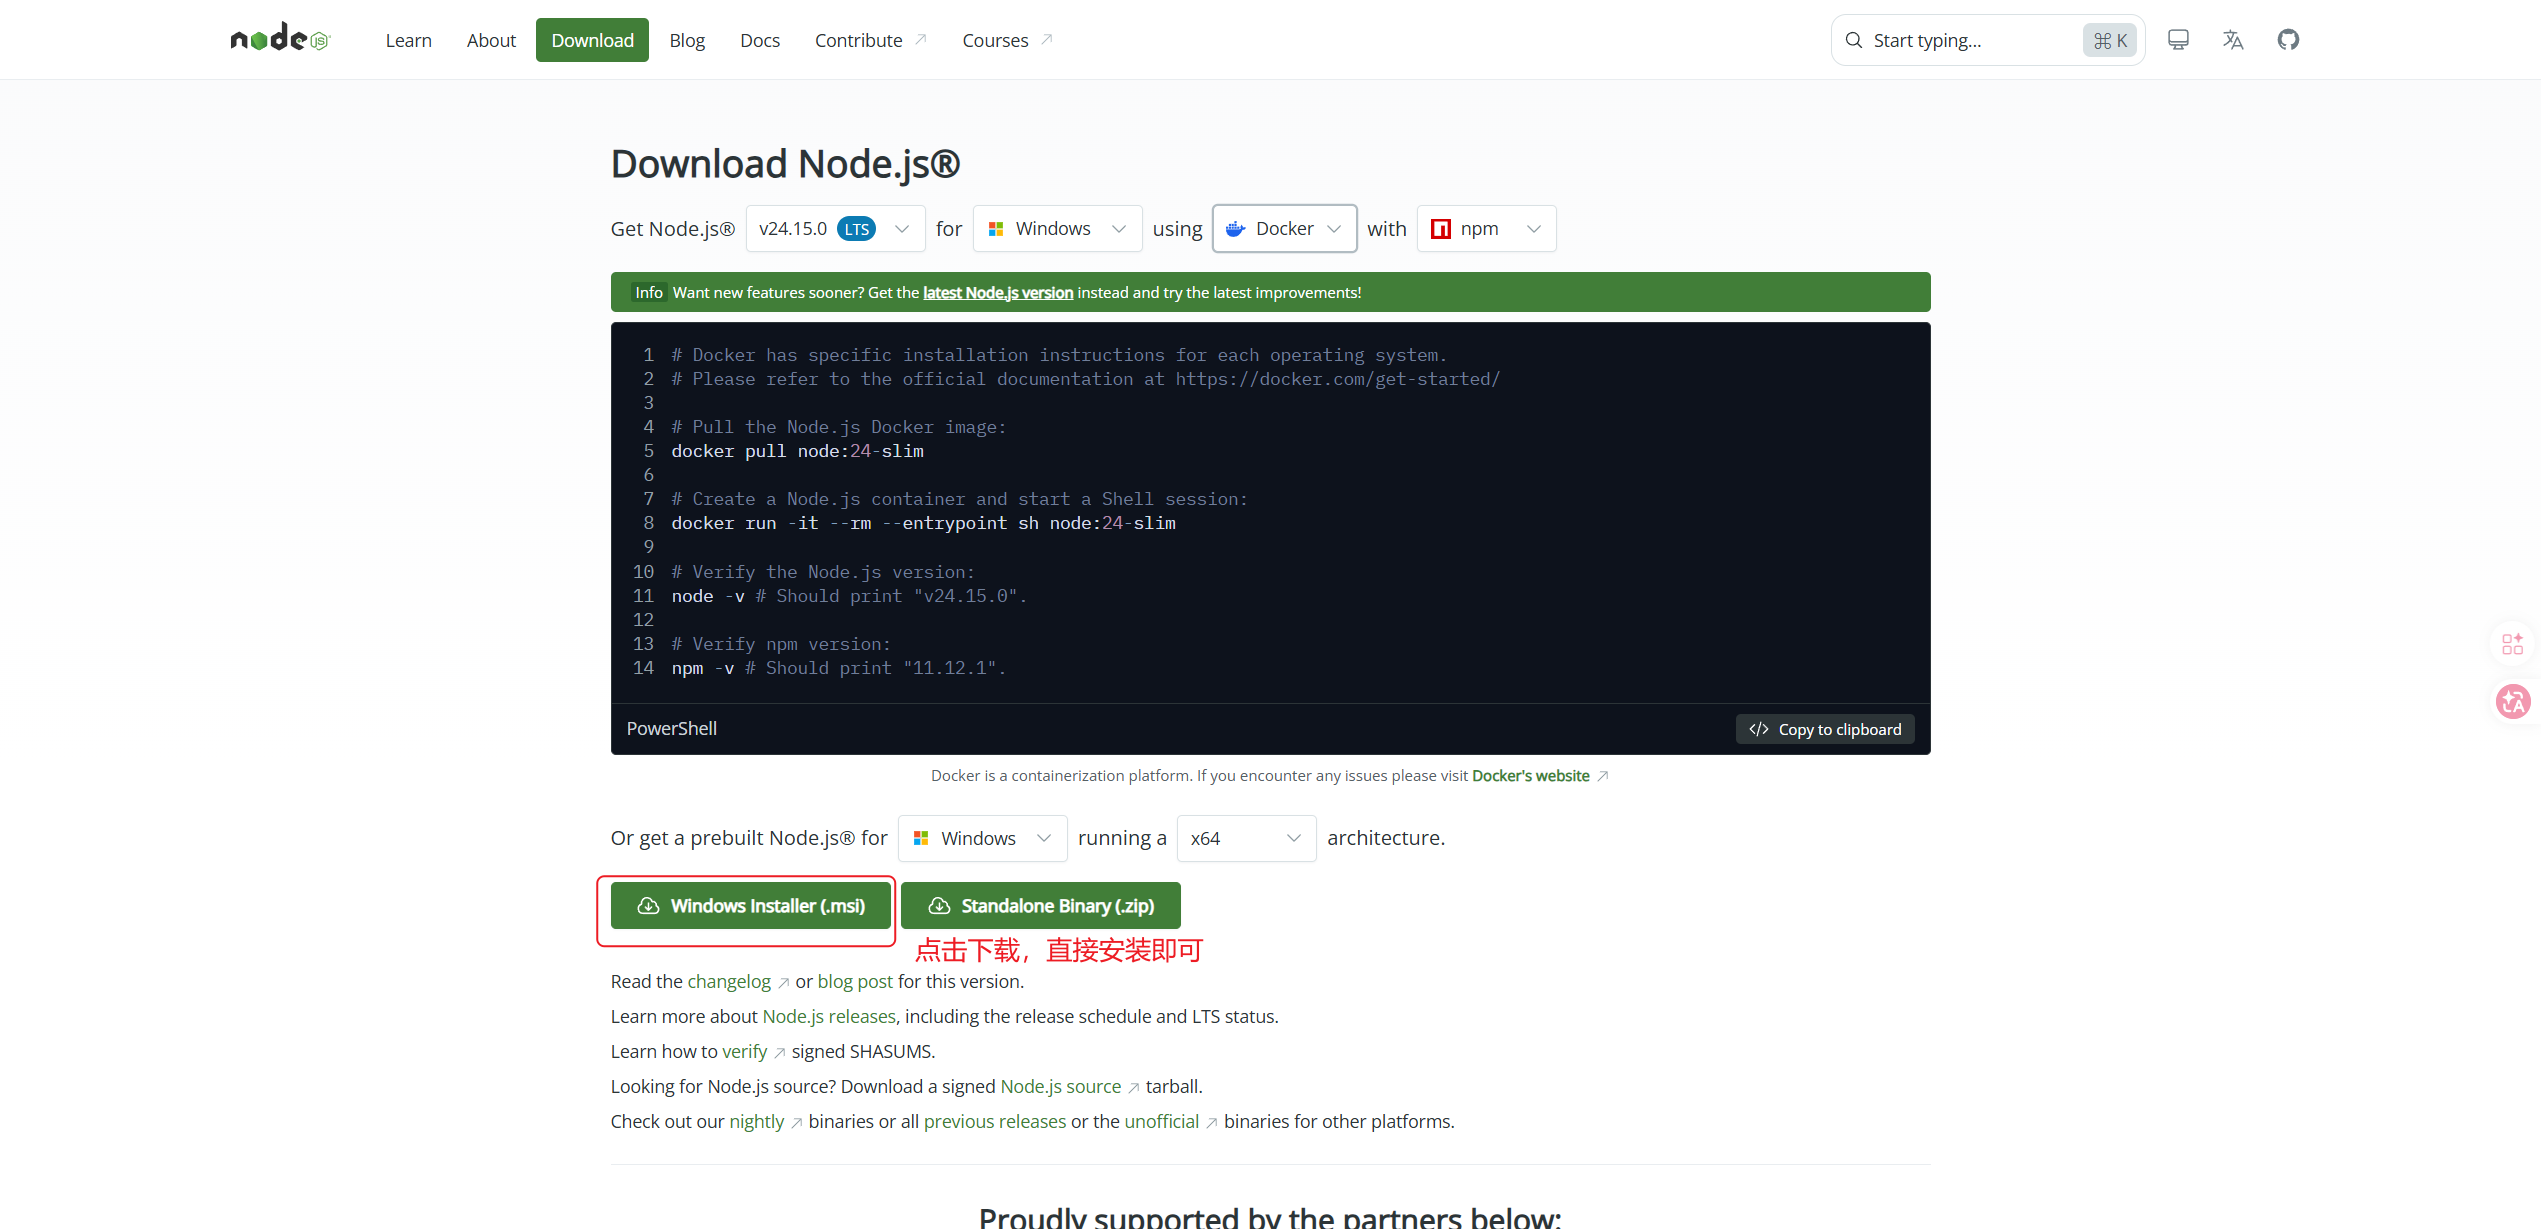
Verify: Open a new terminal and enter npm --version. If a version number appears, installation is complete.
Macos / Linux:
# Download and install fnm:
curl -o- https://fnm.vercel.app/install | bash

# Download and install Node.js:
fnm install 24

# Verify the Node.js version:
node -v # Should print "v24.15.0".

# Verify npm version:
npm -v # Should print "11.12.1".
GPT-Image-2 Image Generation
ThreeRouter supports OpenAI GPT-Image-2 through the OpenAI provider. You can call it using the standard OpenAI /v1/images/generations endpoint.
Supported models:
gpt-image-2- text-to-image generation
Account Configuration
In the admin dashboard, add an OpenAI API Key account with these settings:
- Base URL:
https://api.threerouter.com/v1 - API Key: your threerouter API key
- Model Whitelist:
gpt-image-2
Text-to-Image Example
curl -X POST "https://api.threerouter.com/v1/images/generations" \
  -H "Authorization: Bearer <your-api-key>" \
  -H "Content-Type: application/json" \
  -d '{
    "model": "gpt-image-2",
    "prompt": "a cute cat astronaut on a pastel background"
  }'
Response Format
By default the response contains a URL. Some browsers may block direct access to the OpenAI OSS URL due to referer restrictions, so the URL is best used server-side.
{
  "created": 1234567890,
  "data": [
    {
      "url": "https://img.oss-us-west-1.aliyuncs.com/images/xxx.png"
    }
  ]
}

Test: curl -I -H "User-Agent: Mozilla/5.0" "https://img.oss-us-west-1.aliyuncs.com/images/zzz.png"
Returning Base64
To receive the image as a base64 string instead, set response_format to b64_json. This is useful for front-end clients that cannot access the OSS URL directly.
curl -X POST "https://api.threerouter.com/v1/images/generations" \
  -H "Authorization: Bearer <your-api-key>" \
  -H "Content-Type: application/json" \
  -d '{
    "model": "gpt-image-2",
    "prompt": "a cute cat astronaut on a pastel background",
    "response_format": "b64_json"
  }'
Notes
- Image generation is asynchronous and may take 30-90 seconds.
- Only the
/v1/images/generationsendpoint is supported for image generation. - If the edit endpoint does not accept
url, tryresponse_format=b64_jsonwith a base64 string instead.
Let Us Help You!
Need help? Contact us anytime
Visit Website
Visit ThreeRouter official website for more information and latest updates.
Visit Website →